Introduction
Rüste deine Festplatte zur Speicherplatzerweiterung auf.
Bei dieser Reparatur wird in einigen Schritten beschrieben, wie du die Festplatte durch eine SSD aufrüsten kannst. Insbesondere wird gezeigt, wie der Temperatursensor der SSD installiert wird, so dass der Lüfter des iMac mit der richtigen Drehzahl arbeitet.
Bevor du am iMac arbeitest: Ziehe den Netzstecker und drücke den Einschaltknopf mindestens 10 sec lang, um die Kondensatoren des Netzteils zu entladen.
Sei sehr vorsichtig und berühre keine Anschlüsse der Kondensatoren und auch keine der offenliegenden Lötstellen auf derRückseite der Netzplatine.
What you need
-
Tool used on this step:Heavy-Duty Suction Cups (Pair)$14.95
-
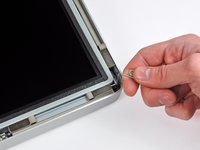
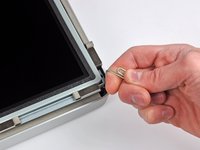
Befestige je einen Heavy Duty Saugheber in den beiden oberen Ecken der Glasscheibe.
-
Halte den Saugheber leicht an der Scheibe und hebe den beweglichen Henkel bis er parallel mit dem anderen ist (wie im dritten Bild gezeigt).
-
-
-
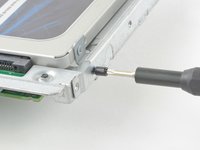
Entferne die acht T10 Torx Schrauben, die das Display am Gehäuse befestigen.
-
-
-
-
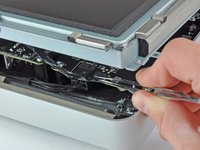
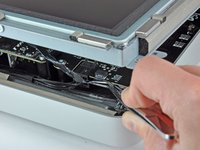
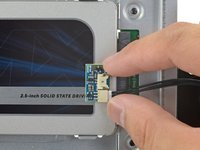
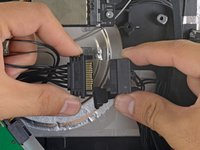
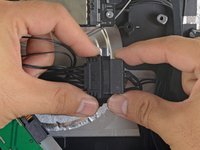
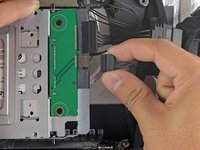
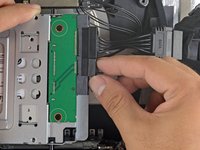
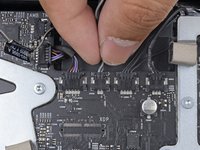
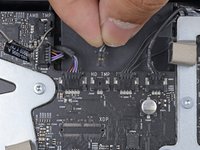
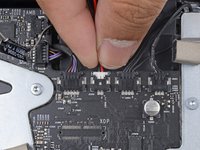
Löse die Stecker an den Kabeln vom Thermosensor, SATA Versorgungskabel und SATA Datenkabel ab.
-
-
-
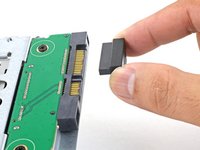
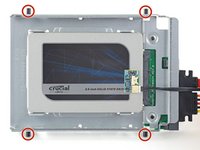
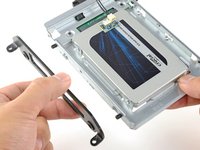
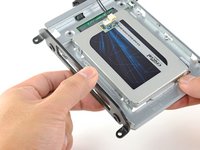
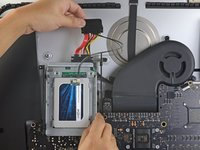
Richte die SSD-Stecker mit den Anschlüssen des Metalleinschubs aus.
-
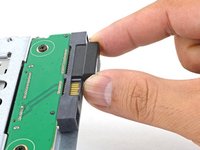
Drücke das Laufwerk gegen die Anschlüsse des Einschubs bis die SSD gut sitzt.
-
-
-
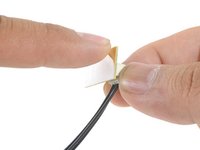
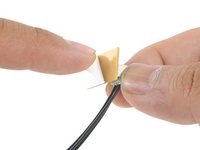
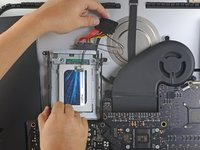
Ziehe die weiße Schutzfolie von der Rückseite der kleinen Temperatursensor-Platine ab, um den Kleber frei zu legen.
-
Klebe die Temperatursensor-Platine auf die freilegende Metalloberfläche der SSD nahe am SATA-Stecker.
-
Biege die überstehenden Drähte des Temperatursensors so weg, dass sie beim Einbau des Einschubs nicht im Weg sind.
-
-
-
Finde den Stecker auf dem Motherboard, der als HD TEMP oder HDD TEMP ausgezeichnet ist.
-
Falls das vorherige Temperatur-Kabel noch mit der Platine verbunden ist, trenne es ab und entferne es. Du brauchst es nicht mehr.
-
Verbinde das zwei-drähtige rot-schwarze Kabel des Temperatursensors mit dem Stecker auf dem Motherboard, der als HD TMP oder HDD TEMP ausgezeichnet ist.
-
Verlege das überschüssige Kabel so, dass es anderen Komponenten nicht in die Quere kommt.
-


Arbeite die Schritte in umgekehrter Reihenfolge ab, um dein Gerät wieder zusammenzubauen.
Cancel: I did not complete this guide.
581 other people completed this guide.
Special thanks to these translators:
100%


These translators are helping us fix the world! Want to contribute?
Start translating ›

88 Guide Comments
While putting the system back together, I recommend untaping and removing the vertical sync cable from the back of the led screen. Plug it back into the LED Driver board and then into the back of the screen. Reapply the tape and continue reassembling as normal. It is far easier to plug it back into the screen than into the driver board through such a small gap.
Wow! That's a great tip... I looked at doing this and thought it would be a hassle but if you said it is easier than doing it taped than it must be easier. I'm going to do this time. Thaanx
My hd failed and i used this guide to replace it with the same model. The problem i'm stuck with now is installing os x again. The installation starts and goes on for a while, while the hard drive makes a weird clicking noise. Then randomly the installation fails and asks to try again. I've done this ten times now.
I'm not here to rant though, i've some useful tips as well.
Instead of buying suction cups, i used a vacuum cleaner inserted into the back of a plastic container to create more pressure per inch. Also used duct tape on edges of the container to create more friction and not damage the glass. Although later i noticed you could wedge the sharp edge of a knife between the glass and the case and widen the gap with a fingernail, then pull the glass out completely.
A note when you're buying screw drivers... The ones with the interchangeable bits won't reach the screws on the lcd, so be prepared to fiddle with strips of paper and screws falling into the sides!
Were you able to finally install the osx ?
Kul -
I'm supposing my SSD will go before my HDD, but either way this doesn't look like the inside of my 27" iMac. Help?