Free Shipping on Domestic Orders $75+

This translation was generated by a machine and has not been reviewed by a person yet. Speak this language? Review it.

Improving Laptop Cooling

What you need

      • First, power off your laptop.

      • Next, remove the battery.

      • Close the display and turn the laptop over.

      • Remove the three coin screws securing the battery.

      • Lift the slightly raised edge where the screws are located to remove the battery.

      • When lifting the battery, never use metal tools.

      Ask FixBot

      Add Comment

      • Next, perform the memory cover removal.

      • There should be a small cover on the back panel. Remove its three screws using a Phillips #0 precision screwdriver.

      • Lift the side of the memory cover where the screws were located and perform the removal.

      Ask FixBot

      Add Comment

      • Remove the HDD bracket. This bracket is secured with screws that also serve to fix the back panel.

      • Remove the three screws securing the bracket.

      • If an HDD is installed, be careful not to damage the HDD while working.

      Ask FixBot

      Add Comment

      • You are now ready to remove the back panel.

      • Use a Phillips #0 screwdriver to remove all the screws visible on the bottom of the laptop.

      • At this time, do not remove the two screws attached to the battery connector.

      • To avoid forgetting where they go, stick the screws to a magnetic mat, or draw a diagram of the laptop on a piece of paper and secure them in the correct spots with tape.

      Ask FixBot

      Add Comment

      • In this section, you will remove the back panel.

      • When removing the back panel, work carefully to avoid damaging the internal components.

      • Insert an opening pick into the side with the exhaust vent and USB port.

      • Do not insert the pick too far, as it may damage internal components.

      • Additionally, disassembly from the opposite side is not recommended, as it significantly increases the risk of cracking the back panel.

      • Carefully disengage the clips and lift the back panel.

      • There is a display connector near the display hinges, which is extremely delicate and requires extra caution.

      • Once the clips on all sides are disengaged, slide the back panel away from the side without the USB connector to separate it from the laptop.

      Ask FixBot

      Add Comment

    1. Improving Laptop Cooling, Heat sink removal: step 6, image 1 of 1
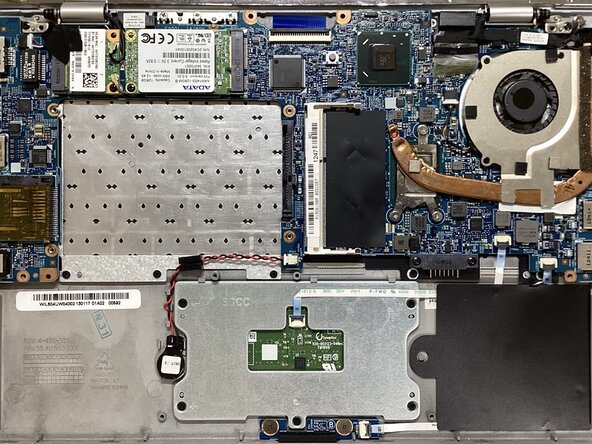
      • After separating the back panel, you should see copper pipes (heat pipes). These are called the heat sink. There are three screws near the tip on the side without the large fan.

      • Remove those screws using a Phillips #0 screwdriver.

      • Once the screws are removed, carefully lift the heat sink.

      • Copper is a very soft material. Rough handling can cause damage to the heat sink.

      Ask FixBot

      Add Comment

      • Once you have completed the removal of the heat sink, you will see the part of the CPU called the die. It may be covered in hard, dried-out thermal paste.

      • Wipe away the old thermal paste.

      • We recommend using a lint-free, non-conductive cloth dampened with anhydrous ethanol to wipe away the thermal paste.

      • Remove the old thermal paste from the heat sink side as well.

      Ask FixBot

      Add Comment

      • Clean the fan using compressed air or a brush.

      • Be careful not to damage the fan blades or the heat pipe.

      Ask FixBot

      Add Comment

      • Apply a small amount of new thermal paste to the center of the CPU die (the small, mirror-like square you cleaned off in the previous step).

      • If the thermal paste comes in a syringe, carefully push the plunger to dispense the paste onto the die.

      Ask FixBot

      Add Comment

      • Replace the heat sink in its original position.

      • Tighten the three screws carefully and in small increments. Overtightening can damage the CPU die.

      Ask FixBot

      Add Comment

      • Follow the steps in reverse order of the Teardown.

      • Once reassembly is complete, plug in the power adapter and verify that the device turns on.

      • The device will not turn on if the power adapter is not connected, even if a charged battery is installed.

      Ask FixBot

      Add Comment

      • If heat dissipation has improved, the fan should be quieter than before.

      Ask FixBot

      Add Comment

Conclusion

You're all done!

Cancel: I did not complete this guide.

bockring_elec

Member since: 12/10/23

725 Reputation

1 Guide authored

0 Guide Comments

Add Comment

View Statistics:

Past 24 Hours: 1

Past 7 Days: 7

Past 30 Days: 45

All Time: 124