Introduction
When practicing your sport in summer or winter, it's easy to get a tear in your T-shirt, leggings or jacket. Knitted fabrics are very stretchy and the best way to repair a hole is to sew it by hand, as explained in this guide.
➡️Before you get started, please check the safety disclaimer at the bottom of the page.
What you need
-
-
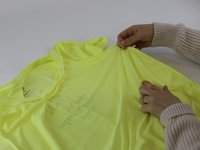
Lay the woven textile on a flat surface with the tear fully exposed.
-
Check how large the tear is, where it is on the item, and whether it is fraying at the edges.
-
Consider: this repair will be visible at the end, so you might wish to use a matching thread colour - or - you might want to celebrate this memory with some contrast colour thread! Think about how you want the final repair to look before starting.
-
-
-
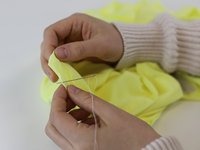
Prepare the needle with the thread.
-
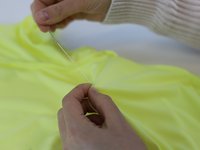
Turn the defective product inside-out, and pinch the broken edges together, so that they are facing towards you.
-
Pass the needle through both pieces of fabric, starting at one end of the hole. Tie a knot to secure it, and pull gently. Be careful not to bunch the fabric, especially if it is lightweight and thin.
-
-
-
-
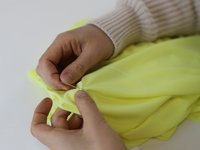
Continue sewing along the hole with a regular sewing technique; passing the needle through both pieces of fabric from one side, then from next side, and so on.
-
Work your way along the seam until the entire hole is closed. Before Making a knot, check whether you think the repair is strong enough - if not, repeat the sewing procces back along the hole to the starting point.
-
Make a knot at the end of the repair.
-
-
-
Make a final test of the repair by lightly stretching the area.
-
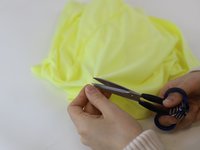
Trim off the excess thread
-
🛠️🏆👏 Congratulations! The repair is complete, and you're ready to go!
-


In need of another repair? Don't worry! Check out our other guides to find quick solutions for your favourite clothing, footwear and equipment!
----------------------------------------
🚨🛠️🩹 IMPORTANT SAFETY NOTICE:
The repair guides provided on this site are intended to help you repair products on your own. While we have put a lot of care into them, all repair work carries some risk:
- Safety Precautions: When repairing your product, take all necessary precautions to ensure your safety. Use appropriate tools and follow the instructions carefully.
- Product Condition: Once your product has been repaired, it may not meet original compliance guidelines anymore and could potentially have issues.
- Liability: We are not responsible for any damage or injury that may occur during the repair process or as a result of using a repaired product. You, as the repairer, assume all risks and responsibilities associated with the repair.
By using these repair guides, you fully acknowledge and accept the potential risks and responsibilities involved.

Team
