
How to Open Your Logitech MX Master 3

What you need

  1. How to Open Your Logitech MX Master 3, Soften the mouse feet adhesive: step 1, image 1 of 3 How to Open Your Logitech MX Master 3, Soften the mouse feet adhesive: step 1, image 2 of 3 How to Open Your Logitech MX Master 3, Soften the mouse feet adhesive: step 1, image 3 of 3
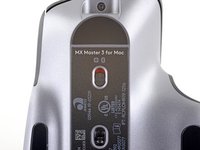
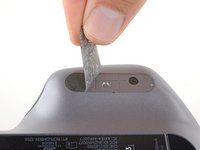
    • Flip the mouse's power switch into the OFF position, unplug any cables, and flip it over so the feet are facing up.

    • The unique shape of some mice can prevent them from laying flat. If you need to, lay your mouse on a soft towel to prevent wobble.

    • If you're planning to reuse your existing mouse feet, note that the adhesive needs to be thoroughly heated for them to be cleanly removed.

    • Heat an iOpener and apply it to each of the mouse feet for about one minute each.

    • Alternatively, you can use a hair dryer to soften the mouse feet adhesive.

    • When using a hair dryer, don't heat the feet for more than a couple seconds at a time—anything hotter than just warm to the touch risks melting or warping the plastic lower case.

    • The information sticker adhesive may soften during this step, but you don't need to remove it.

  2. How to Open Your Logitech MX Master 3, Separate the mouse foot adhesive: step 2, image 1 of 3 How to Open Your Logitech MX Master 3, Separate the mouse foot adhesive: step 2, image 2 of 3 How to Open Your Logitech MX Master 3, Separate the mouse foot adhesive: step 2, image 3 of 3
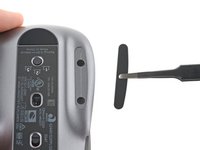
    • Slide an opening pick under an edge of the left mouse foot.

    • Go slowly, and make sure the pick slides underneath both the foot and its adhesive pad. These layers separate easily.

    • If you plan on reusing your mouse feet, be careful not to crease them or separate them from their adhesive pads.

    • If the foot feels stuck, apply more heat before continuing.

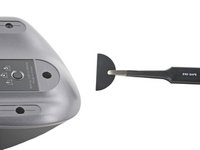
    • Slide your pick under the foot to separate its adhesive until you can grab it with your fingers.

    • Peel up and remove the left mouse foot.

  3. How to Open Your Logitech MX Master 3, Remove the right and rear mouse feet: step 3, image 1 of 2 How to Open Your Logitech MX Master 3, Remove the right and rear mouse feet: step 3, image 2 of 2
    • Repeat the previous two steps to remove the right and the rear mouse feet.

  4. How to Open Your Logitech MX Master 3, Reassembly information: step 4, image 1 of 3 How to Open Your Logitech MX Master 3, Reassembly information: step 4, image 2 of 3 How to Open Your Logitech MX Master 3, Reassembly information: step 4, image 3 of 3
    • If the adhesive separated from the foot:

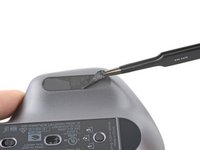
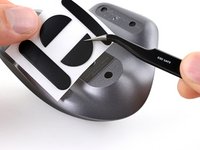
    • Slide the flat end of a spudger under an edge of the adhesive. If the adhesive seems stuck, you may need to heat the adhesive further.

    • Use a pair of tweezers or a spudger to remove any large chunks of leftover adhesive.

    • For installing new mouse feet or reusing your old ones:

    • Thoroughly clean the bottom of the mouse with isopropyl alcohol and a lint-free of microfiber cloth. Allow the surface to dry completely.

    • Peel your new mouse feet away from their adhesive liners and press them firmly into place.

  5. How to Open Your Logitech MX Master 3, Remove the case screws: step 5, image 1 of 1
    • Use a Phillips screwdriver to remove the five 4.3 mm-long screws securing the lower half of the lower case.

    • Use a T5 Torx driver to remove the one 4.2 mm‑long screw securing the upper half of the lower case.

  6. How to Open Your Logitech MX Master 3, Release the left clips: step 6, image 1 of 3 How to Open Your Logitech MX Master 3, Release the left clips: step 6, image 2 of 3 How to Open Your Logitech MX Master 3, Release the left clips: step 6, image 3 of 3
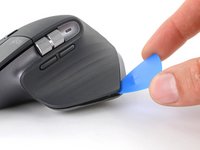
    • Insert your opening pick into the seam between the thumb rest and the lower case.

    • Slide your pick right, towards the rear of the upper shell and pry upward to release the left clips.

  7. How to Open Your Logitech MX Master 3, Release the right clips: step 7, image 1 of 2 How to Open Your Logitech MX Master 3, Release the right clips: step 7, image 2 of 2
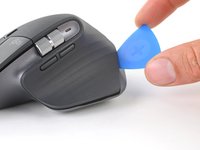
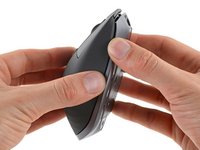
    • Gently pry the upper shell and lower case apart to release the clips on the right side of the mouse.

    • Don't try to fully remove the top shell just yet—another clip and a delicate cable connect the upper shell to the lower case.

  8. How to Open Your Logitech MX Master 3, Release the final clip: step 8, image 1 of 3 How to Open Your Logitech MX Master 3, Release the final clip: step 8, image 2 of 3 How to Open Your Logitech MX Master 3, Release the final clip: step 8, image 3 of 3
    • Lay your mouse down onto your work surface, making sure none of the clips re-engage.

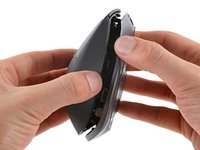
    • Grasp the upper shell and partially lift up the right edge.

    • Pull the upper shell up and back to release the final clip and separate the upper shell from the lower case.

    • Still keep the two halves close together—a cable is still tethered to the upper shell.

    • To reinstall the upper shell, slide the front edge into place first, then press down around the perimeter of the upper shell to engage the remaining clips.

  9. How to Open Your Logitech MX Master 3, Disconnect the interconnect cable: step 9, image 1 of 3 How to Open Your Logitech MX Master 3, Disconnect the interconnect cable: step 9, image 2 of 3 How to Open Your Logitech MX Master 3, Disconnect the interconnect cable: step 9, image 3 of 3
    • Be careful not to strain the cable connecting the upper shell to the lower case.

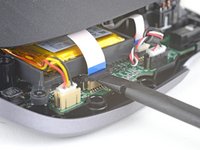
    • Use the flat end of a spudger to gently lift up the black sliding lock on the interconnect cable socket.

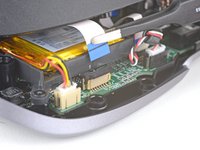
    • Slide the cable straight out of its socket on the motherboard.

    • During reassembly, insert the cable into the socket with its blue tab facing out, then push down the sliding lock to secure the cable.

  10. How to Open Your Logitech MX Master 3, Remove the top half of the mouse: step 10, image 1 of 1
    • Remove the upper shell from the lower case.

Conclusion

To reassemble your device, follow these instructions in reverse order.

Repair didn’t go as planned? Check out our Answers community for troubleshooting help.

22 other people completed this guide.

Adam O'Camb

Member since: 04/11/15

196,326 Reputation

416 Guides authored

7 Comments

Is it possible to remove the (worn down) rubber surface on the upper part to replace it with something more durable (which is to be custom made then)?

Thomas - Reply

I was able to locate a new black plastic topshell part on amazon, it's quality is quite high and feels OEM.

I Monty -

Es vergonzoso que estos ratones tan caros se estropeen con tanta facilidad.

Al Master MX y Master MX2 se les estropea el botón del click izquierdo muy pronto.

Y al Master MX 3 se le atasca la rueda, y lo tengo sólo un año y lo cuido y limpio.

Lo he abierto para desatascar la rueda y lamentablemente no se puede desmontar del todo, por dentro hay pelusilla que no se puede sacar. No sé por qué no ponen la rueda desmontable.

De todos modos, por si a alguien le interesa, le he echado aceite lubricante a la rueda y de momento parece que ha mejorado bastante.

Más exactamente le he echado aceite de silicona, que no estropea los plásticos. Y lo he puesto por la parte interior, por donde parece que tiene como unos engranajes.

Creo que uno de los problemas que tiene es que el muelle del click de la rueda es demasiado débil y al intentar hacerla girar en vez de girar lo que hace es apretar el muelle. Necesito encontrar un muelle compatible pero más fuerte para sustituirlo.

skan - Reply

Al igual que a ti el botón izquiero del MX master 3 de estropeo, pero encontré un video de you tube para repararloa bajo costo y con botones silenciosos, ha quedado muy bien https://youtu.be/nGChuA9hh4I

Georgina Chan Pech -

Tengo el mimso problema, la rueda atascada con pelusa. lo desarmé, pero no veo que se pueda desarmar la rueda más allá para llegar a la pelusa y quitarla. una pena

Fernando Cardozo - Reply

Add Comment

View Statistics:

Past 24 Hours: 46

Past 7 Days: 347

Past 30 Days: 1,611

All Time: 32,691