Introduction
Follow this guide to install Linux on a Mac desktop or laptop with Apple's T2 security chip.
T2 Macs include all Macs from 2018‑2020 with an Intel processor and the iMac Pro. A full list can be found here.
This guide uses CachyOS, since it supports T2 Macs by default. The T2 Linux Wiki has instructions for adding T2 Mac support to other distributions.
CachyOS requires internet during the installation process. They recommend a stable connection of 50 Mbps or better.
CachyOS has multiple desktop environment options, which change how it looks and feels. Do some research beforehand or go based off the screenshots during installation (also available in this list). If you're unsure, try KDE first.
We highly recommend backing up all important data before beginning this guide. Time Machine works well, but you can follow this guide to create a full disk image to restore to easily.
What you need
-
-
-
Connect a USB flash drive with at least 8 GB of capacity to the fastest available port on the Mac.
 Ask FixBot
-
-
-
Download CachyOS Desktop Edition and its checksum. We recommend using the Direct download.
-
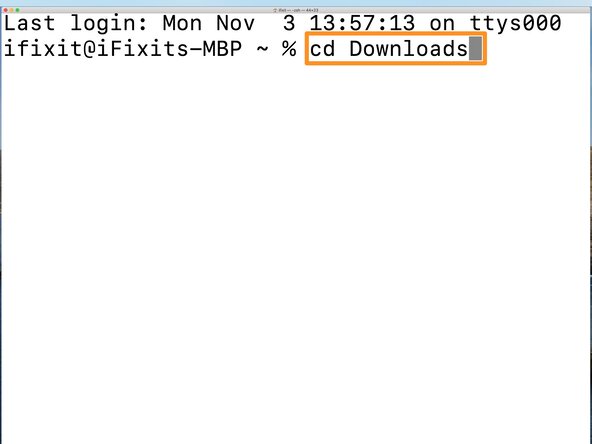
Open the MacOS Terminal app.
-
Type cd Downloads and press Enter. If prompted, allow Terminal to access the Downloads folder.
-
Type shasum ‑a 256 ‑c cachyos‑desktop‑linux‑[version].iso.sha256, where [version] is the number in the name of the file you downloaded.
-
Ensure it says OK. If it doesn't, re-download the file or download from a different mirror (like Sourceforge).
-
-
-
Open Disk Utility.
-
Select Macintosh HD from the left sidebar, then select Partition.
-
Select the + icon underneath the circle labeled Macintosh HD to create a new partition.
-
Name the partition something friendly, like CachyOS. For the format, leave it at the default APFS.
-
Choose a size for this partition (at least 50 GB). This is where CachyOS will be installed. We recommend making this a different size than the Macintosh HD partition to tell them apart later.
-
Click Apply, then click Partition in the window that pops up. If prompted, click Continue and wait for the process to complete.
-
-
-
Download Fedora Media Writer. Click the file ending in .dmg without arm64 in its name.
-
Launch Fedora Media Writer. If MacOS prompts you to eject the disk image, click Cancel and open the Settings app. In the Settings app, navigate to Security & Privacy, and click Open Anyway.
-
Click Select .iso file.
-
Select the .iso file by clicking the Select... button and choosing it in the Finder window that pops up.
-
Select the USB drive you want to be erased and have the CachyOS installer written to.
-
Double-check everything is correct, then select Write. A window will pop up asking to confirm. Select Write to erase the chosen drive and write the CachyOS installer to it.
-
Wait for the installer to be written to the USB drive, then select Finish.
-
-
-
Open the MacOS Terminal app.
-
Type curl -sL https://wiki.t2linux.org/tools/firmware.sh | bash -s copy_to_efi and press Enter.
-
Enter your password when prompted and press Enter.
-
Note the commands to run later. You'll need them to access Wi‑Fi in the installer, then again once CachyOS is installed.
-
Shut down the Mac.
-
-
-
-
Press the power button, then press and hold Command (⌘)+R immediately after you see the Apple logo.
-
MacOS should load into MacOS Recovery, which takes longer than a typical boot. If it boots up normally, restart the Mac and try again.
-
Once in Recovery, select your language (if prompted), select a user with administrator privileges, click Next, then enter its password.
-
Choose Utilities > Startup Security Utility from the menu bar at the top. Enter the password again when prompted.
-
Select No Security in the Secure Boot section, and select Allow booting from external or removable media at the bottom.
-
Click the Apple logo in the menu bar and shut down the Mac.
-
-
-
Press the power button and immediately hold down the Option key. Wait for the boot options to pop up.
-
Select the EFI Boot option to boot from the flash drive.
-
-
-
Open the Terminal and type the following commands, pressing Enter after each one:
-
sudo mkdir ‑p /tmp/apple‑wifi‑efi
-
sudo mount /dev/nvme0n1p1 /tmp/apple‑wifi‑efi
-
bash /tmp/apple‑wifi‑efi/firmware.sh
-
Type 1 and hit Enter when prompted. Then, type y and press Enter.
-
sudo umount /tmp/apple‑wifi‑efi
-
Use the Wi‑Fi icon in the menu bar to connect to a Wi‑Fi network.
-
-
-
Select Launch installer to begin the installation.
-
Select a bootloader:
-
The Refind option is ideal for dual‑booting with MacOS, since it lets you pick which OS to boot into every time the computer is restarted. If you're not planning on using MacOS often or at all, the next option is a better fit.
-
The default Systemd‑boot option is exceptionally fast and unobtrusive. However, to boot into MacOS instead of Linux, you'll need to hold down the Option key like in this step.
-
Click Next.
-
-
-
Select your time zone and click Next.
-
Select your keyboard layout and click Next.
-
-
-
If you want to completely remove MacOS, select Erase disk. If you have multiple drives, be careful not to accidentally erase one with important data on it. Click Next and skip the remainder of this step.
-
If you want to install Linux alongside MacOS, select Replace a partition.
-
Select the partition you created in this step, then click Next.
-
-
-
Select the desktop environment that best matches your personal preference. If you're not sure, stick with KDE aka Plasma Desktop. Click Next.
-
Unless you know what additional packages you need in this menu, keep the default selection and click Next.
-
-
-
Enter your name, username, computer name, and password.
-
Click Next.
-
-
-
Review your installation configuration.
-
Click Install and wait for the installation to complete. It might take a while.
-
Check the Restart now box and click Done.
-
Linux is now installed. Follow the next step to install the Wi‑Fi firmware permanently. If Wi‑Fi already works, you're done!
-
Restore the USB drive used for the installer back to normal with Fedora Media Writer for Linux (available from the software manager app) or from MacOS (if still installed).
-
-
-
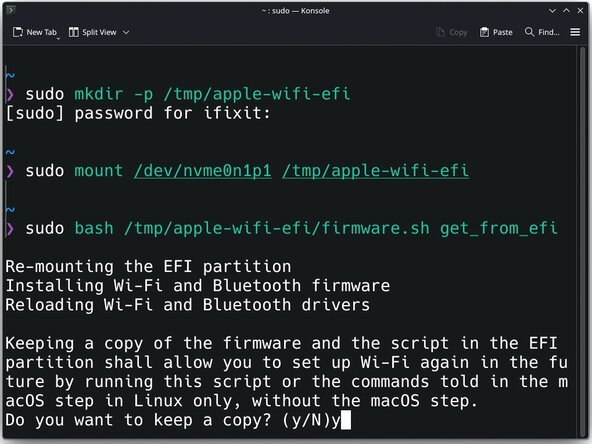
Open the Terminal and type the following commands, pressing Enter after each one:
-
sudo mkdir ‑p /tmp/apple‑wifi‑efi
-
sudo mount /dev/nvme0n1p1 /tmp/apple‑wifi‑efi
-
sudo bash /tmp/apple‑wifi‑efi/firmware.sh get_from_efi
-
When prompted, type y to keep a copy of the firmware in case you need it later.
-
sudo umount /tmp/apple‑wifi‑efi
-
-


Congratulations! You've successfully installed Linux on a T2 Mac.
Didn't go as planned? Try asking our Linux Answers Community for help.
Cancel: I did not complete this guide.
One other person completed this guide.

3 Guide Comments
I've done all this recently on a 2020 MBP. Issues I am facing are:
- on most boot ups, touchbar is not functional, dark
- attempting to come out of sleep (opening lid) the screen remains dark, keyboard & mouse non-reponsive, sometimes the screen will wake up after a few minutes, but non-responsive
- tried a number of various scripts etc, no luck...
What are your recommendations for this? I like CachyOS and would like to use it on this 2020 MBP that otherwise has still a decent amount of life left...
try limiting the cstate to c7, this should fix the issue
Gibt es schon Lösung das Aufwachen beim MacBooks wenn der Deckel geschlossen wird. Bei mir bleibt dann Bildschirm schwarz.