
15% Off Selected iFixit Tools — Limited Time
Free Shipping on Domestic Orders $75+

HP 250 G7 Display Replacement

What you need

  1. HP 250 G7 Display Replacement, Lower Case: step 1, image 1 of 2 HP 250 G7 Display Replacement, Lower Case: step 1, image 2 of 2
    • Unplug the charger and all peripheries. Shut down the laptop before beginning disassembly.

    • Flip the laptop so its underside is facing up.

    • Use a hair dryer to lightly heat the rubber feet.

    • Use a spudger to lift and remove the rubber feet.

    • If you intend to reuse the feet, take care not to tear or warp the rubber feet during removal. Reapply adhesive during reinstallation.

    Ask FixBot

    Add Comment

  2. HP 250 G7 Display Replacement: step 2, image 1 of 3 HP 250 G7 Display Replacement: step 2, image 2 of 3 HP 250 G7 Display Replacement: step 2, image 3 of 3
    • Remove the eleven 9 mm-long Phillips #1 screws securing the lower case.

    Ask FixBot

    Add Comment

  3. HP 250 G7 Display Replacement: step 3, image 1 of 3 HP 250 G7 Display Replacement: step 3, image 2 of 3 HP 250 G7 Display Replacement: step 3, image 3 of 3
    • Insert an opening pick or opening tool into the seam between the lower case and palm rest assembly.

    • Slide the opening pick around the entire perimeter, while prying every couple of centimeters to release the retaining clips.

    • Remove the lower case.

    Ask FixBot

    Add Comment

  4. HP 250 G7 Display Replacement, Battery: step 4, image 1 of 1
    • Remove the three 8 mm-long Phillips #1 screws securing the battery.

    Ask FixBot

    Add Comment

  5. HP 250 G7 Display Replacement: step 5, image 1 of 2 HP 250 G7 Display Replacement: step 5, image 2 of 2
    • Lift the battery up and away from the connector.

    • Remove the battery.

    Ask FixBot

    Add Comment

  6. HP 250 G7 Display Replacement, Display: step 6, image 1 of 3 HP 250 G7 Display Replacement, Display: step 6, image 2 of 3 HP 250 G7 Display Replacement, Display: step 6, image 3 of 3
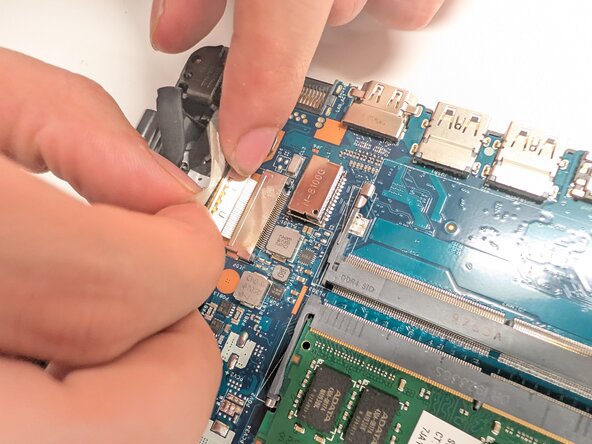
    • Pull back the tape holding the display connector.

    • Disconnect the display connector from the board.

    • Make sure to be gentle when removing as damaging the port will result in the screen no longer working.

    • Remove the cable from the clip so that it is out of the way.

    Ask FixBot

    Add Comment

  7. HP 250 G7 Display Replacement: step 7, image 1 of 3 HP 250 G7 Display Replacement: step 7, image 2 of 3 HP 250 G7 Display Replacement: step 7, image 3 of 3
    • Use a screwdriver to remove the four Phillips #1 6 mm-long screws from the two display hinges.

    • Use a screwdriver to remove the Phillips #1 2 mm-long screw from the right side of the display hinge.

    Ask FixBot

    Add Comment

  8. HP 250 G7 Display Replacement: step 8, image 1 of 3 HP 250 G7 Display Replacement: step 8, image 2 of 3 HP 250 G7 Display Replacement: step 8, image 3 of 3
    • Rotate the hinges upwards to a perpendicular position.

    • Remove the white wire from the clips but do not remove from the board. Please be mindful of this wire when conducting further steps.

    Ask FixBot

    Add Comment

  9. HP 250 G7 Display Replacement: step 9, image 1 of 2 HP 250 G7 Display Replacement: step 9, image 2 of 2
    • Remove the hinge cover by pulling upward near the hinge to remove it from the enclosure.

    • If needed, use a spudger to lift the cover.

    Ask FixBot

    Add Comment

  10. HP 250 G7 Display Replacement: step 10, image 1 of 3 HP 250 G7 Display Replacement: step 10, image 2 of 3 HP 250 G7 Display Replacement: step 10, image 3 of 3
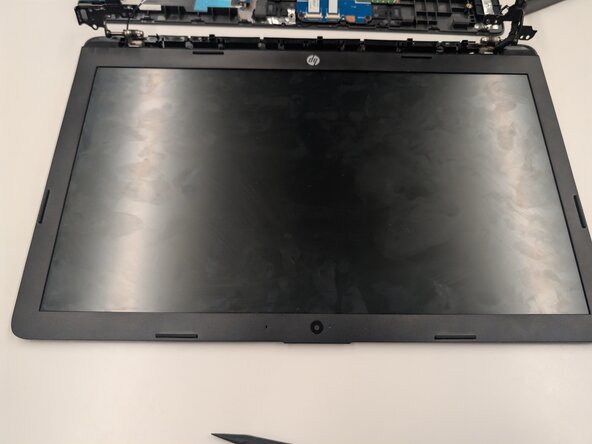
    • Remove the display bezel by flexing the top, then the sides, then the bottom until the bezel disengages from the display assembly.

    • Use the spudger to remove it from the frame if necessary.

    Ask FixBot

    Add Comment

  11. HP 250 G7 Display Replacement: step 11, image 1 of 3 HP 250 G7 Display Replacement: step 11, image 2 of 3 HP 250 G7 Display Replacement: step 11, image 3 of 3
    • Remove the four Phillips #1 M2.0 x 3.0 screws that secure the screen to the frame.

    Ask FixBot

    Add Comment

  12. HP 250 G7 Display Replacement: step 12, image 1 of 3 HP 250 G7 Display Replacement: step 12, image 2 of 3 HP 250 G7 Display Replacement: step 12, image 3 of 3
    • Flip the display panel and position and set it next to the frame.

    Ask FixBot

    Add Comment

  13. HP 250 G7 Display Replacement: step 13, image 1 of 3 HP 250 G7 Display Replacement: step 13, image 2 of 3 HP 250 G7 Display Replacement: step 13, image 3 of 3
    • Flip up the locking bar securing the screen connector.

    • Disconnect the screen connector.

    Ask FixBot

    Add Comment

Conclusion

To reassemble your device, follow the above steps in reverse order.
Take your e-waste to an R2 or e-Stewards certified recycler.
Repair didn’t go as planned? Try some basic troubleshooting or ask our Answers community for help.

Cancel: I did not complete this guide.

2 other people completed this guide.

0 Guide Comments

Add Comment

View Statistics:

Past 24 Hours: 2

Past 7 Days: 6

Past 30 Days: 6

All Time: 35