Shop the Holiday Gift Guide
Free Shipping on Domestic Orders $75+

Google Pixel 10a Screen Removal

Views: 124

View statistics:

Past 24 Hours:
2
Past 7 Days:
9
Past 30 Days:
25
All Time:
124
Comments: 1

1 comment on steps.

Completed: 0

No one has marked this guide "completed." Will you be the first?

Favorites: 0

No one has favorited (and subscribed to) this guide. Will you be the first?

Time Required: No estimate
Difficulty: Moderate
Prerequisite Only

This is a prerequisite-only guide! This guide is part of another procedure and isn’t meant to be used alone.

Google Pixel 10a Screen Removal

What you need

Tools

    1. Google Pixel 10a Screen Removal, Cover the cracked screen: step 1, image 1 of 2 Google Pixel 10a Screen Removal, Cover the cracked screen: step 1, image 2 of 2
      • Glass shards can complicate disassembly—or worse, cause injury. If your phone has a cracked screen, follow these steps:

      • Apply overlapping strips of packing tape to the cracked glass until the whole screen is covered—this will allow the suction cup to stick to the screen.

      • Only cover the glass itself—don't stick any tape to the frame.

      • Consider wearing safety glasses to protect your eyes from any glass shaken free during the repair.

      Ask FixBot

      Add Comment

    2. Google Pixel 10a Screen Removal, Heat the right edge: step 2, image 1 of 2 Google Pixel 10a Screen Removal, Heat the right edge: step 2, image 2 of 2
      • The screen adhesive is very strong, requiring significant heat to soften it. If you have difficulty separating the adhesive, reheat the screen and try again.

      • Use a hair dryer, heat gun, or a heat pad to heat the right edge of the screen until it's slightly too hot to touch.

      • For best practices on using a hair dryer to soften adhesive, check out this guide. For warnings on heat gun use, check out this guide.

      • If you're using a heating pad, set it to 80° C (176° F) and place your phone screen side down for 10 minutes.

      Ask FixBot

      Add Comment

    3. Google Pixel 10a Screen Removal, Prop up the right edge: step 3, image 1 of 1
      • The next three steps show how to create a gap using the opening tool. If you're using a thin metal pick, skip down three steps.

      • Place a small block (like an eraser) under the right edge to prop it up so you'll have room to insert an opening tool.

      Ask FixBot

      Add Comment

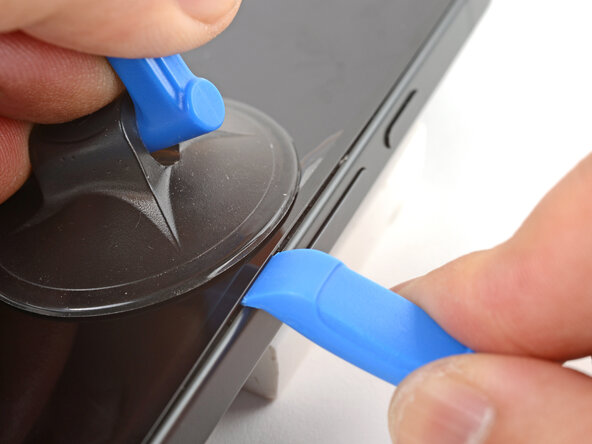
    4. Google Pixel 10a Screen Removal, Create a gap with the opening tool: step 4, image 1 of 3 Google Pixel 10a Screen Removal, Create a gap with the opening tool: step 4, image 2 of 3 Google Pixel 10a Screen Removal, Create a gap with the opening tool: step 4, image 3 of 3
      • Apply a suction handle to the center of the screen's right edge.

      • Pull up on the suction handle with strong, steady force to create a gap.

      • The adhesive is very strong. If you're having trouble, reheat the edge and pull again. Repeated heating and pulling cycles will weaken the adhesive.

      • Press the edge of the opening tool (curved downwards) into the gap.

      Ask FixBot

      Add Comment

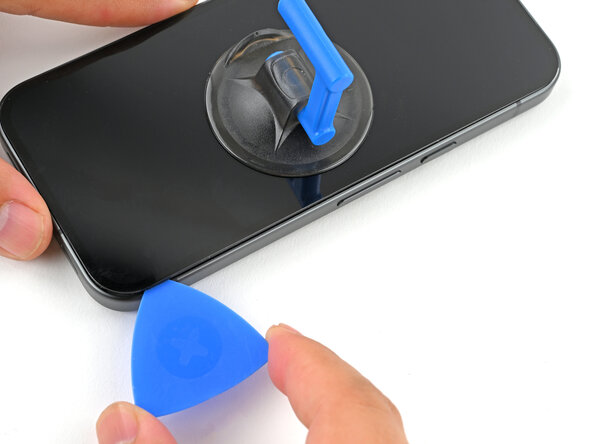
    5. Google Pixel 10a Screen Removal: step 5, image 1 of 3 Google Pixel 10a Screen Removal: step 5, image 2 of 3 Google Pixel 10a Screen Removal: step 5, image 3 of 3
      • Slide the opening tool along the edge to create enough room for the tip of an opening pick.

      • If you're having trouble, reheat the edge and try again.

      • Insert the tip of an opening pick into the gap.

      • Remove the block from under the phone and set the phone on a flat surface.

      • Skip the next two steps.

      Ask FixBot

      Add Comment

    6. Google Pixel 10a Screen Removal, Create a gap with a metal pick: step 6, image 1 of 2 Google Pixel 10a Screen Removal, Create a gap with a metal pick: step 6, image 2 of 2
      • The next two steps show how to create a gap with a metal pick as an alternate method.

      • Apply a suction handle to the center of the screen's right edge.

      • Pull up on the suction handle with strong, steady force to create a gap.

      • The adhesive is very strong. If you're having trouble, reheat the edge and pull again. Repeated heating and pulling cycles will weaken the adhesive.

      • Insert the tip of the metal opening pick into the gap.

      Ask FixBot

      Add Comment

    7. Google Pixel 10a Screen Removal: step 7, image 1 of 1
      • Slide the metal pick along the edge to make room for a plastic opening pick.

      • If you're having trouble, reheat the edge and try again.

      • Insert the tip of a plastic opening pick into the gap and remove the metal pick.

      Ask FixBot

      Add Comment

    8. Google Pixel 10a Screen Removal, Heat the screen again: step 8, image 1 of 1
      • Use a hair dryer or heat gun to heat the right edge of the screen until it's slightly too hot to the touch.

      Ask FixBot

      Add Comment

    9. Google Pixel 10a Screen Removal, Separate the screen adhesive: step 9, image 1 of 2 Google Pixel 10a Screen Removal, Separate the screen adhesive: step 9, image 2 of 2
      • Slide the opening pick down to the bottom-right corner to separate the adhesive.

      • Leave the opening pick there to keep the adhesive from resealing.

      Ask FixBot

      Add Comment

    10. Google Pixel 10a Screen Removal: step 10, image 1 of 3 Google Pixel 10a Screen Removal: step 10, image 2 of 3 Google Pixel 10a Screen Removal: step 10, image 3 of 3
      • Apply heat to each edge and use your opening picks to slice around the entire screen perimeter to separate the adhesive. Leave a pick in each corner to prevent the adhesive from resealing.

      • Don't insert the pick deeper than 2 mm near the front-facing camera to prevent damaging the camera module.

      Ask FixBot

      Add Comment

    11. Google Pixel 10a Screen Removal: step 11, image 1 of 1
      • Swing the screen over the left edge of your phone (like opening the cover of a book) and lay it down flat.

      • If you feel resistance when lifting the screen, use an opening pick to separate any leftover adhesive.

      Ask FixBot

      Add Comment

    12. Google Pixel 10a Screen Removal, Disconnect the screen: step 12, image 1 of 1
      • Use a Torx Plus 3IP screwdriver to remove the 1.9 mm‑long screw securing the screen connector cover.

      Ask FixBot

      Add Comment

    13. Google Pixel 10a Screen Removal: step 13, image 1 of 3 Google Pixel 10a Screen Removal: step 13, image 2 of 3 Google Pixel 10a Screen Removal: step 13, image 3 of 3
      • Use your fingers or tweezers to slide the screen connector cover down slightly to clear the top lip.

      • Lift and remove the cover.

      Ask FixBot

      Add Comment

    14. Google Pixel 10a Screen Removal: step 14, image 1 of 2 Google Pixel 10a Screen Removal: step 14, image 2 of 2
      • Insert the point of a spudger underneath the top-right corner of the screen connector.

      • Pry up to disconnect the screen.

      Ask FixBot

      Add Comment

    15. Google Pixel 10a Screen Removal, Remove the screen: step 15, image 1 of 1
      • Remove the screen.

      Ask FixBot

      Add Comment

Conclusion

To reassemble your device, follow these instructions in reverse order.

Cancel: I did not complete this guide.

Arthur Shi

Member since: 01/03/18

353,975 Reputation

938 Guides authored

0 Guide Comments

Add Comment

View Statistics:

Past 24 Hours: 2

Past 7 Days: 9

Past 30 Days: 25

All Time: 124