Free Shipping on Domestic Orders $75+

Google Pixel 10a Screen Installation

Prerequisite Only
This is a prerequisite-only guide! This guide is part of another procedure and isn’t meant to be used alone.

What you need

    1. Google Pixel 10a Screen Installation, Clean the frame: step 1, image 1 of 2 Google Pixel 10a Screen Installation, Clean the frame: step 1, image 2 of 2
      • Check your original screen for a black plastic perimeter. If it's not on the screen, it's still attached to the frame.

      • Use an opening pick to pry up and remove the black plastic perimeter from the frame.

      Ask FixBot

      Add Comment

    2. Google Pixel 10a Screen Installation: step 2, image 1 of 2 Google Pixel 10a Screen Installation: step 2, image 2 of 2
      • Take your time during this step. A clean frame allows replacement adhesive to lay totally flat, ensuring a better bond.

      • Use a spudger and tweezers to scrape up and remove any screen adhesive from the perimeter of the frame.

      • Use some high‑concentration (>90%) isopropyl alcohol and a lint‑free cloth (or coffee filter) to remove any adhesive residue.

      Ask FixBot

      Add Comment

    3. Google Pixel 10a Screen Installation, Connect the screen: step 3, image 1 of 1
      • Lay the screen next to the phone so the screen connector can comfortably reach the socket.

      Ask FixBot

      Add Comment

    4. Google Pixel 10a Screen Installation: step 4, image 1 of 2 Google Pixel 10a Screen Installation: step 4, image 2 of 2
      • Align the screen press connector over its socket and gently press down with your finger—first on one of the short sides, then on the other—until the connector clicks into place.

      Ask FixBot

      Add Comment

    5. Google Pixel 10a Screen Installation, Install the screen connector cover: step 5, image 1 of 3 Google Pixel 10a Screen Installation, Install the screen connector cover: step 5, image 2 of 3 Google Pixel 10a Screen Installation, Install the screen connector cover: step 5, image 3 of 3
      • Lay the screen connector cover in place and slide it upwards slightly to latch the top edge.

      Ask FixBot

      Add Comment

    6. Google Pixel 10a Screen Installation: step 6, image 1 of 1
      • Use a Torx Plus 3IP screwdriver to install the 1.9 mm‑long screen connector cover screw.

      Ask FixBot

      Add Comment

    7. Google Pixel 10a Screen Installation, Test your repair: step 7, image 1 of 2 Google Pixel 10a Screen Installation, Test your repair: step 7, image 2 of 2
      • This is a good point to test your repair before sealing up your phone:

      • Flip the screen onto onto the frame.

      • Remove the plastic liner covering the screen.

      • Carefully power on the phone, making sure nothing touches the screen while it powers on.

      • Use Google’s Pixel Update and Software Repair tool to calibrate your fingerprint sensor.

      • Run a diagnostics test with the built-in Pixel Diagnostic tool to make sure the screen's working properly.

      • Once you've confirmed screen functionality, fully power off your phone before resuming reassembly.

      Ask FixBot

      Add Comment

    8. Google Pixel 10a Screen Installation, Remove the remaining liners: step 8, image 1 of 2 Google Pixel 10a Screen Installation, Remove the remaining liners: step 8, image 2 of 2
      • Use your fingers and tweezers to remove all remaining liners from the screen.

      • Make sure no liners cover the front-facing camera area.

      Ask FixBot

      Add Comment

    9. Google Pixel 10a Screen Installation, Install the screen: step 9, image 1 of 2 Google Pixel 10a Screen Installation, Install the screen: step 9, image 2 of 2
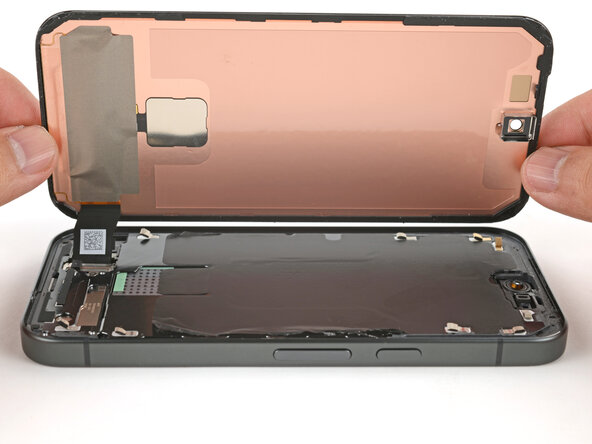
      • Carefully flip the screen over and lay it on the phone.

      Ask FixBot

      Add Comment

    10. Google Pixel 10a Screen Installation: step 10, image 1 of 2 Google Pixel 10a Screen Installation: step 10, image 2 of 2
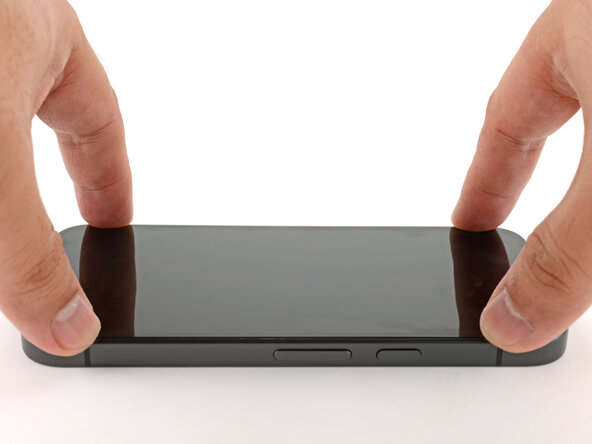
      • Firmly press around the screen perimeter to secure it.

      • You can also hold your phone and squeeze firmly around the perimeter to strengthen the adhesive bond.

      • For an even more secure bond, lay your phone screen-down on a clean and flat surface underneath a few books overnight.

      Ask FixBot

      Add Comment

Conclusion

To reassemble your device, follow these instructions in reverse order.

Cancel: I did not complete this guide.

Arthur Shi

Member since: 01/03/18

350,751 Reputation

938 Guides authored

0 Guide Comments

Add Comment

View Statistics:

Past 24 Hours: 0

Past 7 Days: 2

Past 30 Days: 8

All Time: 89