Free Shipping on Domestic Orders $75+

Gateway 600YG2 Top Case Replacement

What you need

    1. Gateway 600YG2 Top Case Replacement, Battery: step 1, image 1 of 1
      • Flip the laptop over.

      • Slide the battery release tab to the right to open the battery cover.

      Ask FixBot

      Add Comment

    2. Gateway 600YG2 Top Case Replacement: step 2, image 1 of 1
      • Remove the battery cover using the tab on the right side.

      • Lift and remove the battery.

      Ask FixBot

      Add Comment

    1. Gateway 600YG2 Top Case Replacement, Power Button Panel: step 3, image 1 of 1
      • Insert the spudger between the "sysrq" and "ins" keys.

      • Gently pry free the power button panel above the keyboard, from the right and moving to the left.

      Ask FixBot

      Add Comment

    1. Gateway 600YG2 Top Case Replacement, Keyboard: step 4, image 1 of 1
      • Remove the five screws holding the keyboard in place.

      Ask FixBot

      Add Comment

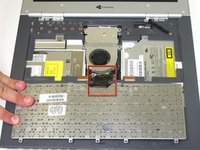
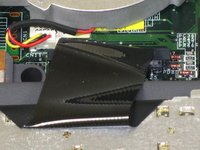
    2. Gateway 600YG2 Top Case Replacement: step 5, image 1 of 2 Gateway 600YG2 Top Case Replacement: step 5, image 2 of 2
      • Possible device damage: When lifting the keyboard out, do not lift the keyboard up. Only fold back along the space bar edge.

      • Possible device damage: Do not pull the black cable by the ribbon section. Only pull it from the connector itself.

      • Follow the black ribbon cable and gently pull straight up.

      Ask FixBot

      Add Comment

    1. Gateway 600YG2 Top Case Replacement, LCD: step 6, image 1 of 1
      • Remove the five screws with a Phillips #0 screwdriver.

      • The LCD hinge covers are held in place by four screws. One screw is for grounding the LCD.

      • Lift the hinge covers along the outer edges with the spudger until they are released.

      Ask FixBot

      Add Comment

    2. Gateway 600YG2 Top Case Replacement: step 7, image 1 of 1
      • Gently unplug the LCD from the system board.

      Ask FixBot

      Add Comment

    3. Gateway 600YG2 Top Case Replacement: step 8, image 1 of 1
      • Using the Phillips #0 screwdriver, remove six screws that hold the LCD to the hinge.

      Ask FixBot

      Add Comment

    4. Gateway 600YG2 Top Case Replacement: step 9, image 1 of 1
      • Check if any cables are still connected before pulling out the LCD.

      • Remove the cable by gently pulling it out while holding down the LCD.

      Ask FixBot

      Add Comment

    1. Gateway 600YG2 Top Case Replacement, CD/DVD or Floppy drives: step 10, image 1 of 1
      • Slide the release and push the button to eject the drive.

      • Remove the drive.

      • When reinserting the drives, put them in the original slot to avoid interface conflicts.

      Ask FixBot

      Add Comment

    1. Gateway 600YG2 Top Case Replacement, Top Case: step 11, image 1 of 1
      • Use a Phillips #0 screwdriver to remove the thirteen screws from the bottom of the computer.

      Ask FixBot

      Add Comment

    2. Gateway 600YG2 Top Case Replacement: step 12, image 1 of 1
      • Remove the two indicated screws.

      Ask FixBot

      Add Comment

    3. Gateway 600YG2 Top Case Replacement: step 13, image 1 of 1
      • Remove the four screws from the back of the case.

      Ask FixBot

      Add Comment

    4. Gateway 600YG2 Top Case Replacement: step 14, image 1 of 1
      • Potential for device damage: Failure to properly do this step will damage your mouse pad ribbon.

      • Lift the plug holding the mouse ribbon about 1/16 inch or until it stops

      • Remove the ribbon.

      Ask FixBot

      Add Comment

    5. Gateway 600YG2 Top Case Replacement: step 15, image 1 of 1
      • Insert your spudger between the upper and lower case at the drive bay closest to the battery.

      • Carefully go around the entire case, unseating all plastic clips holding the upper and lower cases together.

      Ask FixBot

      Add Comment

    6. Gateway 600YG2 Top Case Replacement: step 16, image 1 of 1
      • Lift the upper case about 1/4 inch.

      • Unplug the last connecting wire and remove the upper case.

      Ask FixBot

      Add Comment

Conclusion

To reassemble your device, follow these instructions in reverse order.

Cancel: I did not complete this guide.

One other person completed this guide.

Elizabeth Mazer

Member since: 10/14/10

78 Reputation

10 Guides authored

Team

Cal Poly, Team 20-10, Maness Fall 2010 Member of Cal Poly, Team 20-10, Maness Fall 2010

CPSU-MANESS-F10S20G10

3 Members

72 Guides authored

0 Guide Comments

Add Comment

View Statistics:

Past 24 Hours: 2

Past 7 Days: 14

Past 30 Days: 39

All Time: 2,377