
Gateway 600YG2 System Board Replacement

What you need

  1. Gateway 600YG2 System Board Replacement, Battery: step 1, image 1 of 1
    • Flip the laptop over.

    • Slide the battery release tab to the right with your index finger to open the battery cover.

  2. Gateway 600YG2 System Board Replacement: step 2, image 1 of 1
    • Remove the battery cover using the tab on the right side.

    • Take the battery out with your index finger.

  3. Gateway 600YG2 System Board Replacement, CD/DVD or Floppy drives: step 3, image 1 of 1
    • Slide the release and push the button to eject the drive.

    • Remove the drive.

    • When reinserting the drives, be sure to put them in the original slot to avoid interface conflicts.

  4. Gateway 600YG2 System Board Replacement, Hard Drive: step 4, image 1 of 1
    • Unscrew 1 captive screw holding hard drive cover on.

    • slide hard drive to the right and remove.

    • for detailed pictures and info go to Gateway Support

  5. Gateway 600YG2 System Board Replacement, Power Button Panel: step 5, image 1 of 1
    • Insert the spudger between the "sysrq" and "ins" keys.

    • Gently pry free the power button panel above the keyboard, beginning from the right and moving to the left.

  6. Gateway 600YG2 System Board Replacement, LCD: step 6, image 1 of 1
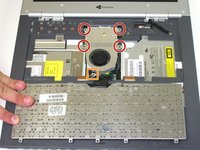
    • Remove the five screws with a Phillips #0 screwdriver.

    • The LCD hinge covers are held in place by four screws. One screw is for grounding the LCD.

    • Lift the hinge covers along the outer edges with the spudger until they are released.

  7. Gateway 600YG2 System Board Replacement: step 7, image 1 of 1
    • Gently unplug the LCD from the system board.

  8. Gateway 600YG2 System Board Replacement: step 8, image 1 of 1
    • Using the Phillips #0 screwdriver, remove six screws that hold the LCD to the hinge.

  9. Gateway 600YG2 System Board Replacement: step 9, image 1 of 1
    • Check if any cables are still connected before pulling out the LCD.

    • Remove the cable by gently pulling it out while holding down the LCD.

  10. Gateway 600YG2 System Board Replacement, Keyboard: step 10, image 1 of 1
    • Remove the 5 screws holding the keyboard in place.

  11. Gateway 600YG2 System Board Replacement: step 11, image 1 of 2 Gateway 600YG2 System Board Replacement: step 11, image 2 of 2
    • Potential for device damage: When lifting the keyboard out, do not lift the keyboard up. Only fold back along the space bar edge.

    • Potential for device damage: Do not pull the black cable by the ribbon section. Only pull it from the connector itself.

    • Follow the black ribbon cable to the connector and gently pull straight up.

  12. Gateway 600YG2 System Board Replacement, System Fan: step 12, image 1 of 2 Gateway 600YG2 System Board Replacement, System Fan: step 12, image 2 of 2
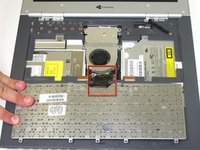
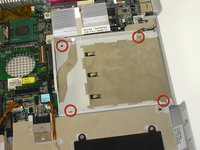
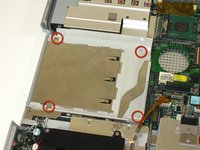
    • Unscrew the four captive screws.

    • Unplug the fan from the system and pull it out. The fan unit should slide forward before coming free.

  13. Gateway 600YG2 System Board Replacement, Top Case: step 13, image 1 of 1
    • Use a Phillips #0 screwdriver to remove the thirteen screws from the bottom of the computer.

  14. Gateway 600YG2 System Board Replacement: step 14, image 1 of 1
    • Remove the two indicated screws.

  15. Gateway 600YG2 System Board Replacement: step 15, image 1 of 1
    • Remove the four screws from the back of the case.

  16. Gateway 600YG2 System Board Replacement: step 16, image 1 of 1
    • Potential for device damage: Failure to properly do this step will damage your mouse pad ribbon.

    • Lift the plug holding the mouse ribbon about 1/16 inch or until it stops

    • Remove the ribbon.

  17. Gateway 600YG2 System Board Replacement: step 17, image 1 of 1
    • Insert your spudger between the upper and lower case at the drive bay closest to the battery.

    • Carefully and slowly go around the entire case, unseating all plastic clips holding the upper and lower cases together.

  18. Gateway 600YG2 System Board Replacement: step 18, image 1 of 1
    • Lift the upper case about 1/4 inch.

    • At the rear of the case is one last connecting wire. Unplug it and remove the upper case.

  19. Gateway 600YG2 System Board Replacement, System Board: step 19, image 1 of 2 Gateway 600YG2 System Board Replacement, System Board: step 19, image 2 of 2
    • Remove 8 screws from drive bays.

  20. Gateway 600YG2 System Board Replacement: step 20, image 1 of 1
    • Remove 6 5mm hex nuts from back of laptop.

  21. Gateway 600YG2 System Board Replacement: step 21, image 1 of 1
    • Remove screw

    • Slide metal clip into battery bay

  22. Gateway 600YG2 System Board Replacement: step 22, image 1 of 1
    • Remove two screws.

    • Hard drive extension should lift out from system board.

  23. Gateway 600YG2 System Board Replacement: step 23, image 1 of 1
    • Remove 4 screws holding left speaker for ease of access to connectors and external sound board.

  24. Gateway 600YG2 System Board Replacement: step 24, image 1 of 1
    • Remove screw and unplug speakers from external sound board.

    • Lift external soundboard away from system board and remove.
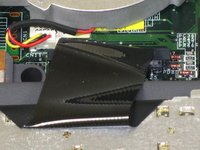
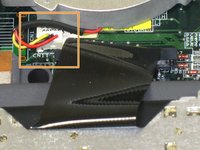
  25. Gateway 600YG2 System Board Replacement: step 25, image 1 of 1
    • Unplug audio DJ

    • Unplug System status light board

    • Starting on the right side of case gently lift and slide system board till it comes free of lower case.

Conclusion

To reassemble your device, follow these instructions in reverse order.

Elizabeth Mazer

Member since: 10/14/10

78 Reputation

10 Guides authored

Team

Cal Poly, Team 20-10, Maness Fall 2010 Member of Cal Poly, Team 20-10, Maness Fall 2010

CPSU-MANESS-F10S20G10

3 Members

22 Guides authored

0 Comments

Add Comment

View Statistics:

Past 24 Hours: 0

Past 7 Days: 2

Past 30 Days: 6

All Time: 2,745