Free Shipping on Domestic Orders $75+

Framework Laptop 16" SSD Replacement

Views: 2.6K

View statistics:

Past 24 Hours:
0
Past 7 Days:
7
Past 30 Days:
22
All Time:
2,645
Comments: 1

1 guide comment.

Go to guide comments
Completed: 1

1 person has marked this guide "completed." Will you be next?

Favorites: 0

No one has favorited (and subscribed to) this guide. Will you be the first?

Time Required: 10 - 15 minutes
Difficulty: Easy
Featured Guide

This guide has been found to be exceptionally cool by the iFixit staff.

Framework Laptop 16" SSD Replacement
Archived Guide This guide is retained solely for historical purposes. Use the updated version of the guide to perform your repair.

Introduction

Go to step 1 ↓

Use this guide to replace the SSD, or the storage, in your Framework 16" laptop.

The Framework 16" laptop supports two SSD slots: one "primary" M.2 2280 card and one "secondary" M.2 2230 card. The primary card sits on top of the secondary card, so you can use this guide to replace both cards.

Note: the laptop used in this guide is a generic setup of one US keyboard, one numpad module, and two touchpad spacers. Your setup might vary, but the procedure should remain the same.

What you need

Tools

    1. Framework Laptop 16" SSD Replacement, Before you begin: step 1, image 1 of 2 Framework Laptop 16" SSD Replacement, Before you begin: step 1, image 2 of 2
      • Unplug all cables and fully shut down your laptop.

      • If your repair requires a spudger, a T5 Torx, or a Phillips screwdriver, you can use the included Framework screwdriver. Whichever works best for you!

      • Framework recommends that you put your laptop into battery disconnect mode in the BIOS whenever removing the battery. Read how to do that here.

      • To disable this mode, click here.

      Ask FixBot

      Add Comment

    1. Framework Laptop 16" SSD Replacement, Unlock the Input Modules: step 2, image 1 of 3 Framework Laptop 16" SSD Replacement, Unlock the Input Modules: step 2, image 2 of 3 Framework Laptop 16" SSD Replacement, Unlock the Input Modules: step 2, image 3 of 3
      • Use your fingernail to pull out the two Input Module latches and unlock them.

      • The latch will show red if it's unlocked.

      Ask FixBot

      Add Comment

    1. Framework Laptop 16" SSD Replacement, Remove the touchpad spacers: step 3, image 1 of 3 Framework Laptop 16" SSD Replacement, Remove the touchpad spacers: step 3, image 2 of 3 Framework Laptop 16" SSD Replacement, Remove the touchpad spacers: step 3, image 3 of 3
      • Use your fingers to slide the touchpad spacer toward the bottom edge of the laptop and unclip it.

      • If you're having trouble, check if the corresponding Input Module latch is properly unlocked.

      • Lift the touchpad spacer off the laptop and remove it.

      Ask FixBot

      Add Comment

    2. Framework Laptop 16" SSD Replacement: step 4, image 1 of 1
      • Repeat the same procedure for the other touchpad spacer.

      Ask FixBot

      Add Comment

    1. Framework Laptop 16" SSD Replacement, Remove the touchpad: step 5, image 1 of 3 Framework Laptop 16" SSD Replacement, Remove the touchpad: step 5, image 2 of 3 Framework Laptop 16" SSD Replacement, Remove the touchpad: step 5, image 3 of 3
      • Use your fingers to slide the touchpad toward the bottom edge of the laptop and disconnect it.

      • If you're having trouble, check if the Input Module latches are properly unlocked.

      • Lift the touchpad and remove it.

      • During reassembly, perform the following:

      • Place the touchpad flat on its cutout so its clips are properly aligned.

      • Press the touchpad down and slide it into place so it lines up evenly with the bottom edge of the laptop.

      Ask FixBot

      Add Comment

    1. Framework Laptop 16" SSD Replacement, Remove the keyboard: step 6, image 1 of 3 Framework Laptop 16" SSD Replacement, Remove the keyboard: step 6, image 2 of 3 Framework Laptop 16" SSD Replacement, Remove the keyboard: step 6, image 3 of 3
      • The keyboard is held in place with strong magnets. Apply gradually increasing force to avoid having the keyboard violently eject.

      • Grip the two pull tabs along the bottom of the keyboard.

      • Lift the pull tabs until the keyboard magnets release.

      • Remove the keyboard.

      • During reassembly, make sure the keyboard is seated properly on its alignment pegs and sits evenly with the edges of the laptop.

      Ask FixBot

      Add Comment

    1. Framework Laptop 16" SSD Replacement, Remove the numpad: step 7, image 1 of 3 Framework Laptop 16" SSD Replacement, Remove the numpad: step 7, image 2 of 3 Framework Laptop 16" SSD Replacement, Remove the numpad: step 7, image 3 of 3
      • The numpad is held in place with strong magnets. Apply gradually increasing force to avoid having the numpad violently eject.

      • Grip the pull tab at the bottom of the numpad.

      • Lift the pull tab until the numpad magnets release.

      • Remove the numpad.

      • During reassembly, make sure the numpad is seated properly on its alignment pegs and sits flush with the edges of the laptop.

      Ask FixBot

      Add Comment

    1. Framework Laptop 16" SSD Replacement, Disconnect the midframe cable: step 8, image 1 of 2 Framework Laptop 16" SSD Replacement, Disconnect the midframe cable: step 8, image 2 of 2
      • Grip the black pull tab on the midframe cable press connector.

      • Lift up to disconnect the midframe cable.

      Ask FixBot

      Add Comment

    2. Framework Laptop 16" SSD Replacement, Loosen the midframe screws: step 9, image 1 of 2 Framework Laptop 16" SSD Replacement, Loosen the midframe screws: step 9, image 2 of 2
      • The midframe screws are ordered from 2–17 (number 1 is the press connector). You don't have to follow the order, but you can use it to help keep track of the screws you've loosened.

      • Use a T5 Torx screwdriver to loosen the 16 captive screws securing the midframe.

      • During reassembly, follow the order (starting with 2) to reinstall the screws across the midframe evenly.

      Ask FixBot

      Add Comment

    3. Framework Laptop 16" SSD Replacement, Remove the midframe: step 10, image 1 of 2 Framework Laptop 16" SSD Replacement, Remove the midframe: step 10, image 2 of 2
      • Use your fingernail to lift the bottom edge of the midframe enough to grip it with your fingers.

      Ask FixBot

      Add Comment

    4. Framework Laptop 16" SSD Replacement: step 11, image 1 of 2 Framework Laptop 16" SSD Replacement: step 11, image 2 of 2
      • Lift the midframe off the laptop and remove it.

      • During reassembly, make sure the midframe sits evenly on its alignment pegs before tightening the screws.

      Ask FixBot

      Add Comment

    1. Framework Laptop 16" SSD Replacement, Loosen the battery screws: step 12, image 1 of 2 Framework Laptop 16" SSD Replacement, Loosen the battery screws: step 12, image 2 of 2
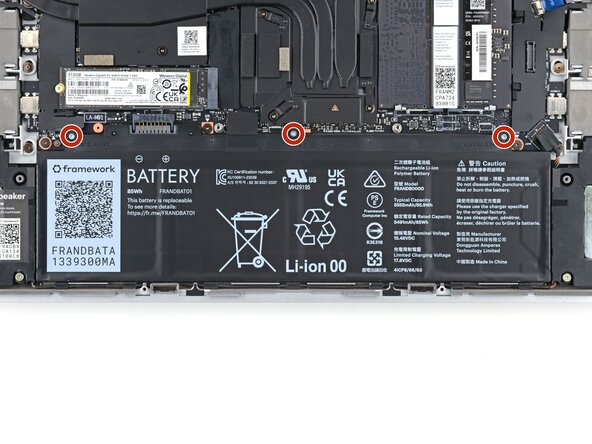
      • Use a T5 Torx screwdriver to loosen the three captive screws securing the battery.

      Ask FixBot

      Add Comment

    2. Framework Laptop 16" SSD Replacement, Remove the battery: step 13, image 1 of 3 Framework Laptop 16" SSD Replacement, Remove the battery: step 13, image 2 of 3 Framework Laptop 16" SSD Replacement, Remove the battery: step 13, image 3 of 3
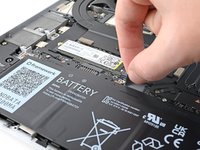
      • Grip the black pull tab at the top of the battery.

      • Lift the pull tab to disconnect the battery connector.

      • Remove the battery.

      Ask FixBot

      Add Comment

    1. Framework Laptop 16" SSD Replacement, Remove the SSD screw: step 14, image 1 of 2 Framework Laptop 16" SSD Replacement, Remove the SSD screw: step 14, image 2 of 2
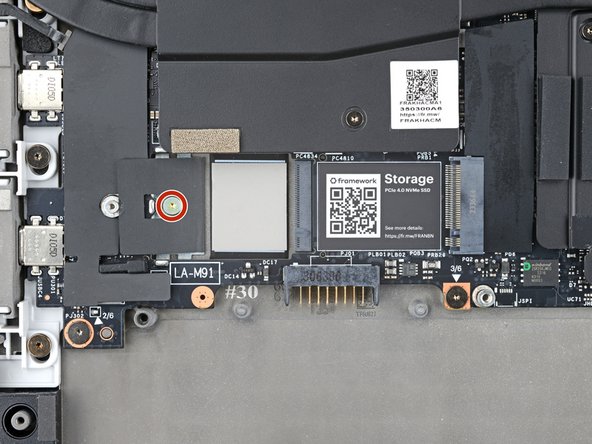
      • Use a T5 Torx screwdriver to remove the 2 mm‑long screw securing the SSD.

      • The SSD might pop up at a shallow angle when you remove the screw.

      Ask FixBot

      Add Comment

    2. Framework Laptop 16" SSD Replacement, Remove the SSD: step 15, image 1 of 3 Framework Laptop 16" SSD Replacement, Remove the SSD: step 15, image 2 of 3 Framework Laptop 16" SSD Replacement, Remove the SSD: step 15, image 3 of 3
      • Grip the end of the SSD with the screw hole and slide it out of its socket.

      • Remove the SSD.

      • If you're installing a secondary M.2 2230 SSD, remove the 2 mm‑long screw next to the gray thermal pad and follow the same removal procedure.

      • During reassembly, insert the SSD at a shallow angle into its socket, and hold it flat to the laptop while you reinsert its screw.

      Ask FixBot

      Add Comment

Conclusion

To reassemble your device, follow these instructions in reverse order.

Take your e-waste to an R2 or e-Stewards certified recycler.

Repair didn’t go as planned? Try some basic troubleshooting, or ask our Answers Community for help.

Cancel: I did not complete this guide.

One other person completed this guide.

Alex Diaz-Kokaisl

Member since: 01/16/22

250,853 Reputation

1,200 Guides authored

Team

Guide Team Member of Guide Team

Staff

10 Members

62,132 Guides authored

1 Guide Comment

Why is battery removal necessary? If machine is powered off or better yet, has internal battery disconnected via bios, this seems like an unnecessary step?

Jacob C. - Reply Share

Add Comment

View Statistics:

Past 24 Hours: 0

Past 7 Days: 7

Past 30 Days: 22

All Time: 2,645