
Dell Alienware 17 Third Hard-Drive Replacement

  1. Dell Alienware 17 Third Hard-Drive Replacement, Remove the Screws: step 1, image 1 of 1
    • WARNING: Before working inside your computer, read the safety information that shipped with your computer and follow the steps in Before Working Inside Your Computer. After working inside your computer, follow the instructions in After Working Inside Your Computer.

    • CAUTION: To avoid data loss, do not remove the hard drive while the computer is On or in Sleep state.

    • CAUTION: Hard drives are extremely fragile. Exercise care when handling the hard drive.

    • NOTE: The media bay can accommodate an optical drive, a hard drive, or a solid-state drive.

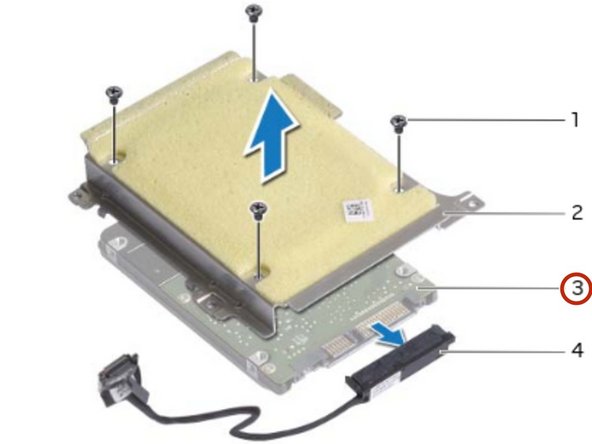
    • Remove the screws that secure the tertiary hard drive assembly to the computer base.

  2. Dell Alienware 17 Third Hard-Drive Replacement, Disconnecting the Hard-Drive Cable: step 2, image 1 of 1
    • Using the pull-tab, disconnect the hard-drive cable from the system board.

  3. Dell Alienware 17 Third Hard-Drive Replacement, Lifting the Hard-Drive Assembly: step 3, image 1 of 1
    • Lift the hard-drive assembly off the computer base.

  4. Dell Alienware 17 Third Hard-Drive Replacement, Disconnect the Interposer: step 4, image 1 of 2 Dell Alienware 17 Third Hard-Drive Replacement, Disconnect the Interposer: step 4, image 2 of 2
    • Disconnect the interposer from the hard drive.

  5. Dell Alienware 17 Third Hard-Drive Replacement, Remove the Screws: step 5, image 1 of 1
    • Remove the screws that secure the hard-drive bracket to the hard drive.

  6. Dell Alienware 17 Third Hard-Drive Replacement, Lifting the Hard-Drive Bracket: step 6, image 1 of 2 Dell Alienware 17 Third Hard-Drive Replacement, Lifting the Hard-Drive Bracket: step 6, image 2 of 2
    • Lift the hard-drive bracket off the hard drive.

  7. Dell Alienware 17 Third Hard-Drive Replacement, Align the Screw Holes: step 7, image 1 of 1
    • Align the screw holes on the NEW hard-drive bracket with the screw holes on the hard drive.

  8. Dell Alienware 17 Third Hard-Drive Replacement, Replace the Screws: step 8, image 1 of 1
    • Replace the screws that secure the hard-drive bracket to the hard drive.

  9. Dell Alienware 17 Third Hard-Drive Replacement, Connect the Interposer: step 9, image 1 of 1
    • Connect the interposer to the hard drive.

  10. Dell Alienware 17 Third Hard-Drive Replacement, Align the Screw Holes: step 10, image 1 of 1
    • Align the screw holes on the hard-drive assembly with the screw holes on the computer base.

  11. Dell Alienware 17 Third Hard-Drive Replacement, Replace the Screws: step 11, image 1 of 1
    • Replace the screws that secure the hard-drive assembly to the computer base.

  12. Dell Alienware 17 Third Hard-Drive Replacement, Connecting the Hard-Drive Cable: step 12, image 1 of 1
    • Connect the hard-drive cable to the system board.

Terrence15

Member since: 12/18/17

79,231 Reputation

441 Guides authored

Team

RampUP America, Inc. Member of RampUP America, Inc.

Community

42 Members

1,989 Guides authored

View Statistics:

Past 24 Hours: 0

Past 7 Days: 5

Past 30 Days: 22

All Time: 1,078