
DJI Phantom Motor Replacement

What you need

  1. DJI Phantom Motor Replacement, Open the Battery Compartment: step 1, image 1 of 3 DJI Phantom Motor Replacement, Open the Battery Compartment: step 1, image 2 of 3 DJI Phantom Motor Replacement, Open the Battery Compartment: step 1, image 3 of 3
    • Press down on battery door release tab to flip the battery door open.

  2. DJI Phantom Motor Replacement, Remove the Battery: step 2, image 1 of 3 DJI Phantom Motor Replacement, Remove the Battery: step 2, image 2 of 3 DJI Phantom Motor Replacement, Remove the Battery: step 2, image 3 of 3
    • Pull out the battery pack.

    • Avoid pulling on the battery wires, excess stress may break the wires, damage the power connectors, or crack the internal solder joints.

  3. DJI Phantom Motor Replacement, Disconnect the Battery: step 3, image 1 of 2 DJI Phantom Motor Replacement, Disconnect the Battery: step 3, image 2 of 2
    • Pull the two halves of the XT60 power connector apart.

    • It's a tight fit, so be careful not to hit your drone or yank on the cables when it releases!

  4. DJI Phantom Motor Replacement, Identifying Silver and Black Collets: step 4, image 1 of 2 DJI Phantom Motor Replacement, Identifying Silver and Black Collets: step 4, image 2 of 2
    • Silver-topped propeller collets unscrew counter-clockwise

    • Black-topped propeller collets unscrew clockwise

  5. DJI Phantom Motor Replacement, Unscrewing Silver Collets: step 5, image 1 of 3 DJI Phantom Motor Replacement, Unscrewing Silver Collets: step 5, image 2 of 3 DJI Phantom Motor Replacement, Unscrewing Silver Collets: step 5, image 3 of 3
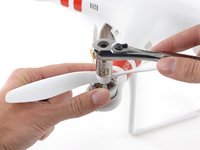
    • For propellors with silver collets: Use a 12 mm wrench or socket to loosen silver collets in the counter-clockwise direction.

    • Once free, unscrew and remove the collet.

  6. DJI Phantom Motor Replacement, Unscrewing Black Collets: step 6, image 1 of 3 DJI Phantom Motor Replacement, Unscrewing Black Collets: step 6, image 2 of 3 DJI Phantom Motor Replacement, Unscrewing Black Collets: step 6, image 3 of 3
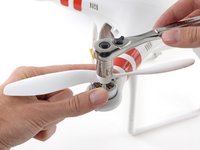
    • For propellors with black collets: Use a 12 mm wrench or socket to loosen black collets in the clockwise direction.

    • Once free, unscrew and remove the collet.

  7. DJI Phantom Motor Replacement, Remove the Propeller: step 7, image 1 of 3 DJI Phantom Motor Replacement, Remove the Propeller: step 7, image 2 of 3 DJI Phantom Motor Replacement, Remove the Propeller: step 7, image 3 of 3
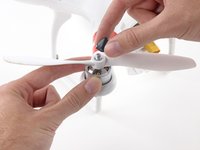
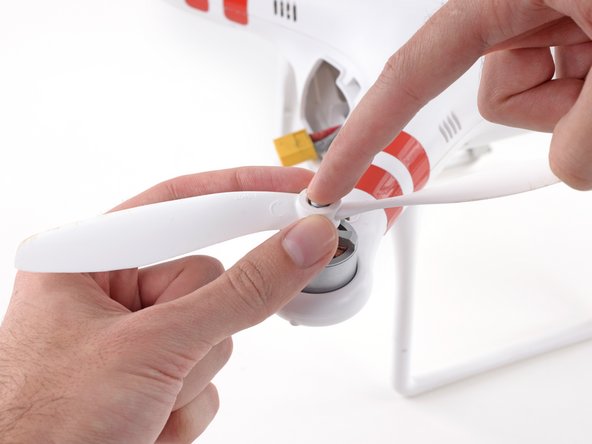
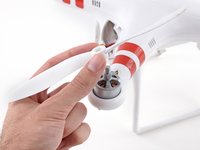
    • Gently press down the motor shaft and lift the propeller up to remove it.

  8. DJI Phantom Motor Replacement, Remove Case Screws: step 8, image 1 of 3 DJI Phantom Motor Replacement, Remove Case Screws: step 8, image 2 of 3 DJI Phantom Motor Replacement, Remove Case Screws: step 8, image 3 of 3
    • After removing all four propellors, flip the drone over.

    • Remove the following screws from the underside of the drone:

    • Twelve 2.0 mm hex screws

    • Four Phillips #0 screws

  9. DJI Phantom Motor Replacement, Unplug Magnetometer: step 9, image 1 of 3 DJI Phantom Motor Replacement, Unplug Magnetometer: step 9, image 2 of 3 DJI Phantom Motor Replacement, Unplug Magnetometer: step 9, image 3 of 3
    • Loosen the cable from the plastic landing gear.

    • Unplug the magnetometer molex connector.

  10. DJI Phantom Motor Replacement, Remove the Top Shell: step 10, image 1 of 3 DJI Phantom Motor Replacement, Remove the Top Shell: step 10, image 2 of 3 DJI Phantom Motor Replacement, Remove the Top Shell: step 10, image 3 of 3
    • Lift up on the top portion of the shell and set it on its side.

    • Do not attempt to fully remove the case. The GPS and Magnetometer cables connect the top shell to the rest of the Phantom, be careful not to stress or break these cables.

  11. DJI Phantom Motor Replacement, Disconnect GPS Cable: step 11, image 1 of 2 DJI Phantom Motor Replacement, Disconnect GPS Cable: step 11, image 2 of 2
    • Lift the GPS cable molex connector up out of its socket on the main board.

  12. DJI Phantom Motor Replacement, Loosen Magnetometer Cable: step 12, image 1 of 3 DJI Phantom Motor Replacement, Loosen Magnetometer Cable: step 12, image 2 of 3 DJI Phantom Motor Replacement, Loosen Magnetometer Cable: step 12, image 3 of 3
    • Gently pull the slack of the magnetometer cable through the case bottom shell.

    • The case top shell should now have enough slack to work on the interior of the Phantom.

  13. DJI Phantom Motor Replacement, Motor: step 13, image 1 of 2 DJI Phantom Motor Replacement, Motor: step 13, image 2 of 2
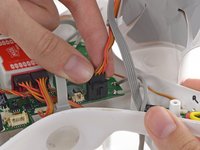
    • Desolder all three motors wires from the speed controller board.

    • Follow our soldering guide to learn how, or just to brush-up on your skills.

    • Be careful not to melt the plastic case bottom shell with your soldering iron or damage any electronic components.

    • When you're reassembling, solder the motor leads back in their original order. This may be different from the picture. Motors on arms across from each other have the same color order, so check the opposite arm for reference.

  14. DJI Phantom Motor Replacement, Unmount the Motor: step 14, image 1 of 1
    • Unscrew the four 2 mm motor hex bolts from the case bottom shell.

  15. DJI Phantom Motor Replacement: step 15, image 1 of 2 DJI Phantom Motor Replacement: step 15, image 2 of 2
    • Remove the motor from the Phantom.

Conclusion

To reassemble your device, follow these instructions in reverse order.

9 other people completed this guide.

David Hoyt

Member since: 04/09/10

4,023 Reputation

43 Guides authored

Team

Cal Poly, Team 25-89, Amido Spring 2010 Member of Cal Poly, Team 25-89, Amido Spring 2010

CPSU-AMIDO-S10S25G89

4 Members

63 Guides authored

0 Comments

Add Comment

View Statistics:

Past 24 Hours: 1

Past 7 Days: 2

Past 30 Days: 12

All Time: 18,135