Free Shipping on Domestic Orders $75+

Conair Cord-Keeper 169XR Fan Grille Replacement

What you need

  1. Conair Cord-Keeper 169XR Fan Grille Replacement, Handle Cover: step 1, image 1 of 2 Conair Cord-Keeper 169XR Fan Grille Replacement, Handle Cover: step 1, image 2 of 2
    • Unscrew the two 18 mm long Phillips #2 screws on the side of the hair dryer.

    Ask FixBot

    Add Comment

  2. Conair Cord-Keeper 169XR Fan Grille Replacement: step 2, image 1 of 1
    • Be cautious of pieces that can possibly fall out when removing the face of the handle.

    • Once you have taken the screws out, take the top half of the handle off by lifting it off of the dryer.

    Ask FixBot

    Add Comment

  3. Conair Cord-Keeper 169XR Fan Grille Replacement, Dryer Head: step 3, image 1 of 2 Conair Cord-Keeper 169XR Fan Grille Replacement, Dryer Head: step 3, image 2 of 2
    • Remove the inner white disk piece by gently pulling it out with your finger nail.

    Ask FixBot

    Add Comment

  4. Conair Cord-Keeper 169XR Fan Grille Replacement: step 4, image 1 of 3 Conair Cord-Keeper 169XR Fan Grille Replacement: step 4, image 2 of 3 Conair Cord-Keeper 169XR Fan Grille Replacement: step 4, image 3 of 3
    • Gently remove the tan boxes (power supply) by wiggling them out of place and set them aside so you can take the back part of the handle off.

    Ask FixBot

    Add Comment

  5. Conair Cord-Keeper 169XR Fan Grille Replacement: step 5, image 1 of 2 Conair Cord-Keeper 169XR Fan Grille Replacement: step 5, image 2 of 2
    • Remove the inner white disk piece from the base of the dryer head by gently pulling it out with your finger nail.

    Ask FixBot

    Add Comment

  6. Conair Cord-Keeper 169XR Fan Grille Replacement: step 6, image 1 of 1
    • Unscrew the three 12 mm long Phillips #2 screws to remove the back of the hairdryer.

    Ask FixBot

    Add Comment

  7. Conair Cord-Keeper 169XR Fan Grille Replacement: step 7, image 1 of 1
    • Once the three screws are removed, pop the back of the dryer off by wiggling it until it comes loose. This shouldn't take too much effort.

    Ask FixBot

    Add Comment

  8. Conair Cord-Keeper 169XR Fan Grille Replacement: step 8, image 1 of 2 Conair Cord-Keeper 169XR Fan Grille Replacement: step 8, image 2 of 2
    • Unwind the cord and lay it to the side so you can get to the screw in the middle easier.

    • Remove the single 12 mm long Phillips #2 screw in the middle of the cord track.

    Ask FixBot

    Add Comment

  9. Conair Cord-Keeper 169XR Fan Grille Replacement: step 9, image 1 of 2 Conair Cord-Keeper 169XR Fan Grille Replacement: step 9, image 2 of 2
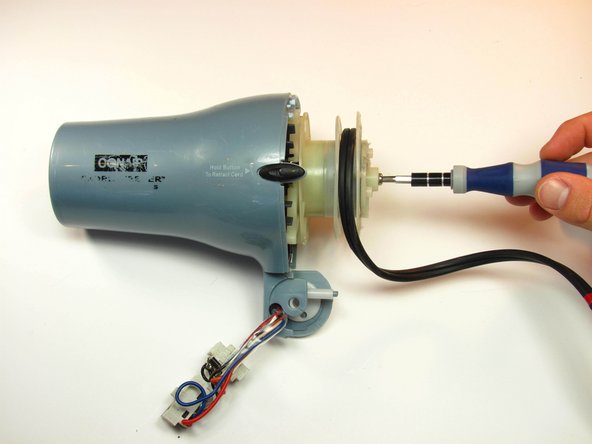
    • Take off the white cap that covers the heating coil. You will see a wound up piece of metal (cord retracting coil) underneath once the cap is removed.

    Ask FixBot

    Add Comment

  10. Conair Cord-Keeper 169XR Fan Grille Replacement: step 10, image 1 of 2 Conair Cord-Keeper 169XR Fan Grille Replacement: step 10, image 2 of 2
    • When removing the coil, make sure it stays wound up. It could very easily pop out, and you would have to wind it all the way back up and try to squeeze it back into the slot when you reassemble the dryer.

    • To remove the coil, use your screw driver to pop the coil out of the slot.

    • The second image is what the coil would look like if it came undone when you removed it.

    Ask FixBot

    Add Comment

  11. Conair Cord-Keeper 169XR Fan Grille Replacement: step 11, image 1 of 3 Conair Cord-Keeper 169XR Fan Grille Replacement: step 11, image 2 of 3 Conair Cord-Keeper 169XR Fan Grille Replacement: step 11, image 3 of 3
    • Once the coil is removed, unscrew the three 11 mm long Phillips #2 screws underneath to remove the retracting wheel.

    Ask FixBot

    Add Comment

  12. Conair Cord-Keeper 169XR Fan Grille Replacement, Fan Grille: step 12, image 1 of 2 Conair Cord-Keeper 169XR Fan Grille Replacement, Fan Grille: step 12, image 2 of 2
    • On the back of the dryer, remove the white plastic piece so the wires don't get caught.

    Ask FixBot

    Add Comment

  13. Conair Cord-Keeper 169XR Fan Grille Replacement: step 13, image 1 of 1
    • Once the cords aren't blocked, gently pop the outer shell of the dryer head off.

    Ask FixBot

    Add Comment

  14. Conair Cord-Keeper 169XR Fan Grille Replacement: step 14, image 1 of 2 Conair Cord-Keeper 169XR Fan Grille Replacement: step 14, image 2 of 2
    • Once you have removed the inner parts of the dryer head, pull out the front grill piece and replace it with a new one.

    Ask FixBot

    Add Comment

Conclusion

To reassemble your device, follow these instructions in reverse order.

Cancel: I did not complete this guide.

Candace

Member since: 01/23/14

1,028 Reputation

7 Guides authored

Team

Cal Poly, Team 10-33, Maness Winter 2014 Member of Cal Poly, Team 10-33, Maness Winter 2014

CPSU-MANESS-W14S10G33

3 Members

14 Guides authored

0 Guide Comments

Add Comment

View Statistics:

Past 24 Hours: 0

Past 7 Days: 4

Past 30 Days: 32

All Time: 1,918