
Canon EOS A2 LCD Screen Plastic Cover Replacement

What you need

  1. Canon EOS A2 LCD Screen Plastic Cover Replacement, Battery: step 1, image 1 of 1
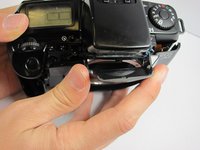
    • Locate the battery door/camera grip on the left side of the camera and lift the rotating removal tab.

  2. Canon EOS A2 LCD Screen Plastic Cover Replacement: step 2, image 1 of 1
    • Twist the tab clockwise to unlock the door, then pull outward from the camera to remove it.

  3. Canon EOS A2 LCD Screen Plastic Cover Replacement: step 3, image 1 of 1
    • Remove the battery from inside the battery housing and set the cover aside.

  4. Canon EOS A2 LCD Screen Plastic Cover Replacement, Front Cover: step 4, image 1 of 1
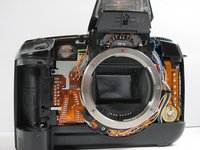
    • Remove the two 6.4mm screws above the lens aperture using a phillips #00 screw driver.

  5. Canon EOS A2 LCD Screen Plastic Cover Replacement: step 5, image 1 of 1
    • Remove the 6.4mm screw from the inside of the flash bezel.

    • If the flash is locked down, insert the battery, then with the help of a pencil turn the rotary (CW or CCW) switch until the "125" is displayed in the LCD. Press the Flash symbol button. You should hear the latch from the flash, then you can manually lift the flash. If OK, then remove the battery from the camera

  6. Canon EOS A2 LCD Screen Plastic Cover Replacement: step 6, image 1 of 1
    • Flip the camera upside down and remove the 5.4mm screw below the lens bezel on the front of the camera.

  7. Canon EOS A2 LCD Screen Plastic Cover Replacement: step 7, image 1 of 1
    • Remove the 5.6mm screws behind the battery cover.

  8. Canon EOS A2 LCD Screen Plastic Cover Replacement: step 8, image 1 of 1
    • Remove two 6.4mm screws on the latch mechanism on the right side of the camera.

  9. Canon EOS A2 LCD Screen Plastic Cover Replacement: step 9, image 1 of 1
    • Remove the 6.4mm screw on the top of the inside edge of the battery hole.

  10. Canon EOS A2 LCD Screen Plastic Cover Replacement: step 10, image 1 of 2 Canon EOS A2 LCD Screen Plastic Cover Replacement: step 10, image 2 of 2
    • Starting at the flash, carefully pull the front cover away from the camera.

  11. Canon EOS A2 LCD Screen Plastic Cover Replacement, Top Cover: step 11, image 1 of 1
    • Remove the 4.3mm screw below the camera strap ring.

  12. Canon EOS A2 LCD Screen Plastic Cover Replacement: step 12, image 1 of 1
    • Remove two 4.8mm screws located on both sides of the eyepiece.

  13. Canon EOS A2 LCD Screen Plastic Cover Replacement: step 13, image 1 of 1
    • Pull the top cover up slowly.

    • A ribbon cable is attached to the bottom of the top cover and the camera. Pull up very carefully to avoid damaging this.

  14. Canon EOS A2 LCD Screen Plastic Cover Replacement: step 14, image 1 of 1
    • Once you have revealed the ribbon cable, gently let the top cover hang off the front of the camera. Use the plastic opening tool to gently pull the white tabs on the ribbon cable, releasing the ribbon cable.

    • If you pull the white tabs all the way out, just insert them back in to avoid losing them.

  15. Canon EOS A2 LCD Screen Plastic Cover Replacement, LCD Screen Plastic Cover: step 15, image 1 of 1
    • Use a soft cloth to push up on the LCD plastic protector from underneath the top of the camera.

  16. Canon EOS A2 LCD Screen Plastic Cover Replacement: step 16, image 1 of 1
    • Once the LCD protector has been broken free, lift up on the side adjacent to the flash and pull out the plastic protector. You may now install the new plastic cover.

Conclusion

To reassemble your device, follow these instructions in reverse order.

Mark

Member since: 04/20/11

192 Reputation

5 Guides authored

Team

Cal Poly, Team 8-9, Regan Spring 2011 Member of Cal Poly, Team 8-9, Regan Spring 2011

CPSU-REGAN-S11S8G9

4 Members

12 Guides authored

0 Comments

Add Comment

View Statistics:

Past 24 Hours: 0

Past 7 Days: 8

Past 30 Days: 13

All Time: 3,298