Introduction
This manual is only for changing the heating element and not for identification of the broken heating element as the problem.
Warning: this device contains capacitors containing a high voltage charge. If treaded wrongly you risk an electric shock and severe injuries. Please inform yourself about the risks of dealing with capacitors before starting the repair (for example here).
What you need
-
-
Make sure the machine is unplugged
-
The machine must not contain any water. Water would run into the body if the heating element is removed and can potentially destroy the machine entirely.
-
Let the machine sit unplugged for a while to allow the capacitors to discharge. Warning: this is not an entirely reliable method to discharge the capacitors. They still can contain a significant charge.
-
-
-
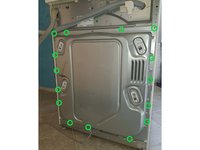
Open the screws marked in green with a T5 Torx
-
Remove the cover. Warning: the edges are very sharp and you can cut yourself easily. Best thing to do is to wear gloves
-
-
-
-
Warning: the area marked in read holds two capacitors. Do not touch anything near this area and avoid touching cables leading from and to this area.
-
The heating element sits within the area marked in green
-
Best thing to do is to take a picture of the heating element wiring, so you can wire the new heating element exactly the same.
-
Remove all cables leading to the heating element
-
Open the nut with the 10mm socket (this loosens the heating element seal)
-
Now you can pull out the heating element carefully. If it is jammed you can use a flat-head screwdriver to loosen it
-
-
-
The old heating element contains a temperature sensor. This sensor can be (carefully) pushed out and be reused with the new heating element
-
Push out the temperature sensor. Warning: do not pull on the cable connector, this can destroy the sensor
-
Now carefully push the temperature sensor into the hole of the new heating element
-
-
-
Push the prepared heating element into the opening
-
Check if the drum can spinn freely and that no grinding noises occur
-
If the drum doesn't spinn freely or there are grinding noises you need to readjust the heating element
-
Tighten the nut with the 10mm socket to spread the sealing
-
Use the previously taken picture to wire up the replaced heating element
-
-
-
Fill some water into the drum and check if any water runs through the sealing of the heating element
-
Close the machine body (see step two)
-
Plug the machine back in and start a washing cycle
-
Unplug the machine after the washing cycle
-
Now re-open the machine and check for any leakage on the new heating element
-
If everything is dry, the machine can be closed again and the repair was successful.
-


That's it. Happy washing! :)
Cancel: I did not complete this guide.
3 other people completed this guide.
Special thanks to these translators:
100%

These translators are helping us fix the world! Want to contribute?
Start translating ›

3 Guide Comments
hallo - vielen dank für die tolle anleitung! ich hab jetzt nach ausbau des heizstabes gesehen, dass auch tief in der öffnung ein metallteil ist, welches wohl in kontakt mit dem heizstab ist. beim reinleuchten mit der taschenlampe sind auch auf diesem teil enorme kalkablagerungen. wie komme ich da ran bzw muss dieses teil auch gereinigt werden? außerdem habe ich in der öffnung eine feuchte stelle gefunden - in der trommel ist aber schon seit 1 woche kein wasser mehr drin! vielen dank für die hilfe, sabrina