
Battery Disconnection

Prerequisite Only
This guide is only intended to be used as a prerequisite for other guides. It's incomplete by itself.

What you need

  1. Battery Disconnection, Back Cover: step 1, image 1 of 2 Battery Disconnection, Back Cover: step 1, image 2 of 2
    • Remove the eight 4 mm T5 Torx screws from the bottom cover.

  2. Battery Disconnection: step 2, image 1 of 2 Battery Disconnection: step 2, image 2 of 2
    • Use a plastic opening tool to pry open the 'XPS' flap in the middle.

  3. Battery Disconnection: step 3, image 1 of 1
    • Remove the single Phillips screw hidden beneath the flap.

  4. Battery Disconnection: step 4, image 1 of 1
    • Use opening picks or a plastic pry tool to pry open the case clips, beginning from the back edge.

  5. Battery Disconnection: step 5, image 1 of 1
    • Remove the bottom cover.

  6. Battery Disconnection, Battery Disconnection: step 6, image 1 of 2 Battery Disconnection, Battery Disconnection: step 6, image 2 of 2
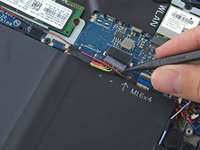
    • Pull the battery cable connector towards the battery to disconnect it from its socket.

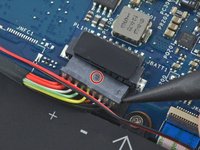
    • If the connector is stubborn, push a little at one side, then the other, to "walk" it out of its socket.

    • If you have trouble walking the connector out of the socket, use the point of a spudger to gently push on the connector indent to slide the connector out.

    • Do not pull up.

    • Open the display and press the power button for five seconds to drain any remaining charge from the system.

Conclusion

To reassemble your device, follow these instructions in reverse order.

Jeff Suovanen

Member since: 08/06/13

427,002 Reputation

259 Guides authored

Team

iFixit Member of iFixit

Staff

136 Members

16,560 Guides authored

0 Comments

Add Comment

View Statistics:

Past 24 Hours: 0

Past 7 Days: 0

Past 30 Days: 0

All Time: 64