Introduction
ご自宅の冷蔵庫のドアシールが弱くなり、正しく閉まらなくなっているのなら、この修理ガイドは最適です。
ドアシールが機能していない場合、ドア全体または冷蔵庫自体を交換する必要があると考えがちです。ですが実際には、交換すべきパーツはドアシールなのです。ほとんどの場合、シールを洗浄して位置を調整するだけで、問題を解決できます。
この修理ガイドではあなたの冷蔵庫のドアシールを取り外して洗浄、再び取り付ける簡単な方法を示しています。
What you need
-
-
プラスドライバを持ってください。
-
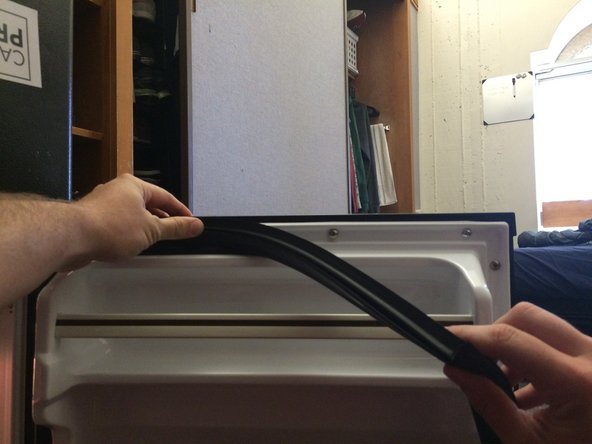
ドアシールを持ち上げると、その下にネジが付けられています。これがシールを固定しています。このネジを緩めますが、ネジを穴からは外さないでください。
-
-


これで冷蔵庫は正しく密閉され、シールはしっかりと固定されるはずです。 正しく機能しているか確認するために、シールが所定の位置にあるか時々チェックしてください。
これで冷蔵庫は正しく密閉され、シールはしっかりと固定されるはずです。 正しく機能しているか確認するために、シールが所定の位置にあるか時々チェックしてください。
Cancel: I did not complete this guide.
59 other people completed this guide.
Special thanks to these translators:
100%


These translators are helping us fix the world! Want to contribute?
Start translating ›
Team

Cal Poly, Team 30-5, Green Spring 2015 Member of Cal Poly, Team 30-5, Green Spring 2015
CPSU-GREEN-S15S30G5
5 Members
31 Guides authored
11 Comments
Love that you show how to fix on a mini fridge! #CollegeLife Thanks for this :)
How can I fix the seals on chest fridge.
How much should the GE repairman charge for this repair? My mother-in-law was told it’ll cost her between $250-$275. I think that’s too much due to the cost of the seal. Does the labor cost account for the extra $200?
CLICK on the link here to help us engineering students to solve Fridge door problems!! https://docs.google.com/forms/d/e/1FAIpQ...
DON'T PUT VASELINE. I've ruined 2 fridges with this, now they're constantly running. You'll need silicon grease. This article is right. If it ain't broke, don't fix it, and &&^& the Vaseline guys
The seal was indeed damaged, but the door is unbalanced. Next repair for my 30 year old fridge.
Thanks for the great guidance.
Buy used support the little guy who refurbish
Thanku so much. It was really helpful. Got my problem fixed by ur advice.
How to fix a fridge or freezer seal: The easy way!
Use Duct tape to hold the door closed while you push (gently crushing the door seal) the door closed as hard as you can easily do. Leave the duct tape on for about 24 hours.
In most cases this will cause the door seal to re-level itself and seal better for a long time to come.
Generally, if a dollar bill placed between the door and the fridge comes out EASILY it means that that spot is not sealing well.