This translation may not reflect the most recent updates from the source guide. Help update the translation or view the source guide.
What you need
-
-
Если стекло дисплея разбито, то в процессе ремонта важно предотвратить его дальнейшее разрушение (которое, кстати, может повлечь за собой серьёзные травмы). Заклейте стекло клейкой лентой.
-
Наложите столько слоёв прозрачной ленты, сколько потребуется. Дисплей должен быть заклеен полностью.
-
-
-
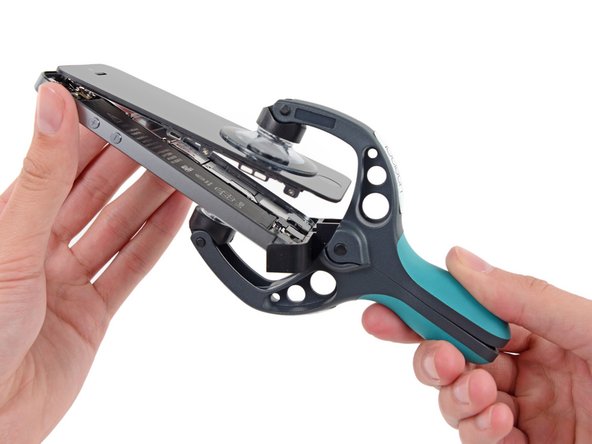
Откройте «челюсти» с присосками, сведя ручки iSclack вместе.
-
Поместите iPhone между присосок, вложив его в пластиковый ограничитель.
-
Верхняя присоска должна оказаться чуть выше кнопки Home.
-
Сведите присоски вместе, разведя ручки. Крепко прижмите присоски к передней и задней панелям iPhone.
-
-
-
-
Удалите два винта, фиксирующих металлический держатель коннектора батареи на материнской плате:
-
Один крестовой 1,8 мм (Philips)
-
Один крестовой 1,6 мм (Philips)
-
-
-
Используйте диэлектрическую лопатку, чтобы подцепить коннектор сотовой антенны от материнской платы (рядом с динамиком).
-
-
-
Удалите винты, фиксирующие модуль разъёма Lightning и коннектора наушников на корпусе:
-
Один крестовой 2,5 мм
-
Два крестовых 3,3 мм
-
Один крестовой 2,9 мм
-
Два крестовых 1,5 мм
-
Один крестовой 2,8 мм
-
-
-
Аккуратно потяните динамик от шлейфа коннектора Lightning.
-


Следуйте этим инструкциям в обратном порядке, чтобы собрать устройство.
Следуйте этим инструкциям в обратном порядке, чтобы собрать устройство.
Cancel: I did not complete this guide.
512 other people completed this guide.
Special thanks to these translators:
18%

Jasper Fleischhauer is helping us fix the world! Want to contribute?
Start translating ›

67 Comments
Just a quick note that if you're doing this teardown because your iPhone 5 isn't charging unless you apply some force to the Lightning cable, the problem may simply be some lint or other crud in the Lightning port. Blow some compressed air in there before you disassemble your iPhone and see if it solves the problem - it did for me.
ifixed my i5 by cleaning the port too (was just about to buy the kit!). I found a paper clip done the job perfectly.
Cheers, Adam Engst.
Also found dirt was the only fault with a number of 5's.
Gary -
Well I bought the replacement first and then realized about the dirt. I removed the dirt and it is now working again. I guess after 2 years the thing accumulates quite a bit of dust.
esleep -
THANK YOU for your comment, Adam, and the others that took the time to confirm it worked for them. Thankfully I read it before attempting this repair on my iPhone 5S. It took only 10 seconds with a very skinny (<1 mm) screwdriver, scraping the deep edge of the port, and I pulled out a wad of pocket lint that was about the size of a pea when uncompressed. A paperclip would have done the job. Charger works perfectly now.
Erin S -