
USB-C Replacement Port Part#
Looking for part number of a replacement usb-C port for the retroid pocket 3.
Is this a good question?
Score
1

Rep: 23
![]() 2
2
Looking for part number of a replacement usb-C port for the retroid pocket 3.
Is this a good question?

Rep: 55
![]() 4
4

4 T5 screws at the back, then use a pick to pry the shell off via the microSD slot.

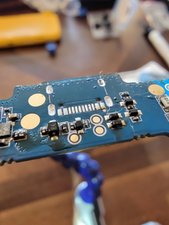
remove green ph00 screws, leave yellow. remove shield.
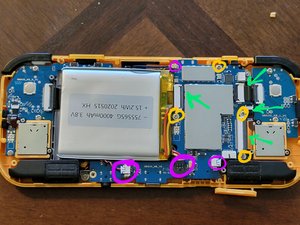
Remove yellow ph00 screws, un-plug purple cables, lift black ribbon socket latches and carefully slide them out. I accidentally ripped my left joystick ribbon doing this, but thankfully you can replace them with Nintendo Switch joysticks. The rubber caps can be shoved through the Retroid frame with a tiny bit of dish soap as the cap is slightly larger than OEM.
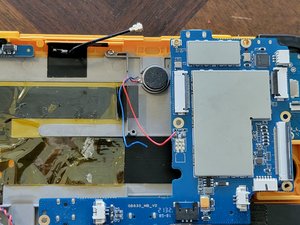
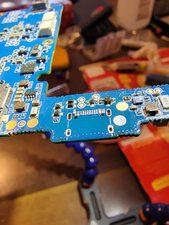
Carefully pull up the battery. It is adhered directly to the kapton tape that is preotecting the large ribbon cables below it which is not repair friendly, but you can push down on the tape as you start to get the battery up so that the cables don't get damaged. The tiny blue and red cables for some sort of sensor attached to the back of the display are easy to pull off here, and they need to be de-soldered anyway to detach the motherboard from the front assembly.
I watched some videos on how to de-solder USB-C ports, and after trying it with my iron, I realized that you absolutely must use a hot air rework station to heat the whole assembly at once or else you won't be able to detach the port. You will need that tool and some good paste flux in a syringe for precise application.
I was SHOCKED at just how much heat it took to remove the old port, I think I had it up around 440c at low fan speed, and couldn't get it to liquefy until I absolutely blasted it right up close and it totally damaged the broken port. This did work though.
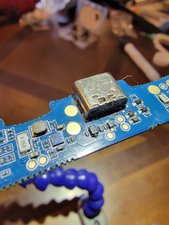
Then you need to use a solder sucker and some solder braid and paste flux to clear out the through holes in the PCB, and add some solder carefully to each of the 16 pin pads without bridging them. I was using a 2x donegan visor and it honestly wasn't enough. My phone's macro lens was able to capture the details more than I could see them.
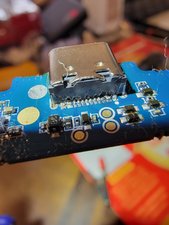
Here's the new C port installed. Please excuse the Q-Tip fiber mess. I decided to carefully solder each pin to their pads with my iron, as the hot air station was scary in the way of how much heat it took to get the old one off. I think this was a mistake though, as even with my smallest tip I believe I didn't get them all 100% perfectly separated. I reassembled everything and plugged it in and it charges correctly, but I couldn't get it to mount as a drive on my computer like it used to. I'd call it a win though, since I can use the SD card to move data around, and it otherwise works as expected. I found this project to be very difficult, but I learned quite a lot. I'm baffled as to how some of those Youtube videos showing the C port coming off so easily with the hot air station though.
I hope this helps someone, let me know if you have any questions.
Was this answer helpful?
Awesome job Luke. Appreciate your help.
Let me know how it goes for you! Perhaps they will be able to repair it for you somehow.
Fixed mine. I ordered the Amazon usb-c ports you had linked as well as a couple from Sparkfun (which still haven’t arrived a month later). It charges, boots, and connects to pc. I did find the Amazon ports a bit on the lower quality end of the spectrum, but it did the trick.
The most difficult part for me was clearing the solder out of the post holes! Got it done in the end though so all good.
Great job! I agree, that solder didn't want to clear out. It took me a lot of tries with a solder sucker. Did you use the heat gun to re-solder the port?
Used heat gun and iron for port. Cleaned pads and applied solder with iron. Set port with heat gun set at 250C (I had it at 400 to remove it). I initially had two shorted pins, so did some touch up with iron after.
Rep: 55
![]() 4
4
One of my kids' ports is also broken, I contacted Retroid just before the weekend and am planning on disassembling his unit to check it out. I'll post what they say, but I'll bet they treat these as a new board replacement (which is a problem since they no longer even have the 3 or the 3+ upgrade PCB in stock). I'm thinking that this one from Sparkfun might be a match, as it looks like a four through-hole stabilized surface mount C port: https://www.sparkfun.com/products/15111
I'll post more once I can take a look at the front of the board, I can't find my magnet sheet or pen, and there's no defined guide for this device yet - which makes me sort of want to spend the time making a guide with some photos as I go. I'm just tight for time.
Was this answer helpful?
Did you ever get a response back from retroid?
I was told that they no longer have motherboards for the pocket 3, but that they might be willing to offer me a discount if I asked about another newer unit when I contacted sales@goretroid.com. Because of this I figured it was a no lose situation to try the repair. I later found a guy named ChrisCovers on reddit who apparently fields repairs for the US market and he said that there is a one year warranty, and to submit a request just in case on the discord server.
Join Retroid's Discord channel: https://discord.com/invite/WHqP2pNKzj
accept the rules, then submit a repair request using the instructions in the Customer Support channel.
Port I used: https://www.amazon.com/dp/B07L3LW65Y
Flux I used: https://www.amazon.com/dp/B0BXM1GF3Y
Past 24 Hours: 1
Past 7 Days: 17
Past 30 Days: 65
All Time: 1,339