
Free Shipping on Domestic Orders $75+

Charging station for the Dualsense PS5 controller.

Dualsense Charging Station Tear Down Guide

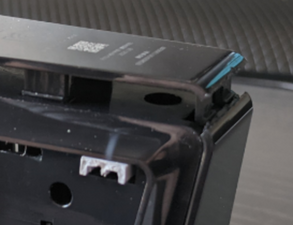
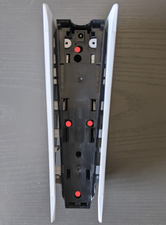
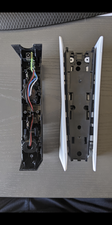
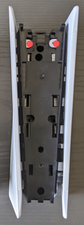
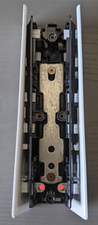
One of the charging ports on my charging station is no longer working. I think one of the metal contacts that is supposed to spring up is trapped in the plastic housing. Does anyone know how to open this thing so I can try and re-seat it?

Thanks!

Answer this question I have this problem too

Is this a good question?

Score 10
2 Comments

I have the same issue too...

Can you make a teardown video in order to get to the broken metal contact

by

Does anyone know where to get replacement spring connectors or prongs?

by

Add a comment

4 Answers

Most Helpful Answer
  1. Take DualSense charger and front facing you, turn over so the bottom is up. Locate seam where plastic meets plastic and use wedge to open and pop the plastic internal clips.
Block Image
  1. Slowly lifting and working your way back, pull up and release clips to remove bottom piece.
  2. Remove four screws that hold the base to the charging ports and separate.
Block Image
Block Image
  1. If you want to further remove the side plates, remove the two screws located in the following two locations.
Block Image
Block Image
  1. Once all four are removed, slowly pull back on side panels to release the plastic clips that hold on side panels.
  2. Basic teardown complete!

Was this answer helpful?

Score 9

1 Comment:

This is awesome that the guide is helping in different ways. I wrote my teardown because I hated the white color and wanted to paint it black.

by

Add a comment

I got one of these that was thrown out at my local gamestop because they said it wasnt charging. I had the same problem where one of the pins was not being exposed when the plastic part moves down. I just used a box cutter knife and used the edge to bend the flattened pin upwards so that it was poking out again. Dont bend them too much because i think they need to make contact with the metal underneath the plastic but just enough to get them poking up again.

You could probably use a tweezers or other small metal instrument to do this as well.

I didnt need to disassemble. It seems like its easy to fold them under the plastic housing that the controller pushes down to expose the connectors.

Unplug the unit before doing this, to be safe.

Was this answer helpful?

Score 1
Add a comment

I know this is old but I have just managed to repair my dock which had a broken spring contact and i didn't find much help. I used a pogo pin from Aliexpress:

https://a.aliexpress.com/_EI7E3K6

SMD type 5mm height.

I had to widen the plastic housing a bit so it could fit through but it works.

Block Image
Block Image
Block Image

Was this answer helpful?

Score 1

3 Comments:

I don't know how they didn't use this contact type by default...

Thanks a lot.

by

Did you solder it on the board instead on previous connector, or used base of connector and soldered pogo pin on it ?

by

I soldered it directly onto the board (I entirely removed the old contact with a hot air rework station)

by

Add a comment

I had the same problem, but when I tried to free the contact pin from the plastic cover it snapped. It's quite brittle metal. I was able to disassemble with the above guide and solder a bit of copper wire to the base of the contact and now it's working again. The contact base takes solder easily.

Was this answer helpful?

Score 0
Add a comment

Add your answer

TT_El_Barto will be eternally grateful.
View Statistics:

Past 24 Hours: 9

Past 7 Days: 69

Past 30 Days: 373

All Time: 10,697