Introduction
The AR.Drone is earth-shattering. It has blown away every drone expert we've talked to. It's not just a toy: it's a phenomenal piece of engineering that manages to solve some very difficult software problems in order to take flight. Hidden beneath the foam fascia lies some very sophisticated electronics, all of which makes flying the quadricopter very seamless. We were quite interested in seeing exactly what components Parrot used to make their awesome flying device.
This holiday season, let’s encourage repair and reuse rather than buying more things we don’t need and won’t last. With our friends at Wired, we’re running a toy repair contest. We’re giving away a ton of awesome tools, so make sure to get started on your entry right away!
What you need
-
-
The Parrot AR.Drone remote-controlled quadricopter recently landed on our teardown table.
-
What's cooler than one quadricopter? Two quadricopters, of course! The AR.Drone comes with two hulls: an indoor unit with guards over the propellers (grey/white) and an outdoor unit (orange/blue).
-
You might notice the lack of a controller with this awesome gadget. That's because the controls are managed via an iPhone, iPod Touch, or iPad by using AR.Free Flight, an application available for download in the Apple App Store.
-
Android users can now enjoy the AR.Drone Android app from the Market!
-
-
-
Talk about repair-friendly; opening up the AR.Drone doesn't even require a screwdriver. (Compare this with some recent devices we have torn down!)
-
The hull is attached to the body by a pair of magnets; one in the hull and one on the body.
-
Much of the AR.Drone's body is made of expanded polypropylene (EPP), a common substance that is both extremely light and easily manufactured into complex shapes.
-
-
-
The 1000mAh 11.1V lithium polymer battery is attached via a connector, making it delightfully easy to remove.
-
The second connector is a balance charge connector, which ensures that each of the three battery cells is charging equally, thus optimizing capacity and prolonging battery life.
-
The battery contains a protection circuit module, which prevents it from discharging too rapidly, over charging, or short circuiting.
-
Parrot claims the battery will only last about 12 minutes after a full charge, which takes around 90 minutes. Taking your AR.Drone out to the park with only one battery won't get you much play time, unfortunately.
-
-
-
The two large mesh cylinders make up the ultrasound altimeter, which stabilizes the quadricopter within 6 meters of the ground.
-
The back side of the navigation board contains the Microchip PIC24HJ16GP304 40MHZ 16-bit microprocessor.
-
The MEMS gyroscope, the Invensense IDG 500, is also found on this board.
-
-
-
-
Each propeller assembly is made up of the propeller blade, gear, motor and motor controller board.
-
These are not your run-of-the-mill propellers. The design team behind these won a micro drone design contest put on by the French Army.
-
The propellers spin in different directions depending on the side they are mounted on, and are marked either C (clockwise) or A (anti-clockwise).
-
-
-
The four motors and their electronic controllers are each held to the central cross by six screws and a connector.
-
Each brushless motor runs at 28,000 RPM while the AR.Drone is hovering, and as fast as 41,400 during full acceleration.
-
The speed of the motor is managed by the electronic controller, which includes an 8-bit microcontroller and a 10-bit ADC.
-
-
-
A little bit of prying and the front-facing VGA camera comes right off.
-
The 93 degree wide-angle camera can stream its video and images directly to your iPhone, iPad, or iPod Touch.
-
With a resolution of 640x480 pixels, we doubt anyone will be filming HD movies with the AR.Drone's camera.
-
With Augmented Reality, objects captured by the camera become part of the AR.Flying Ace game.
-
-
-
The central cross easily pulls right out of the foam shell.
-
The two sets of wires in the central cross are responsible for controlling and providing power to the four motors.
-
The tubes of the cross are made of carbon fiber to save weight and provide plenty of structural rigidity.
-
The other plastic pieces are made of polyamide 6,6 (PA66), more commonly known as nylon.
-
-
-
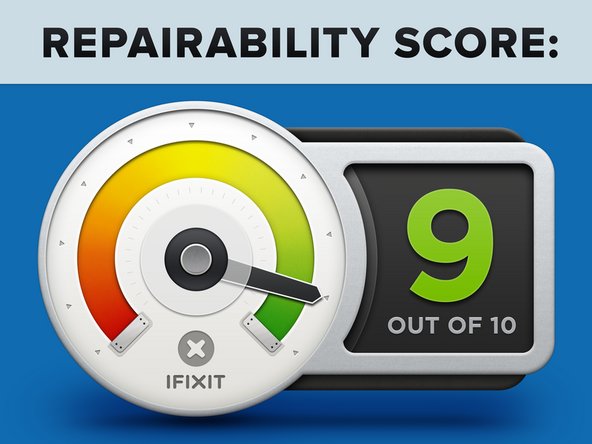
Parrot AR.Drone Repairability: 9 out of 10 (10 is easiest to repair).
-
The battery and upper case come off easily without removing a single screw.
-
Almost everything is attached via ribbon cable connectors and screws, making replacement much more feasible.
-
Parrot provides replacement parts and repair videos for common problems. Repair wouldn't be very easy without both of these.
-
The c-clips on each propeller assembly are very hard to remove without the correct tool.
-
It's a pain to reapply adhesive after removing all the adhered parts.
-


12 Comments
Thanks for the teardown. Now if only they made it Android friendly this would be worth getting for me.
Turn off your data connection
Just wondering what dose the connection look like for the camera to the mouther board, and is the connection the same for the ardrone 2
Love the Parrot AR 2.0! But it's a pricey fix... So before you take on this drone you should master the UDI U818A. It's really easy to fly and extremely cheap. If you're a beginner you should check out this review. It helped me make my decision...