Introduction
Well, we went for it. After forking out a bank-account-devastating $530, we have the Superphone in hand! Keep your eyes peeled as we tear this baby apart.
After all was said and done, we made a video slideshow of it as well. Enjoy!
What you need
-
-
The Nexus One, manufactured by HTC, is the latest and greatest Android phone. It sports:
-
A 1 GHz Qualcomm (QCOM) Snapdragon processor.
-
A 3.7" 480x800 widescreen WVGA AMOLED display.
-
A 5MP digital camera w/ LED flash that also records .mp4 video.
-
802.11n wireless capability for when you can't depend on 3G.
-
7 hours of 3G talk time from a removable 3.7V, 1400 mAh lithium battery.
-
The box's color scheme kind of looks like Google's.
-
Pawning apps on the clear plastic protective sleeve? Guess the app store really is that desperate.
-
-
-
The upper circuit board is held in place by another Phillips screw.
-
After removing the screw, maneuver the upper board past the two metal clips holding it in place and lift it out of the phone body.
-
The large black-coated foil section is the data connection between the two main circuit boards.
-
-
-
After some trying moments with a few tools of destruction, we figured out the bottom cover can simply be popped off with a plastic opening tool.
-
Guess what? We found more screws.
-
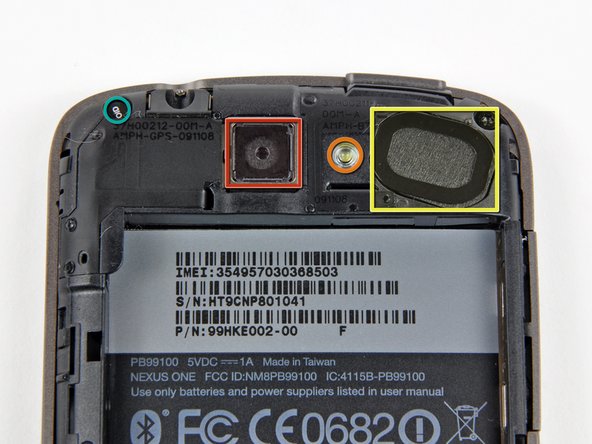
This phone uses many foil antennas attached to the several plastic internal frame pieces.
-
-
-
-
With a quick pry of the plastic opening tool, we found that the black plastic frame slightly envelops the lower side of the logic board.
-
And just like that, the plastic frame snaps off, revealing the lower logic board.
-
It's quite a colorful phone on the inside. We've got oranges, greens, yellows, dark grays, and all sorts of fun stuff!
-
-
-
The Nexus features a 3.7-inch (diagonal) widescreen WVGA AMOLED touchscreen.
-
The Nexus display features a resolution of 480 x 800. That's a few less pixels than Motorola's Droid (480 x 854), but far more than the iPhone 3GS (320 x 480).
-
-
-
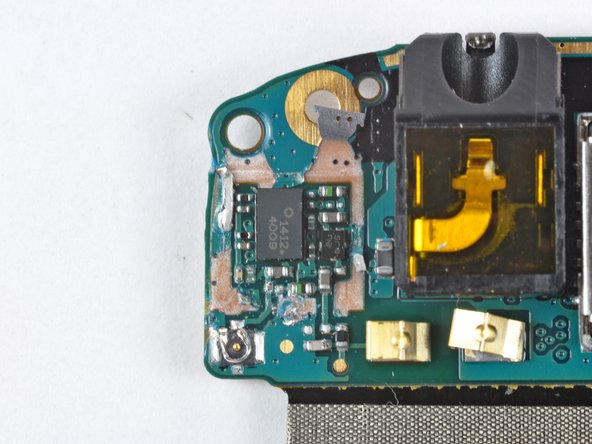
A list of the chips we've identified so far:
-
Samsung 943 KA100O015M-AJTT
-
Skyworks (SWKS) SKY77336 GSM power amplifier (labeled SKY77336-21 3888833 1P 0940 MX)
-
Qualcomm (QCOM) PM7540 power management chip (labeled PM7540 AH43510 C4944001)
-
The TI (TXN) TPS65023 integrated Power Management IC (labeled TPS65023 TI 9AJ P675 G4)
-
-
-
Qualcomm (QCOM) appears to be the big winner on the Nexus. We've found at least three of their chips in here already.
-
On the left is a RTR6285 RF transceiver.
-
The large chip on the right is the nexus of the Nexus. It's a Qualcom (QCOM) QSD8250 "Snapdragon" 1 GHz ARM processor.
-
The small chip between the two Qualcomm (QCOM) chips is an Audience A1026 voice processor, including ambient noise cancellation.
-
-
-
The Bluetooth and 802.11n wireless is provided by a Broadcom (BRCM) BCM4329 chip.
-
The 802.11n capability gives the Nexus an advantage over the iPhone 3GS, which only has 802.11g connectivity. The Broadcom (BRCM) chip in the Nexus is the same chip we found in Apple's newest (3rd generation) iPod touch.
-
The package is labeled BCM4329EKUBG CD0942 P21 937322 SEA
-
-
-
Three more chips.
-
Unfortunately these were located underneath soldered EMI covers. For the sake of science and gadget lovers everywhere, we had to be a little forceful to get these covers off.
-
Using the Nexus One post-teardown just became very iffy. Previous to this step, we felt good about its functionality, but no longer...
-


11 Comments
Quote from Dan:
Anyone know if there's a chip from Dialog Semiconductor in there?
There is one in the IPAD.
Very helpful, I made a unit from 2 broken ones. Thanks