What you need

This teardown is not a repair guide. To repair your MacBook Pro 15" Unibody Late 2008 and Early 2009, use our service manual.

  1. MacBook Pro 15" Unibody Teardown, MacBook Pro 15" Unibody Teardown: step 1, image 1 of 1
    • The new, 37 percent friendlier-to-squirrels and tree-frogs MacBook Pro box. Yay for pallet density! Oh, and it's heavier than it looks.

    • Follow our updates on twitter.

  2. MacBook Pro 15" Unibody Teardown: step 2, image 1 of 1
    • Old on the left, new on the right.

    • The keyboard is now more similar to the old MacBook than the previous MacBook Pro. While the unibody case is very cool, this is going to make keyboard repair difficult.

    • That screen isn't just glossy, it's a mirror!

  3. MacBook Pro 15" Unibody Teardown: step 3, image 1 of 1
    • New, rounded bottom. And a much darker plastic wireless window.

    • In the box:

    • In an insane move, there is no video adapter included. I don't care if DisplayPort is an industry standard or not, I just paid $2161.92 for a computer that won't plug into any monitor Apple has shipped to date! But Apple is happy to sell you one for $29.00!

  4. MacBook Pro 15" Unibody Teardown: step 4, image 1 of 1
    • The holes in the speaker grill are significantly smaller, making the upper case surface feel smoother.

  5. MacBook Pro 15" Unibody Teardown: step 5, image 1 of 1
    • Ports, left to right:

    • MagSafe Power Port

    • Gigabit Ethernet Port

    • Firewire 800 Port (FW 400 with optional cable)

    • USB Port X2

    • Mini DisplayPort

    • Audio Line-in , Audio Line-out

    • ExpressCard/34 Slot

  6. MacBook Pro 15" Unibody Teardown: step 6, image 1 of 1
    • Removing the battery cover.

    • Aww, look at the cute little Apple logo.

  7. MacBook Pro 15" Unibody Teardown: step 7, image 1 of 1
    • Remove one Phillips screw to release the hard drive bracket. The screw is held captive to the bracket.

    • Remove the four T6 screws securing the hard drive.

    • Replacing the hard drive is significantly easier on this machine than the previous MacBook Pro.

    • This machine uses the same, industry standard SATA notebook drives as previous MacBook Pro and MacBook models.

    • Shameless plug: Of course, you can upgrade the hard drive in any Apple laptop. We have free guides for every model that makes hard drive replacement easy.

    • Kudos to Apple for making this easy. Keeping repair costs down is probably the most environmentally friendly thing Apple has done with this machine.

  8. MacBook Pro 15" Unibody Teardown: step 8, image 1 of 1
    • The first step to opening this machine is removing the bottom plate.

    • Remove the following 8 screws:

    • Let's see what's creating all that torsional rigidity that Jony Ive keeps talking about.

  9. MacBook Pro 15" Unibody Teardown: step 9, image 1 of 1
    • We're inside!

    • Disassembling this laptop is reminiscent of the old PowerBook G4 Titanium models, and very similar to the MacBook Air.

    • You remove the bottom plate, and everything is screwed into the upper case. The case is now Apple's custom-machined unibody enclosure.

    • The interior is cleaner and flows together better than the previous Pro.

    • Cable routing from various parts of the case to the logic board is simpler in this than the new MacBook because Apple had more room to play with.

  10. MacBook Pro 15" Unibody Teardown: step 10, image 1 of 1
    • Removing the two 1 GB DIMMs. These chips are a new RAM type for Apple, 1066 MHz DDR3 SDRAM.

    • Apple claims this machine maxes out at 4GB RAM, but the Montevina chipset appears to support up to 8GB.

    • Shameless plug: You can upgrade your existing MacBook or MacBook Pro to 4 GB. We'll also be offering the RAM for the new Unibody machines in the near future.

  11. MacBook Pro 15" Unibody Teardown: step 11, image 1 of 1
    • We're going to remove the optical drive next.

    • Disconnect these two connectors.

  12. MacBook Pro 15" Unibody Teardown: step 12, image 1 of 1
    • To free the Superdrive, remove the following 3 screws

  13. MacBook Pro 15" Unibody Teardown: step 13, image 1 of 1
    • Liberating the optical drive from the confines of this beautiful machine.

  14. MacBook Pro 15" Unibody Teardown: step 14, image 1 of 3 MacBook Pro 15" Unibody Teardown: step 14, image 2 of 3 MacBook Pro 15" Unibody Teardown: step 14, image 3 of 3
    • The optical drive is SATA for the first time. Panasonic model #UJ878A.

    • The superdrive in the last model was ATA, model #UJ857.

    • You can see the different connectors in the middle picture. The new, SATA connector is on top.

    • The rightmost photo is a shot of the new drive label.

  15. MacBook Pro 15" Unibody Teardown: step 15, image 1 of 1
    • Pry the two fan connectors up off their sockets on the logic board.

    • Remove the following 6 screws:

    • Three 3.1 mm Philips screws.

    • Three 3.7 mm Philips screws.

  16. MacBook Pro 15" Unibody Teardown: step 16, image 1 of 1
    • Removing the two cooling fans.

    • Apple has long used a unique fan design with a high number of fan blades. This allows them to achieve moderate airflow with low RPM. The slower the fan spins, the quieter it is.

  17. MacBook Pro 15" Unibody Teardown: step 17, image 1 of 1
    • There are a number of ribbon cables to disconnect from the logic board.

  18. MacBook Pro 15" Unibody Teardown: step 18, image 1 of 1
    • Remove the following 11 screws:

    • While our circles make it look like there are a lot of screws, this machine appears to have fewer screws than the previous MacBook Pro. These screws all attach directly to the solid-piece upper case, which should simplify maintenance a bit.

  19. MacBook Pro 15" Unibody Teardown: step 19, image 1 of 1
    • Removing the logic board.

    • We're noticing a lot of hardware similarities between the MacBook Air, new Macbook, and this MacBook Pro.

    • Apple has taken their new manufacturing approach to heart, and is using the flexibility it provides to standardize as much of their design as possible.

  20. MacBook Pro 15" Unibody Teardown: step 20, image 1 of 1
    • The top of the logic board, with the heatsink still attached.

  21. MacBook Pro 15" Unibody Teardown: step 21, image 1 of 2 MacBook Pro 15" Unibody Teardown: step 21, image 2 of 2
    • Logic board top with heatsink removed.

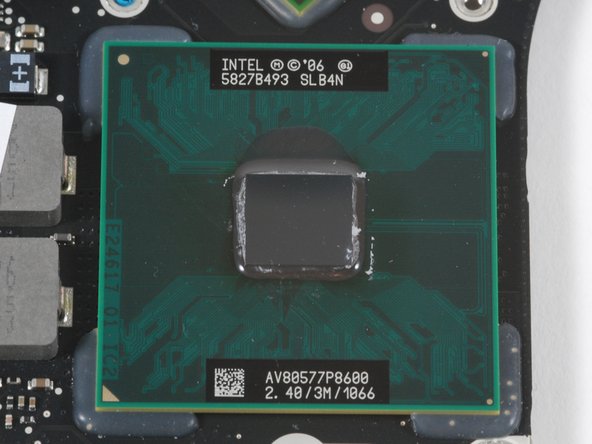
    • The large chip on top is the Intel 2.4 GHz Montevina processor. It has 3M L2 cache and a 1066 MHz bus. Markings: 5827B493 SLB4N AV80577P8600

    • The other two large chips are Nvidia graphics chips.

    • We'll post part numbers as we identify them.

  22. MacBook Pro 15" Unibody Teardown: step 22, image 1 of 1
    • Logic board bottom.

  23. MacBook Pro 15" Unibody Teardown: step 23, image 1 of 2 MacBook Pro 15" Unibody Teardown: step 23, image 2 of 2
    • Here are the two Nvidia chips! They occupy a significant amount of the logic board. There's no way both of these puppies could fit in a MacBook Air.

    • The first chip is marked 37N3C2 0836B2 PB6623.S03 MCP79MXT-B2. This is the GeForce 9400M, also serving as a northbridge.

    • The second chip is marked U807B034 0827C1 NH7962.01W G96-632-C1. This is the GeForce 9600M GT, which has 32 processor cores and is capable of 120 Gigaflops.

  24. MacBook Pro 15" Unibody Teardown: step 24, image 1 of 1
    • Continuing the disassembly, we're going to remove the display assembly.

    • Remove six 6 mm T-6 Torx screws near the hinge.

  25. MacBook Pro 15" Unibody Teardown: step 25, image 1 of 1
    • Removing the lower display bezel.

  26. MacBook Pro 15" Unibody Teardown: step 26, image 1 of 1
    • Removing the Airport card.

    • Disconnect the antenna connector and the data cable.

    • Remove the two screws.

    • The Bluetooth cable disappears into the display, and our sources tell us that it's sandwiched between the glass and the metal case. This means that if your Bluetooth goes out, you may have to replace the entire display!

  27. MacBook Pro 15" Unibody Teardown: step 27, image 1 of 1
    • Airport card (the pink is a thermal pad).

  28. MacBook Pro 15" Unibody Teardown: step 28, image 1 of 1
    • The "unibody" upper case assembly.

    • This case assembly includes the keyboard, glass trackpad, and ribbon cables.

    • While the manufacturing of the case is sexy, our sources say that Apple is treating this as a single replaceable part. This means that if you break a key on the keyboard, you'll have to replace the entire upper case. That could get very expensive.

  29. MacBook Pro 15" Unibody Teardown: step 29, image 1 of 1
    • In an attempt to save a lot of people a lot of money, we're going to try removing the keyboard from the upper case.

  30. MacBook Pro 15" Unibody Teardown: step 30, image 1 of 1
    • The keyboard is secured by lots of tiny black Phillips #000 screws. We're removing ALL of them.

  31. MacBook Pro 15" Unibody Teardown: step 31, image 1 of 1
    • OK, we got them all out. There are 56 screws on the keyboard, plus two on the power button.

    • This is looking promising!

  32. MacBook Pro 15" Unibody Teardown: step 32, image 1 of 1
    • We got it off! Phew. It took about 15 minutes to remove all the screws.

    • It looks like users may be able to repair their own keyboards after all! Great news for the heavy-handed and spill-prone.

  33. MacBook Pro 15" Unibody Teardown: step 33, image 1 of 1
    • Wow! What an incredible machine. We are very impressed by the ease with which the new MacBook Pro came apart. This machine should be a joy to work on.

    • Bottom left: hard drive and battery.

    • Top: Display

    • Center: Logic board, fans, and speakers

    • Bottom-center: subwoofer, optical drive, RAM, and heatsinks.

    • Right: Custom-machined unibody upper case and keyboard.

    • Here's a high resolution image.

    • Looking for more pictures? We've also disassembled the new MacBook.

7 Comments

Can you offer a printable version of this article as a single page?

casemon - Reply

Quote from casemon:

Can you offer a printable version of this article as a single page?

that would be great

iPhoneGS - Reply

What is the reparability score on this one?

Dark Knight - Reply

is it possible to replace the memory cage after a spring holder part broke? There are 4 screws but after I took them out it was taking too much pressure to attempt to undo it unless I knew it was supposed to and which way it was supposed to go, Forward, Backward or up? Seems stupid to have to replace the whole logic board just to replace the plastic spring memory holder

Bill Pennock - Reply

I remember when I decide to remove the keyboard for my 2009 13" macbook pro "only for fun" hahaha

juanmanuel1236 - Reply

Add Comment

View Statistics:

Past 24 Hours: 2

Past 7 Days: 28

Past 30 Days: 138

All Time: 720,070