Introduction
Apple just expanded their Retina family. The newest bundle of joy: a 13'' MacBook Pro with Retina display. It's small, it's sleek, and all those pixels are pretty darn snazzy. What goes best with a new gadget? Yep, you guessed it: kittens.* So, for this teardown, we brought in the big guns.
Can't get enough teardowns…or kittens? Follow us on Twitter, or check us out on ye olde Facebook to keep up with all the latest iFixit news.
*No kittens were harmed in the making of this teardown.
What you need
-
-
The 13" MacBook Pro has received the Retina display treatment! Let's see what it's packing.
-
13.3" 2560x1600 pixel (227 ppi) Retina display
-
2.5 GHz Intel Core i5 processor
-
128 or 256 GB flash storage
-
8 GB DDR3L onboard RAM
-
Thunderbolt, USB 3.0, and HDMI I/O
-
Intel HD Graphics 4000
-
-
-
We normally charge top dollar for pictures of kittens, but today you can have these wallpapers for the low, low price of $free. They're the right resolution (aka 2560 x 1600) for your 13" MBP con Retina Display.
-
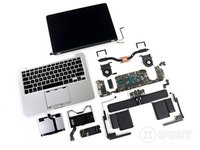
Devices from bottom to top:
-
13" MacBook Pro Early 2011
-
13" MacBook Pro Retina Late 2012
-
21-Day-Old Kitten Late 2012
-
-
-
This Retina MacBook Pro has the model number A1425. Does that model number look unfamiliar to you? Us too!
-
Another new MacBook Pro Model number?! We haven't been this excited since the last time Apple gave out a new model number to Big Brother Retina.
-
Enough with the completely redesigned outside…let's get inside!
-
-
-
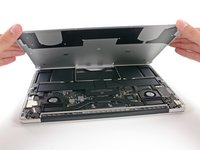
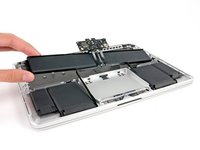
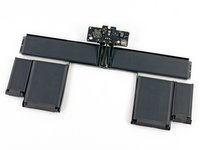
We open it up to find…
-
…a grumpy face?
-
It's a familiar face, though it seems to be missing some teeth. There is definitely a battery design change, specifically the migration of two battery cells off of the trackpad. We will examine this more later, but it appears that the trackpad will be a little easier to replace this time around.
-
Grumpy kitten glares back at the grumpy-faced MacBook Pro Retina, likely reminiscing on Retina displays past.
-
-
-
Service only by an Apple Cert— ya, we've seen it again, and again, and again.
-
Just as we've said time after time, we have the right to remove 'Do Not Remove' stickers.
-
-
-
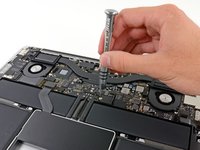
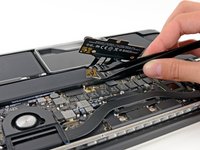
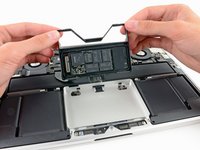
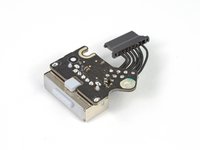
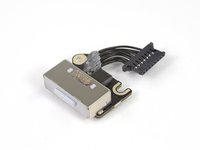
As always, we start by disconnecting the battery, a simple task that requires no more than releasing a conn—wait, what is this?
-
Instead of the good ol' run-of-the-mill battery connector that we've seen in most other Apple laptops, the battery is connected using several screws that hold a connector board in place.
-
This little PCB serves only as a bridge between the battery control board and the logic board.
-
…weird?
-
-
-
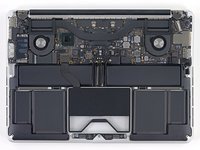
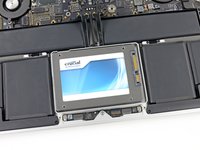
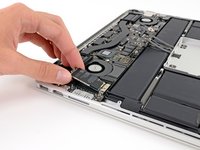
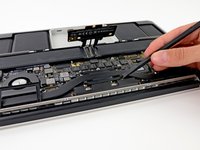
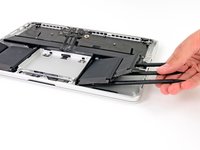
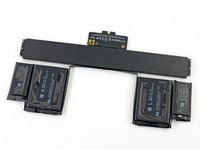
The most striking layout change resulting from the shrink from a 15" to 13" form factor is the rearranged battery cells. This allowed Apple's designers to cleverly tuck the SSD away underneath the trackpad assembly.
-
The empty space next to the SSD is very un-Apple. It's not like them to leave big air gaps in their newest, sleekest designs.
-
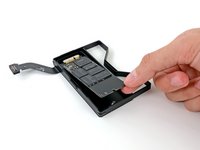
Our first thought was that a standard 2.5" laptop drive might fit in this space, and it almost looks like this little nook was designed with that in mind.
-
Our 9.5mm Crucial SSD didn't allow the bottom cover to be closed, but just by a smidge. We'll see if a 7 mm or 5 mm super-slim hard drive could be incorporated into the space.
-
-
-
-
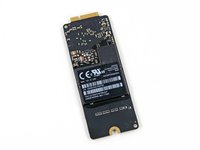
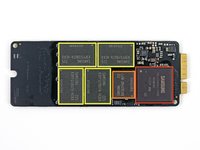
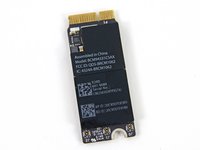
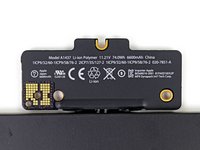
Let's take a closer look at the 256 GB SSD that came in our MacBook Pro.
-
It's a Samsung MZ-DPC2560/0A2 unit, rated at 3.3 volts and 2.39 amps. The serial number reads S0X5NYAC703706.
-
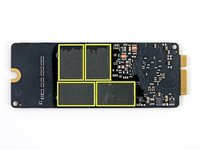
Samsung S4LJ204X01-Y040
-
Samsung K4T2G31QF-MCF7
-
Samsung K9FGY8UA7A-HCKO 32 GB NAND flash (8 x 32 GB = 256 GB)
-
-
-
Out comes the AirPort card. The card is now placed outboard from the right fan, and is the exact same model as found in the 15" MBPr (model number BCM94331CSAX).
-
The AirPort card may be the same as our last Retina teardown, but do you know what's different about this teardown?
-
Kittens, that's what.
-
-
-
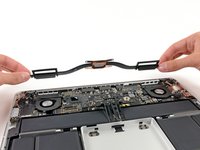
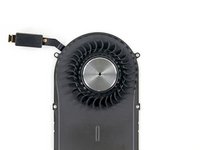
♫ It's gettin' hot in here (so hot), so take off all your heat sinks. ♫
-
All one of them, that is! The heat sink has been slightly scaled down to fit the smaller 13" Retina display, but the design looks very similar to its predecessor, including the two rubber heat sink covers.
-
-
-
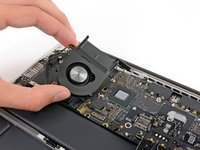
These fans are great. More specifically, their asymmetrical blade spacing is great at breaking up annoying air patterns that symmetrically-spaced fan blades might generate. This provides users with quieter fans.
-
They are probably pretty good at cooling the computer down, too.
-
While these fans are pretty cool, they can't be removed without first taking out the heat sink, which means you'll have to bust out your Arctic Silver in order to perform the job properly.
-
-
-
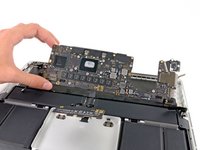
And just like that, out comes the logic board.
-
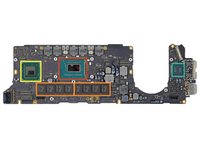
Front side of the logic board:
-
Intel Core i5-3210M 2.5 GHz processor (Intel HD Graphics 4000 and Turbo Boost up to 3.10 GHz)
-
Hynix H5TC4G83MFR DDR3L SDRAM (8x4 Gb front and back for a total of 64 Gb or 8 GB)
-
Intel BD82QS77 platform controller hub
-
Intel DSL3510L Thunderbolt controller
-
-
-
Here's a look at the flipside:
-
Texas Instruments Stellaris LM4FS1AH microcontroller with integrated ARM core
-
Hynix H5TC4G83MFR DDR3L SDRAM
-
SMSC USB2512B USB 2.0 Hub Controller
-
Cypress Semiconductor CY8C24794-24L programmable SoC
-
Maxim MAX15119 Apple-specific IMVP7 CPU/GPU power controller
-
Cirrus Audio 4206BCNZ audio controller
-
Texas Instruments TPS 51980
-
-
-
Apple has been on a roll with new I/O connectors lately. We first saw MagSafe 2 in the MacBook Air and Retina models released this summer, and now their mobile devices have ditched the 30-pin dock connector in favor of the Lightning connector.
-
It's only a matter of time until Apple decides to replace the MagSafe 2 connector with the Kitten connector.
-
-
-
Okay, deep breath. We are going to attempt to remove the battery.
-
Six cells stand between us and the upper case.
-
Despite what happened last time, we are determined to get the battery out.
-
This time we're excited to find two of the six cells in a metal tray held in with screws and no adhesive. Barely started and already 1/3 done!
-
Things slow down when we get to the outer cells and start slowly spudgering under the edges. Listening for the snap crackle & pop of breaking adhesive, we cautiously push forward until all six cells are free.
-
-
-
It was a slow and tedious process, but we removed the battery—sans puncture.
-
The task took us roughly 15 minutes to complete, without the use of a heat gun. All we needed was a Torx screwdriver and three spudgers.
-
In contrast, it took us three attempts to successfully remove the 15" Retina's battery without puncturing it, and the third attempt took over half an hour to perform.
-
Yet, EPEAT lab investigators reported the time required for the MacBook Pro 15" Retina battery removal was under 2.5 minutes, cited that the operation could be conducted “easily and safely,” and gave the laptop its Gold rating.
-
We certainly disagreed with that notion, given it was the least repairable computer we've ever encountered.
-
The 13" Retina battery is a step in the right direction towards recyclability and repairability, but it's still a far cry from the no-adhesive MacBook Pro batteries of yesteryear.
-
-
-
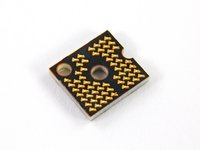
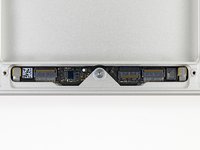
The trackpad board contains several connectors and two prominent ICs:
-
Silicon Storage Technology SST25VF020 2 Mbit SPI Serial Flash
-
Broadcom BCM5976 touchscreen controller (as found in the iPhone 5.)
-
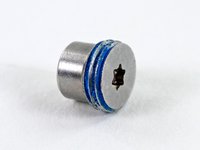
What a funky looking trackpad set screw. This standoff screw is much bigger than those found in previous generations, and is held in with threadlocker.
-
-
-
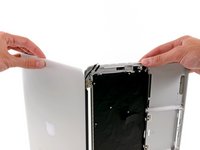
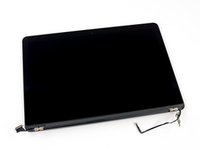
The Retina display comes out after removing a few Torx screws.
-
We did not attempt to separate the display from the glass, seeing as how the whole enchilada is fused together. But if you are curious, take a look at our Retina display teardown for the full rundown.
-
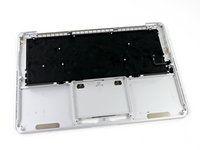
After all is said and done, the only thing that remains is the upper case.
-
-
-
We promised you kitties and we're not ones to disappoint our loyal fans.
-
A few tips regarding kitties:
-
No matter what, your kitty will always hate mondays.
-
If you fuse your kitty with a cherry pop tart, and launch it into space, the results will be spectacular.
-
Kitties like chemistry.
-
Never trust a grin without a kitty.
-
In the words of the great Bob Barker, "help control the pet population. Have your pet spayed or neutered. Goodbye everybody!"
-
-
-
MacBook Pro 13" Retina Display Repairability: 2 out of 10 (10 is easiest to repair)
-
There appears to be enough space to fit a regular 5 mm or 7 mm 2.5" laptop drive, but a custom cable will need to be developed.
-
The battery is still glued into the laptop's top case, but it's slightly less difficult to remove compared to the 15" model.
-
Proprietary pentalobe screws prevent you from gaining access to anything inside.
-
The RAM is surface-mount soldered to the logic board, so no upgrade is possible. It will forever have 8 GB of RAM.
-
The display assembly is almost impossible to take apart. If anything ever fails inside the display, you'll need to replace the display as a whole.
-


18 Guide Comments
Who wouldn't?
Was hoping there would have been at least one view of the front of the screen, to see if that 75% claimed reduction in reflections holds true.
Non-upgradeability, non-repairability, and OSX Lion are why I bought the last of the non-Retina MBPs instead.
At least the SSD comes out, though, even if it's nonstandard. So issues with data under NDAs can be worked around if it has to go in for "repair" (replacement looks more likely). Soldered memory is really annoying (especially on the 13" where they only offer 8G) but there's a weight and size argument for that. Glued battery, though, is just deliberate obsolescence.
That said, I wonder, have iFixit tried hot wire for un-gluing the cells? Seems to me that a thing similar to what one would use for carving styrofoam, i.e. a nichrome hotwire, might be just the thing for that, so long as it can be slipped in behind the cells?