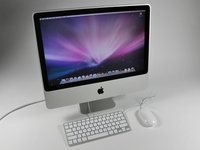
What you need

This teardown is not a repair guide. To repair your iMac Intel 20" EMC 2266, use our service manual.

  1. iMac Intel 20" EMC 2266 Teardown, iMac Intel 20" EMC 2266 Teardown: step 1, image 1 of 2 iMac Intel 20" EMC 2266 Teardown, iMac Intel 20" EMC 2266 Teardown: step 1, image 2 of 2
    • It's here!

    • We turned it on (only briefly, of course); the LCD display is beautifully clear, even though its resolution (1680x1050) is smaller than the 1920x1200 resolution found in the MacBook Pro 17" Unibody.

    • The speakers are also surprisingly loud and clear, given that the sound seemingly comes out of nowhere...

    • Feel free to comment on specific steps as we go. We'll do our best to accommodate any special requests for pictures.

  2. iMac Intel 20" EMC 2266 Teardown: step 2, image 1 of 1
    • The ports:

    • Optical digital audio out / in

    • Four USB 2.0 ports

    • FireWire 800, 7 watts

    • Gigabit Ethernet

    • Mini DisplayPort (with support for DVI, dual-link DVI, and VGA)

  3. iMac Intel 20" EMC 2266 Teardown: step 3, image 1 of 2 iMac Intel 20" EMC 2266 Teardown: step 3, image 2 of 2
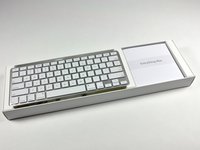
    • Look at those lovely cords. Yay for cords. Going wireless will add an extra $50 to your iMac's pricetag -- $20 for the mouse and $30 for the keyboard.

    • Apple should really have an Aluminum mouse. The included white plastic Mighty Mouse looks like something thrown in as an afterthought.

    • Our keyboard has no number pad, but in their online store Apple offers a "keyboard with numeric keypad" as a no-cost alternative to the standard one.

    • Apple confirmed that nothing from the PC world was used in the creation of this iMac, as evident by the "Everything Mac" slogan.

  4. iMac Intel 20" EMC 2266 Teardown: step 4, image 1 of 2 iMac Intel 20" EMC 2266 Teardown: step 4, image 2 of 2
    • It has begun.

    • Unscrewing the single exterior screw -- the RAM cover. We brainstorm on what magical wonders may lie underneath...

    • Behold: RAM!

    • Unfortunately, this is the extent of Apple-approved user-serviceability for this iMac.

  5. iMac Intel 20" EMC 2266 Teardown: step 5, image 1 of 1
    • We use only the best parts around here. Our suction cups come straight from Maranello, Italy (in Ferrari red, of course).

  6. iMac Intel 20" EMC 2266 Teardown: step 6, image 1 of 3 iMac Intel 20" EMC 2266 Teardown: step 6, image 2 of 3 iMac Intel 20" EMC 2266 Teardown: step 6, image 3 of 3
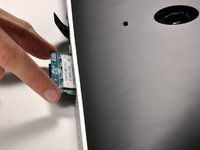
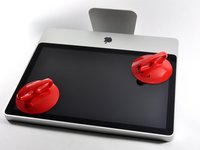
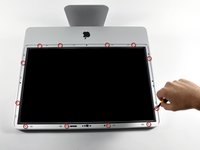
    • Fourteen magnets hold the front glass panel in place. Our suction cups were very handy for this operation.

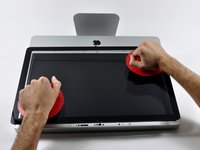
    • The glass panel comes off with a gentle pull straight up.

    • The suction cups made removing the glass surprisingly painless. However, getting dust or fingerprints on either the glass or LCD is a concern. You must make sure both the LCD panel and glass are completely clean prior to reassembly.

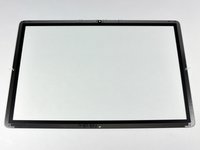
    • The rear of the glass has a metallic bezel, as well as seven alignment posts. The magnets that help hold the glass in place are in the iMac's aluminum front bezel.

  7. iMac Intel 20" EMC 2266 Teardown: step 7, image 1 of 2 iMac Intel 20" EMC 2266 Teardown: step 7, image 2 of 2
    • The display is less glossy now.

    • Twelve screws are exposed:

    • Eight 12.8 mm T8 Torx screws.

    • Four 24.6 mm T8 Torx screws.

    • The front bezel then simply rotates up. The microphone cable must be disconnected before the bezel is entirely free.

  8. iMac Intel 20" EMC 2266 Teardown: step 8, image 1 of 1
    • It almost looks like Tim Burton joined the iMac design team...

  9. iMac Intel 20" EMC 2266 Teardown: step 9, image 1 of 2 iMac Intel 20" EMC 2266 Teardown: step 9, image 2 of 2
    • We wanted to see how the iMac clock battery (190 mAh) stacks up with the 17" Unibody's behemoth (12,820 mAh), so we put them next to each other:

    • 17" Unibody wins.

  10. iMac Intel 20" EMC 2266 Teardown: step 10, image 1 of 2 iMac Intel 20" EMC 2266 Teardown: step 10, image 2 of 2
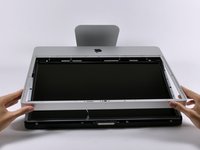
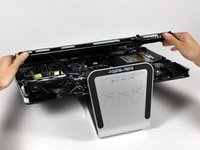
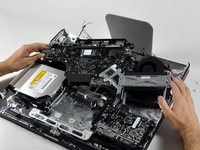
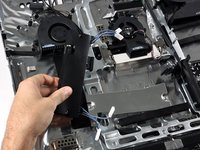
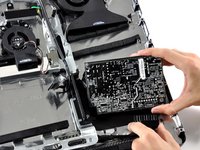
    • Most components are buried beneath the LCD assembly. This isn't a new design for Intel iMacs, but is certainly not as convenient as the rear-accessible iMac G5.

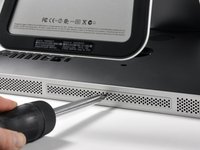
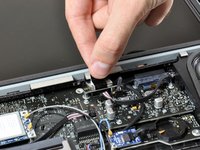
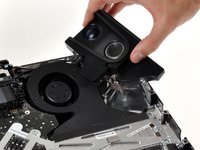
    • Unscrewing the two T6 screws securing the display data cable.

    • After removing the two screws, we pulled the connector straight up, wiggling back and forth as necessary.

  11. iMac Intel 20" EMC 2266 Teardown: step 11, image 1 of 2 iMac Intel 20" EMC 2266 Teardown: step 11, image 2 of 2
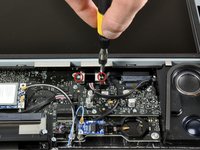
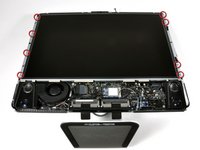
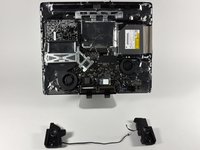
    • The LCD panel is held in place with eight 11.8mm T8 Torx screws.

    • The LCD in this iMac is not LED backlit, but uses the more traditional CCFL backlight.

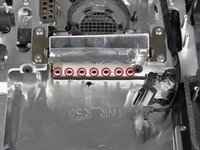
    • There are five cables (four inverter cables and one temperature sensor) to disconnect before the LCD panel can be removed from the iMac.

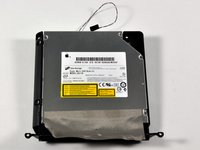
    • This display is an AU Optronics M302EW02. The manufacture date shown on the back of the LCD is 09/04, that's probably the 4th week of 2009.

  12. iMac Intel 20" EMC 2266 Teardown: step 12, image 1 of 1
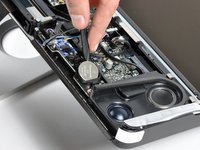
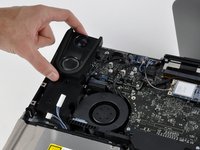
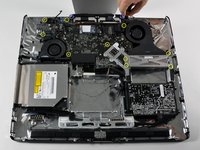
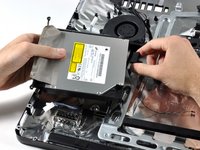
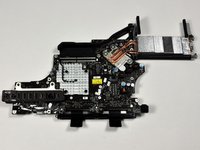
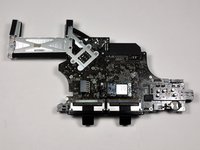
    • Removing the desktop 320GB SATA hard drive.

    • After disconnecting the temperature sensor cables, we rotated the long black clip toward the drive to unlock it, then swung it to the side.

    • We then unplugged the SATA cables and pulled out the hard drive without removing any additional screws.

    • This screw-less design for the hard drive is nice, but unfortunately getting to this point requires removing 21 screws.

  13. iMac Intel 20" EMC 2266 Teardown: step 13, image 1 of 3 iMac Intel 20" EMC 2266 Teardown: step 13, image 2 of 3 iMac Intel 20" EMC 2266 Teardown: step 13, image 3 of 3
    • Each speaker is attached by one screw and one connector cable.

    • Only the right speaker needs to be removed to gain access to the logic board, but we removed them both.

    • The Bluetooth board is the blue board in the top center.

    • The 802.11n card is on the right with two antenna wires running to it from below the logic board.

  14. iMac Intel 20" EMC 2266 Teardown: step 14, image 1 of 3 iMac Intel 20" EMC 2266 Teardown: step 14, image 2 of 3 iMac Intel 20" EMC 2266 Teardown: step 14, image 3 of 3
    • Removing the logic board.

    • First off, let's disconnect 13 connectors.

    • Next, we remove 10 T10 Torx screws... (Second image)

    • ...and 2 T8 Torx screws.

    • It's out! (Third image)

  15. iMac Intel 20" EMC 2266 Teardown: step 15, image 1 of 2 iMac Intel 20" EMC 2266 Teardown: step 15, image 2 of 2
    • Apple's flat-panel iMacs have always been an interesting cross between a laptop and a desktop. This iMac features a laptop-style optical drive and RAM, but a desktop hard drive.

    • This is a 12.7mm SATA 8x double-layer SuperDrive.

    • As far as we know, this leaves the AppleTV as the only shipping Apple product with a PATA drive.

  16. iMac Intel 20" EMC 2266 Teardown: step 16, image 1 of 2 iMac Intel 20" EMC 2266 Teardown: step 16, image 2 of 2
    • As we mentioned earlier, this iMac still uses an LCD with a CCFL backlight. This particular display features four backlights, each of which require their own high-voltage AC power.

    • All four are powered by a single large inverter.

  17. iMac Intel 20" EMC 2266 Teardown: step 17, image 1 of 2 iMac Intel 20" EMC 2266 Teardown: step 17, image 2 of 2
    • This is the power supply. If you're doing this at home, be very careful handling it, as capacitors can remain charged even after power has been disconnected from the computer.

    • This iMac isn't very colorful, internally or externally. However, the power supply (once removed) is surprisingly vibrant.

  18. iMac Intel 20" EMC 2266 Teardown: step 18, image 1 of 2 iMac Intel 20" EMC 2266 Teardown: step 18, image 2 of 2
    • The large and awkward logic board.

    • The ports are all soldered directly to the logic board, and connect at a slight angle to fit the curvature of the iMac's rear housing.

  19. iMac Intel 20" EMC 2266 Teardown: step 19, image 1 of 1
    • The heat sink directly above the 2.66 GHz Core 2 Duo processor.

    • The gray and black cable is a temperature sensor, one of at least six we've found in this iMac so far.

    • The processor appears to be socketed, but unfortunately there's a "Warranty void if removed" sticker that must be removed to access it.

  20. iMac Intel 20" EMC 2266 Teardown: step 20, image 1 of 2 iMac Intel 20" EMC 2266 Teardown: step 20, image 2 of 2
    • On the 20" iMac the stand is very integrated into the computer. Removing the stand requires you to first remove almost all internal components.

    • The stand is fastened to the housing with 7 T10 Torx screws.

    • The stand is very heavy and sturdy. Just the aluminum stand by itself weighs 33.3 ounces -- almost 70% of the weight of a MacBook Air.

  21. iMac Intel 20" EMC 2266 Teardown: step 21, image 1 of 1

11 Comments

I'd like to see a guide for the replacement of the video card on the iMac Intel 20" using the iMac you used in this guide "iMac 20" Teardown". It is the exact same model I have.

These are really great guides!! I appreciate you doing them!!

Phuztone - Reply

does anyone know if you can upgrade the processor in this model??

Realeyez' the pupil - Reply

yes, but 2007 only with T9300 or T9500

Chris Müller -

Can you tell me if I can use D.C. Power instead of 110 ac?

riouxlm - Reply

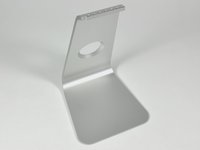
Wonderful teardown! I was able to remove the electronic guts and LCD of a broken aluminum imac thanks to this guide. Now I wonder what to do with an empty Aluminum case with stand. It's too thin for an aquarium. Any ideas?

twistedlot - Reply

Add Comment

View Statistics:

Past 24 Hours: 23

Past 7 Days: 93

Past 30 Days: 363

All Time: 634,227