What you need
-
-
Remove the slide cover.
-
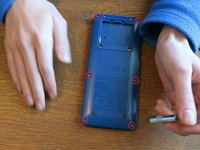
Turn the calculator so the screen faces down.
-
Take the Phillips #0 screwdriver and remove the battery cover.
-
Remove the battery. (You may need to use the spudger)
-
-
-
Use the Phillips #00 screwdriver to remove the screws underneath the battery.
-
Use the T6 screwdriver to remove the 6 screws on the edges of the calculator.
-
-
-
-
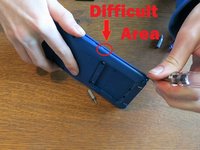
Use a spudger to separate the top shell from the bottom one by prying the crease all around the calculator.
-
The middle part is very difficult to separate! You will need to use a lot of force.
-
-
-
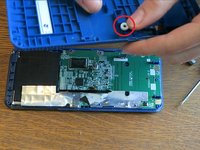
With the back shell off, you can now access the Reset button.
-
Take off the white and black rubber to access the hard plastic part.
-
-
-
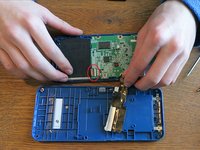
Gently bend back the Aluminum shield. You will not be able to take all of it off since it is partially glued on.
-
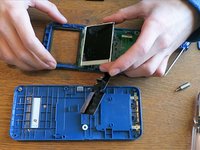
If you need to access the LCD, you can pick it up and bend it back.
-
Follow this guide to safely disconnect the ribbon cable from the ZIF connector: Recognizing & Disconnecting Cable Connectors
-
With the LCD out, you can now easily pop out the transparent, plastic cover that's connected to the shell. This allows you to replace the glue if it's weak.
-
-
-
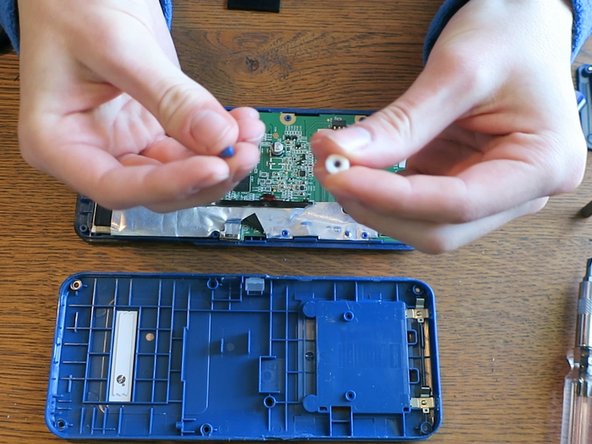
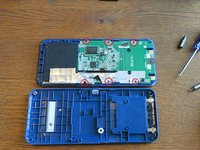
Here you can see all the components of the Motherboard. Unfortunately, all the components on the PCB (except the LCD ribbon cable) are all soldered onto the motherboard.
-
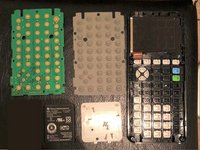
Unfortunately, to access the buttons underneath the motherboard you will need to break the melted bits on the PCB because it is heat-melted to the shell.
-
Be sure to keep the buttons facing down otherwise they may fall out.
-
Once the PCB is removed, you can now remove the grey membrane to reveal the buttons.
-
I thought I'd give this an unofficial repairability score. I give it a 4. The battery is trivial to replace. The shell is (mostly) easy to remove, the LCD screen, LCD plastic cover, and the Reset button can be replaced. However, you can not upgrade anything, nor easily replace the FLASH, ASIC, USB, LED, keypad buttons and battery contacts.
-


30 Guide Comments
This brings up a memory of mine. When I was in the 5th grade, they had just released the TI-89. In school we were asked to buy the TI-83 Plus. I remember fondly buying the TI-89 by accident not realizing it was actually a different model entirely (it has a built-in computer algebra system among other things). I had always enjoyed technology and figuring how things worked so I read the entire manual and tore the calculator up seeing all the specs. Of course when it came to testing time, we were only permitted to using the TI-83 Plus. Using the TI-89 was basically cheating, but I had no idea how to use the TI-83, and they actually checked that you were using a compliant calculator. I found that I could transplant the entire guts on the TI-89 into the TI-83 Plus. I didn’t matter that none of the buttons were the same. I had memorized every function in the calculator. No worries, I only used the functions permitted. I was a good student after all.
Are you sure it was the 83 Plus you transferred the internals to or was it the 84 Plus? The 84 Plus uses the same shell design as the 89 and I've never heard of fitting the 89’s internals into an 83 Plus! That's not saying it's impossible though, cool story!
just for exploring all this you should have passed the test!
boddeke -
Does anyone know where to get replacement parts? other forums have said to just buy another calculator but the 200$ price tag is not very encouraging.
@evankaba Well the goal is to buy a cheap, broken calculator not a brand new one. Unfortunately it’s quite difficult to find a broken TI 84 Plus CE. It’s also very difficult to find replacement parts since TI sources many parts directly from manufacturers. Could you share what’s wrong with your calculator and which part you need? I might be able to help you out.