Introduction
It's been almost exactly a year since we tore down the Galaxy S5, but Samsung has leaped light-years ahead with the design of the Galaxy S6 Edge. Only a teardown will tell if its glass-and-aluminum construction and curved-edge screen make it as future-proof as it is futuristic. Join us as we venture forth to the Edge of the (newest) Galaxy.
Don't get caught spacing out! Stay up to date with our latest repair news on Twitter, join our inner circle on Facebook, and check out our Instagram for some shots that are out of this world.
What you need
Video Overview
-
-
This new handset has some serious six appeal. Notable upgrades include:
-
5.1" Super AMOLED capacitive touchscreen (1440 x 2560, ~577 ppi, 16M colors)
-
Samsung Exynos 7 Octa 7420 Processor with integrated Mali-T760 GPU and 3 GB memory
-
16 MP rear camera with HDR, LED Flash, and 4K video recording
-
Built-in support for Qi and Powermat wireless charging
-
32/64/128 GB storage options (but no microSD slot)
-
Corning Gorilla Glass 4 backing
-
-
-
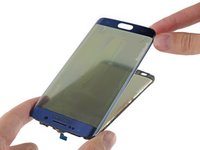
The Edge is on, and so far we're impressed. With its sleek curves and sharp display, the S6 is like an infinity pool in the palm of your hand...
-
...except that it feels a lot less ergonomic, and is a total fingerprint magnet.
-
A quick peek from either side shows the Edge's information stream feature, bringing all of your important news, weather, and notifications to the side of your screen.
-
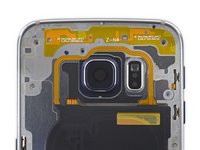
We catch a glimpse of the proximity and gesture sensors, as well as the front-facing camera—all sealed behind the Edge's Gorilla Glass.
-
-
-
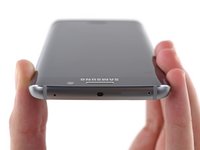
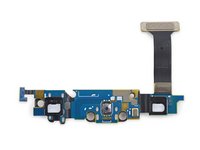
Living on the edge of the new Galaxy are the phone's speaker and microphone, as well as the audio jack and USB 2.0 port.
-
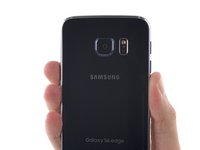
The now-familiar heart rate monitor is visible below the LED flash, next to the rear camera.
-
Unfortunately, people are already having issues with the sensor.
-
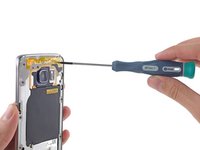
A second microphone takes up residence on the top edge of the phone, along with the IR blaster and SIM tray.
-
-
Tool used on this step:Heavy-Duty Suction Cups (Pair)$14.95
-
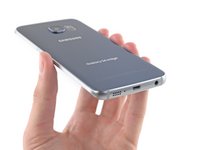
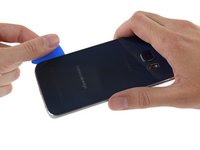
Now for a look at the back of this cutting-edge device. We note the model number—SM-G925T—and get to work dispatching the back cover.
-
The rear panel is glued on rock-solid, and is a tight fit within the frame. Even with the adhesive patiently iOpened, we had to break out our Heavy Duty Suction Cup to slip in an opening pick. Definitely not fun.
-
Throwback to when Samsung had ultra user-friendly battery replacement doors. RIP.
-
-
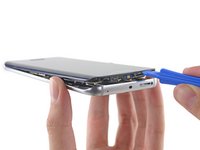
Tool used on this step:iFixit Opening Picks (Set of 6)$4.99
-
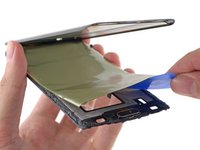
Our Opening Picks are instrumental in revealing the inside of the Edge.
-
Even our slim picks have trouble defeating the edges of this glass.
-
With a
littlelot of help from our iOpener friend—and gobs of patience—we edge our way around the perimeter. -
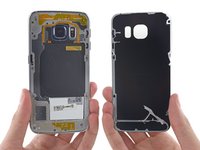
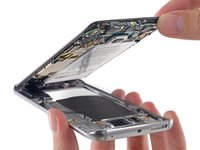
The back panel is removed (well, mostly). Underneath, we find a rather sticky situation... but it's nothing we can't handle.
-
-
-
With a couple magic words (and some well-applied force), the adhered panel separates cleanly from the rest of the phone.
-
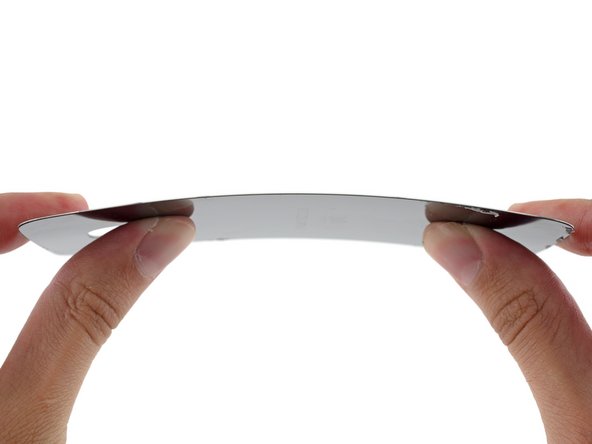
With the panel finally off, the adhesive peels off the glass nicely, but leaves a sticky residue on the metal midframe.
-
When we heard that the S6/S6 Edge shipped with a glass panel, we fell into 2011 flashback land; but after our sophisticated stress tests, it looks like glass has come a long way in four years.
-
-
-
In every previous Galaxy phone—including even the repair-challenged Galaxy S5 of last year—this is the part where we got to pop out the battery with a fingernail.
-
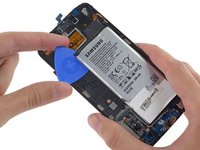
Our old friends, screwdriver and plastic opening tool, jump into the fray to help out. At least it looks like we're done with adhesive—the midframe comes off pretty easily, showing off all the goodies under the hood.
-
-
-
-
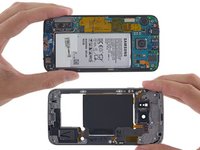
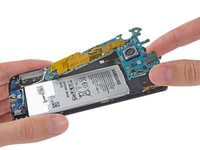
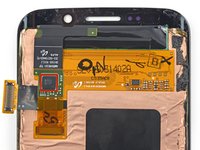
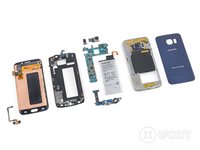
With the midframe dispatched, we finally get a look at the battery and motherboard.
-
By this point, we're also accustomed to being able to remove the expandable memory, in the form of a MicroSD card. Where is it? Oh, that's right—Samsung eliminated it. If you need additional storage, you'd better pay for it up-front; there'll be no adding it later.
-
The midframe is littered with goodies—tons of spring contacts, an NFC/wireless charging coil, and a speaker.
-
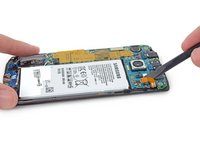
We'd love to get the battery out now and take a look, but for the moment we'll have to settle for disconnecting it from the motherboard.
-
-
-
Labelled antennas on the midframe, how cute.
-
According to Samsung, the antennas are welded to the midframe via ultrasonic welding to provide stability and save on space.
-
We also found a hole in the
spacetime continuummidframe for the power button.
-
-
-
With all of its connectors popped, the motherboard is almost free of the display—it shares the same wonky, wrong-side IO board connection that we first saw in the Galaxy S5.
-
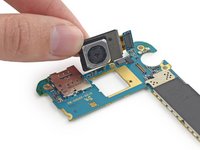
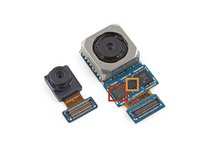
We pluck the main camera from the motherboard to get a better look at the hardware riding on its PCB:
-
Winbond W25Q32FW Serial Flash Memory
-
InvenSense IDG-2030 dual axis gyroscope for optical image stabilization
-
The 16 MP OIS rear-facing camera dwarfs the 5 MP selfie cam.
-
-
-
As ChipWorks noted in their recent Galaxy S6 analysis, more and more of the chips in Samsung's flagship phones seem to be originating in-house. On the front side of the mobo, we find:
-
Samsung Exynos 7420 Octa-core Processor - 64-bit, 2.1 GHz Quad + 1.5 GHz Quad, with Samsung K3RG3G30MM-DGCH 3 GB LPDDR4 RAM layered in
-
Samsung KLUBG4G1BD 32GB NAND Flash
-
Skyworks 78041 Hybrid Multimode Multiband (MMMB) Front-End Module (FEM)
-
Avago AFEM-9020 PAM
-
Wolfson Microelectronics WM1840 Audio Codec and Maxim MAX98505 Class DG Audio Amplifier
-
Samsung N5DDPS3 - Similar to the N5DDPS2 spotted in the Galaxy S6, likely NFC Controller
-
InvenSense MP65M 6-Axis Accel + Gyro, and Samsung C2N89U (likely image processor)
-
-
-
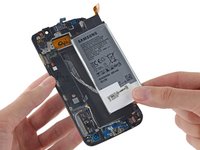
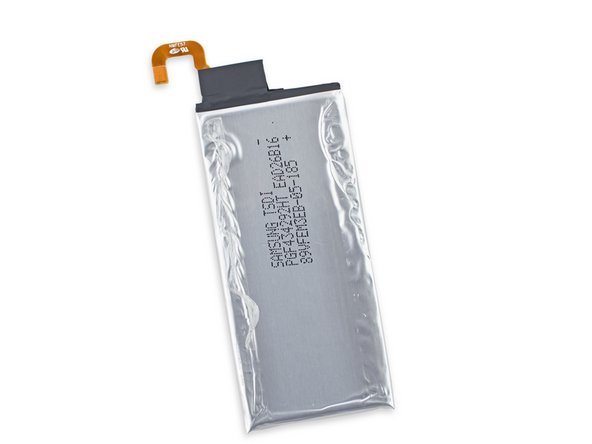
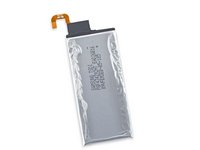
Free of its clingy mucilage, we get a better look at the 3.85 V, 10.01 Wh battery.
-
Samsung has stepped down from the 2800 mAh battery found in the Galaxy S5, and returned to a 2600 mAh battery like the S4.
-
Samsung claims that the Edge's battery will provide 12 hours of LTE web surfing, 26 hours of 3G WCDMA talk time, and up to 58 hours of music playback.
-
And it's fresh off the presses! Seriously, look at the date.
-
-
-
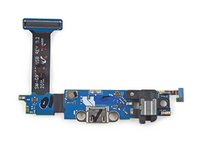
In what seems like a(nother) major step backward, the S6 Edge dumps the lightning-fast Micro-B USB 3.0 port found on the Galaxy S5 in favor of a garden-variety microUSB (2.0) port.
-
Welcome to the year 2000.
-
-
-
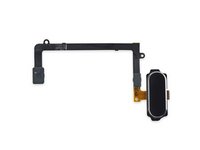
The last component to come off the display assembly is the modular home button.
-
Also unlike the S5, there's no need for any secret trap doors.
-
Thanks to ditching the display-out-first shenanigans of last year, we get a totally different path to the home button. Better? Meh. Probably not worse.
-
-
-
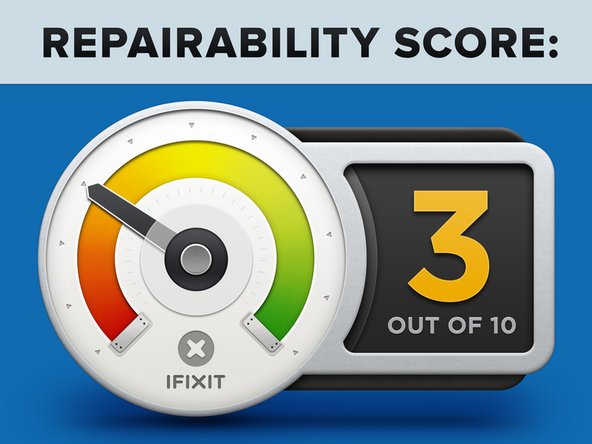
Samsung Galaxy S6 Edge Repairability Score: 3 out of 10 (10 is easiest to repair).
-
Many components are modular and can be replaced independently.
-
In an improvement over the S5's design, you no longer have to remove the display to get into the phone and replace the motherboard.
-
Front and back glass make for double the crackability, and strong adhesive on the rear glass makes it very difficult to gain entry into the device.
-
The battery is very tightly adhered to the back of the display, and buried beneath the midframe and motherboard.
-
Replacing the glass without destroying the display is going to be very difficult.
-


24 Guide Comments
Holy He11 you guys got the phone that says "A S S" in it. I wouldn't rate this a "3" this is more like a 5 in my book. You guys rate a m7 as a "1" which is one of the more difficult phones out there but its still easier than some of the older Motorolas.
Do I know you??????
That sure looks like a MicroSD receptacle on image "Step 11" on the bottom left corner of the board. Is that the Simm Card receptacle or a MicroSD receptacle?
That's the SIM card receptacle.
Ryan -
SD Card Yeah Nelson Bush, that is an SD card slot. Everybody in Samsung forgot they put it there. Ooops.