Introduction
The newest iteration of Amazon's base Kindle e-reader brings us to the 7th generation. New to the party is the addition of a touch screen, but how will it fare for repair? Tune in to find out.
Double Teardown Alert! We also tore down Amazon's new $100 Kindle Fire HD 6!
Read all about our repair exploits on Twitter, flip through our book of faces, or enjoy our Instagram picture book.
What you need
-
-
That time of the year is upon us. No it's not Leif Erikson day, nor is it National Hug Your Cat day. It's that time of the year when new Kindles show up on our teardown doorstep.
-
Today's special guest, the Kindle 7th Generation (now with a touch screen!):
-
6" display with Pearl e-paper technology with 167 ppi
-
4 GB storage capacity (it could figuratively hold thousands of books)
-
802.11b, 802.11g, or 802.11n Wi-Fi compatibility
-
Touch screen (did we mention it has a touch screen)
-
4 weeks of battery life (based on 30 minutes of reading a day, with wireless turned off)
-
-
-
In case you forgot which smiling benevolent overlord megacorp is responsible for your Kindle, simply turn it over and the answer shall present itself: Amazon.
-
All of the Kindle's numerous IO hardware features are conveniently located together on the bottom edge. Including and completely limited to:
-
Power button
-
Multicolored status LED
-
Micro USB port
-
-
-
-
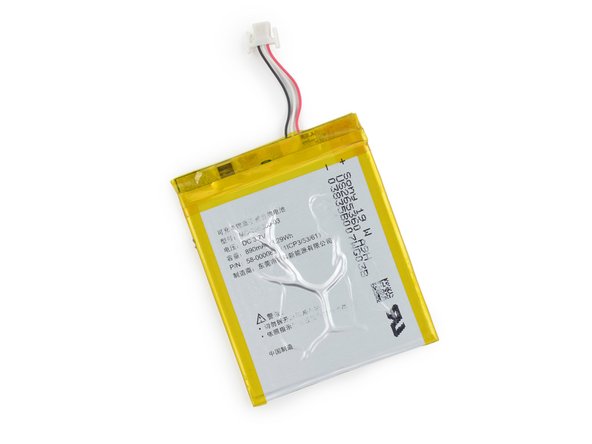
In a teardown that's otherwise been a breeze, we've encountered our first real repair barrier. Overly sticky battery adhesive. Decidedly the worst kind of adhesive, this is the kind that requires effort to remove. Yuck.
-
The Lithium-ion Polymer battery in the Kindle 7th Generation is rated at 3.7 V and 890 mAh. That works out to 3.29 Wh of energy.
-
Sounds like a lot! But it's half the eight-week spec of the Kindle Paperwhite, a backlit tablet with a 5.25 Wh battery. Where is this Kindle's extra power going?
-
-
-
We let some cables and screws know what we think of them, and free the motherboard for a closer look:
-
Elpida (now Micron Technology) B2432BCPE-8D-F DDR2 Mobile RAM
-
Freescale Semiconductor MCIMX6L7DVN10AB Applications Processor
-
SanDisk SDIN7DP2-4G eMMC iNand Ultra 4 GB NAND Flash
-
Atheros AR6803G-BL3B
-
Maxim Integrated MAX77696A Power Management Integrated Circuit
-
24.000 430F
-
-
-
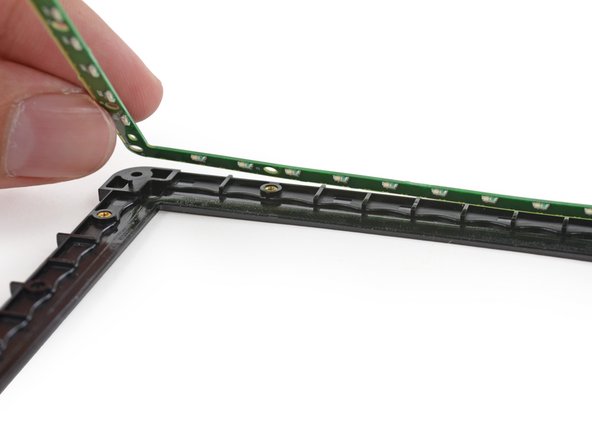
Returning to the front of the display assembly, we pop off a plastic bezel and find a secret perimetric circuit board.
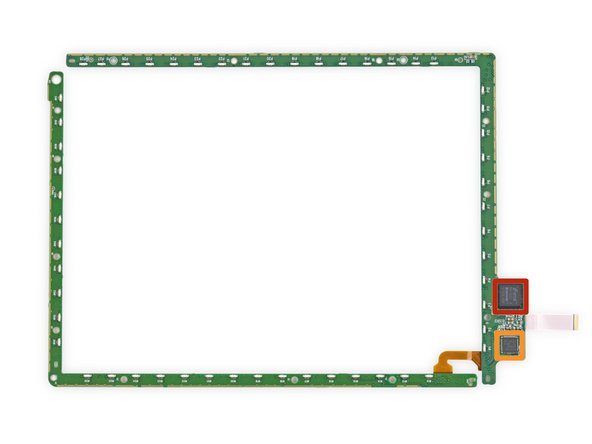
-
Looks like we've found the source of the new Kindle's touching sensibilities. A grid of infrared LEDs and receivers crosses the display, powered by Neonode's zForce tech.
-
The LEDs project away from the display, into small wells in the plastic bezel. These wells collimate and reflect the light back across the face of the display, in wide flat bands to be received on the opposite side...
-
...until your finger gets in the way and blocks the band, registering a touch.
-
-
-
The touch grid is made up of two distinct circuit boards, joined by a small ribbon cable.
-
One is lined with LEDs and projects, from the top and left side of the Kindle's display. and the other is made up of IR receivers (likely phototransistors), and makes up the right and bottom edges of the display.
-
There's a bit of circuitry on the receiver board, to monitor the breaks in projected light and detect touch:
-
Neonode zForce NN1001 Single Chip Optical Touch Controller
-
Texas Instruments MSP430G2 Ultra Low Power Microcontroller
-
-
-
Kindle 7th Generation Repairability Score: 8 out of 10 (10 is easiest to repair).
-
Simple, modular design with few, distinct components that can be replaced independently.
-
Easy opening procedure—clips supplemented by mild adhesive are all that hold the front bezel in place.
-
Battery adhesive is much stronger than necessary, making its replacement hazardous.
-


16 Comments
Step 6 , Image 3 right bottom corner is the antenna. Atheros AR6803G-BL3B is the wifi system on chip I guess which is shown in image 2 near to the antenna.
I replaced the battery and now i have problema with a cable that connect the infrared LEDs and the receptors with the motherboard.Please help.
P.S.Now my touchscreen doesn't work.
Hello, i need capacity of C7 capacitor on Kindle 7th generation wp63gw touch board. Can you help me?