What you need

This teardown is not a repair guide. To repair your GPD WIN2, use our service manual.

  1. This step is untranslated. Help translate it

    : step 1, image 1 of 2 : step 1, image 2 of 2
    • 裏面にSSDの蓋はねじで止まっているので、これを外すとSSDにアクセスできます

    • SSDは引き抜くと外れます

  2. This step is untranslated. Help translate it

    : step 2, image 1 of 3 : step 2, image 2 of 3 : step 2, image 3 of 3
    • 裏面のねじを一通り外します

    • ツメで止まっているので、隙間からそっとこじ開けます

  3. This step is untranslated. Help translate it

    : step 3, image 1 of 2 : step 3, image 2 of 2
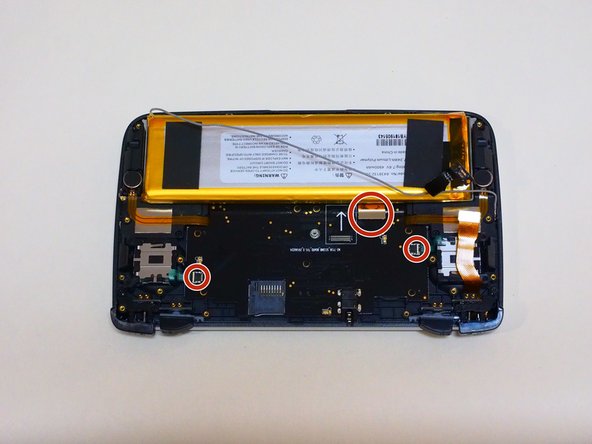
    • ショートしないよう、バッテリーコネクタを先に外します

    • ねじを外すとコネクタがとれるようになります

  4. This step is untranslated. Help translate it

    : step 4, image 1 of 3 : step 4, image 2 of 3 : step 4, image 3 of 3
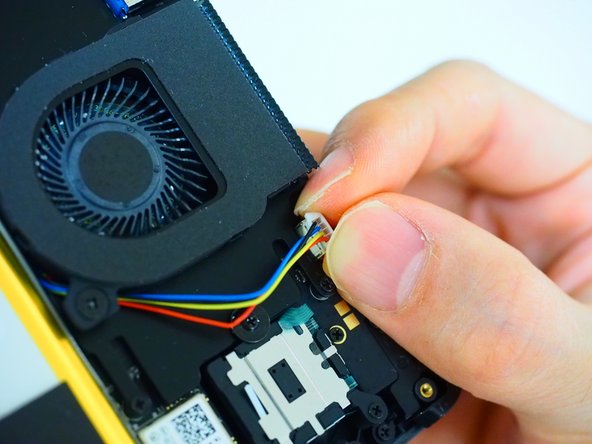
    • 液晶コネクタ、CPUファンコネクタ、Wi-Fiアンテナコネクタを一通り外します

  5. This step is untranslated. Help translate it

    : step 5, image 1 of 3 : step 5, image 2 of 3 : step 5, image 3 of 3
    • ねじを外すとCPUクーラーが取れます

    • グリスが塗られているので、汚れないように気を付けてください

    • 可能であれば、組み立てるときにグリスを塗りなおしてください

  6. This step is untranslated. Help translate it

    : step 6, image 1 of 2 : step 6, image 2 of 2
    • ねじを取ると、SSDコネクタが外せるようになります

  7. This step is untranslated. Help translate it

    : step 7, image 1 of 3 : step 7, image 2 of 3 : step 7, image 3 of 3
    • ねじを外すと、ロジックボードを浮かすことができます

    • 裏面でインターフェースボードとコネクタで繋がっているので、これを外します

  8. This step is untranslated. Help translate it

    : step 8, image 1 of 3 : step 8, image 2 of 3 : step 8, image 3 of 3
    • JoystickとKeyboadのコネクタを外します

  9. This step is untranslated. Help translate it

    : step 9, image 1 of 2 : step 9, image 2 of 2
    • ねじを外すとインターフェースボードが外せます

  10. This step is untranslated. Help translate it

    : step 10, image 1 of 3 : step 10, image 2 of 3 : step 10, image 3 of 3
    • 十字キー、ボタンはラバーの下にあります。特に固定はされてないので、つまむと取れます

    • Joystickの残りのねじを外して、垂直に抜きます

  11. This step is untranslated. Help translate it

    : step 11, image 1 of 2 : step 11, image 2 of 2
    • ねじを取るとスピーカーが取れるようになります

  12. This step is untranslated. Help translate it

    : step 12, image 1 of 3 : step 12, image 2 of 3 : step 12, image 3 of 3
    • ねじを外すとキーボードが取れます

    • バッテリーは両面テープでついているので、はがすのが難しいです。今回は外さないでおきます

  13. This step is untranslated. Help translate it

    : step 13, image 1 of 2 : step 13, image 2 of 2
    • L/Rスイッチの外は固定されていないので、特に何もしなくても外せます

    • 小さいバネがあるので、無くさないよう注意してください

    • L/Rスイッチの中はねじで固定されています

  14. This step is untranslated. Help translate it

    : step 14, image 1 of 3 : step 14, image 2 of 3 : step 14, image 3 of 3
    • 右端にとっかかりが用意されています。ここから開いていきます

  15. This step is untranslated. Help translate it

    : step 15, image 1 of 2 : step 15, image 2 of 2
    • 今回、液晶は外していません

    • 液晶を外したいのであれば、裏ブタを外してコネクタを抜き、液晶のフレームを外すと取れると思います

noria901

Member since: 06/15/18

509 Reputation

3 Guides authored

0 Comments

Add Comment

View Statistics:

Past 24 Hours: 2

Past 7 Days: 14

Past 30 Days: 58

All Time: 5,657