Free Shipping on Domestic Orders $75+

This translation was generated by a machine and has not been reviewed by a person yet. Speak this language? Review it.

why! Tablet Rear Camera Replacement

What you need

    1. why! Tablet Rear Camera Replacement, Access Various Components: step 1, image 1 of 3 why! Tablet Rear Camera Replacement, Access Various Components: step 1, image 2 of 3 why! Tablet Rear Camera Replacement, Access Various Components: step 1, image 3 of 3
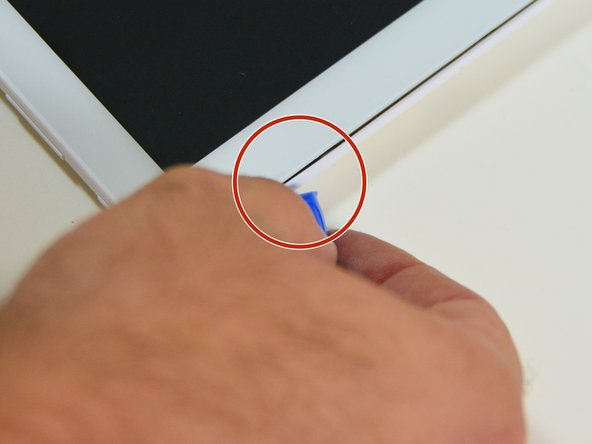
      • Using a plastic opening tool, insert the tip into the corner of the tablet, between the screen and the rear case.

      • Gently pry to start separating the rear case at this corner.

      Ask FixBot

      Add Comment

    2. why! Tablet Rear Camera Replacement: step 2, image 1 of 3 why! Tablet Rear Camera Replacement: step 2, image 2 of 3 why! Tablet Rear Camera Replacement: step 2, image 3 of 3
      • Slide the opening tool along the edge of the tablet to release the rear case fasteners, reinserting the tool at other points along the perimeter as needed.

      • Once the perimeter is clear, lift and remove the rear case to access the internal components (motherboard, battery).

      Ask FixBot

      Add Comment

    1. why! Tablet Rear Camera Replacement, Battery: step 3, image 1 of 3 why! Tablet Rear Camera Replacement, Battery: step 3, image 2 of 3 why! Tablet Rear Camera Replacement, Battery: step 3, image 3 of 3
      • Locate the two connectors shown on the motherboard, near the camera module.

      • Using a screwdriver, remove the screw near the battery.

      • Remove the screw on the edge of the housing, next to the cable.

      Ask FixBot

      Add Comment

    2. why! Tablet Rear Camera Replacement: step 4, image 1 of 3 why! Tablet Rear Camera Replacement: step 4, image 2 of 3 why! Tablet Rear Camera Replacement: step 4, image 3 of 3
      • Remove the screw near the corner of the battery.

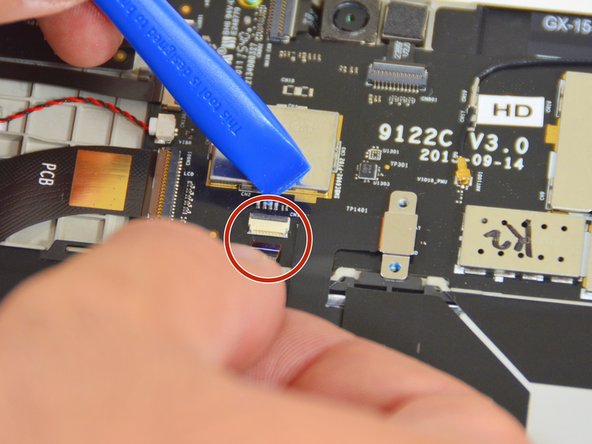
      • Using the opening tool, disconnect the connector located near the edge of the motherboard, next to the camera module.

      • Disconnect the connector on the left edge of the motherboard.

      Ask FixBot

      Add Comment

    3. why! Tablet Rear Camera Replacement: step 5, image 1 of 3 why! Tablet Rear Camera Replacement: step 5, image 2 of 3 why! Tablet Rear Camera Replacement: step 5, image 3 of 3
      • Disconnect the small white connector in the center of the motherboard.

      • Disconnect the connector on the left edge, near the battery label.

      • Disconnect the battery connector, in the upper right corner of the motherboard.

      Ask FixBot

      Add Comment

    4. why! Tablet Rear Camera Replacement: step 6, image 1 of 3 why! Tablet Rear Camera Replacement: step 6, image 2 of 3 why! Tablet Rear Camera Replacement: step 6, image 3 of 3
      • Caution: Handle the battery with care. Avoid bending, puncturing, or damaging it.

      • Disconnect the last connector on the edge of the motherboard.

      • Gently lift the battery to free it from its recess, then remove it from the tablet.

      Ask FixBot

      Add Comment

    1. why! Tablet Rear Camera Replacement, Rear camera: step 7, image 1 of 3 why! Tablet Rear Camera Replacement, Rear camera: step 7, image 2 of 3 why! Tablet Rear Camera Replacement, Rear camera: step 7, image 3 of 3
      • Locate the rear camera module and its connector on the motherboard, at the top of the tablet.

      • Using the tool, disconnect the rear camera cable connector.

      • Gently pry the rear camera module out of its housing, and remove it.

      Ask FixBot

      Add Comment

Conclusion

To reassemble your device, follow the instructions in reverse order.

Cancel: I did not complete this guide.

Felice Suglia

Member since: 06/15/13

33,634 Reputation

283 Guides authored

0 Guide Comments

Add Comment

View Statistics:

Past 24 Hours: 2

Past 7 Days: 18

Past 30 Days: 66

All Time: 117