
jp.ik Leap T304 LCD Replacement Replacement

What you need

  1. jp.ik Leap T304 LCD Replacement Replacement, jp.ik Leap T304 LCD Replacement: step 1, image 1 of 2 jp.ik Leap T304 LCD Replacement Replacement, jp.ik Leap T304 LCD Replacement: step 1, image 2 of 2
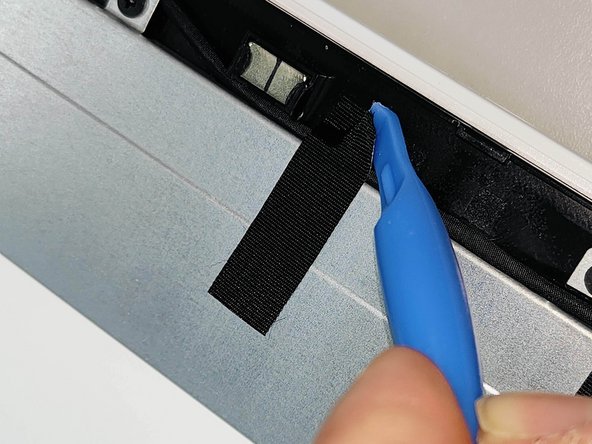
    • First make sure the notebook is turned off and check if you have the necessary tools.

  2. jp.ik Leap T304 LCD Replacement Replacement: step 2, image 1 of 2 jp.ik Leap T304 LCD Replacement Replacement: step 2, image 2 of 2
    • All screws are identified by circles. Pay special attention to the red circles as the rubber covers hide the screws.

    • With an utlility knife remove all the screw covers.

    • For this action, the procedure must be carried out with caution, as the covers are glued with a resistant glue.

  3. jp.ik Leap T304 LCD Replacement Replacement: step 3, image 1 of 1
    • Remove all screws with a Philips PH1 screwdriver

    • All screws are the same, don't worry about identifying them.

  4. jp.ik Leap T304 LCD Replacement Replacement: step 4, image 1 of 3 jp.ik Leap T304 LCD Replacement Replacement: step 4, image 2 of 3 jp.ik Leap T304 LCD Replacement Replacement: step 4, image 3 of 3
    • Using the plastic tool, insert it between the plastic and open it carefully.

    • You will feel and hear several clicks, which are perfectly normal. Remove the rear LCD Cover completely.

  5. jp.ik Leap T304 LCD Replacement Replacement: step 5, image 1 of 3 jp.ik Leap T304 LCD Replacement Replacement: step 5, image 2 of 3 jp.ik Leap T304 LCD Replacement Replacement: step 5, image 3 of 3
    • Unscrew both hinges.

    • All screws are the same, don't worry about identifying them.

  6. jp.ik Leap T304 LCD Replacement Replacement: step 6, image 1 of 2 jp.ik Leap T304 LCD Replacement Replacement: step 6, image 2 of 2
    • Carefully disconnect the cable identified in the figure, removing it from its connector.

  7. jp.ik Leap T304 LCD Replacement Replacement: step 7, image 1 of 3 jp.ik Leap T304 LCD Replacement Replacement: step 7, image 2 of 3 jp.ik Leap T304 LCD Replacement Replacement: step 7, image 3 of 3
    • Remove the mylers shown in the image.

  8. jp.ik Leap T304 LCD Replacement Replacement: step 8, image 1 of 2 jp.ik Leap T304 LCD Replacement Replacement: step 8, image 2 of 2
    • Peel off and remove the Wireless antennas

    • Before removing the wireless antennas, the cable route must always be analyzed to ensure that the antennas will be correctly replaced in their original position.

  9. jp.ik Leap T304 LCD Replacement Replacement: step 9, image 1 of 3 jp.ik Leap T304 LCD Replacement Replacement: step 9, image 2 of 3 jp.ik Leap T304 LCD Replacement Replacement: step 9, image 3 of 3
    • Remove the left and right LCD Bracket.

  10. jp.ik Leap T304 LCD Replacement Replacement: step 10, image 1 of 3 jp.ik Leap T304 LCD Replacement Replacement: step 10, image 2 of 3 jp.ik Leap T304 LCD Replacement Replacement: step 10, image 3 of 3
    • Remove the LCD from the Bezel.

    • To reassemble the LCD module, you must perform the previous steps in reverse.

    • After replacing the LCD, always check if flat cable is correctly connected and the protection tape is stuck in the original position.

Conclusion

To reassemble your device, follow these instructions in reverse order.

One other person completed this guide.

Special thanks to these translators:

pt en

100%

Miguel Santos is helping us fix the world! Want to contribute?
Start translating ›

Miguel Santos

Member since: 01/29/24

509 Reputation

1 Guide authored

Team

jp.ik Member of jp.ik

Business

2 Members

14 Guides authored

0 Comments

Add Comment

View Statistics:

Past 24 Hours: 1

Past 7 Days: 1

Past 30 Days: 3

All Time: 145