Free Shipping on Domestic Orders $75+

iPod Touch 7th Generation Lightning Connector Assembly Replacement

Prerequisite Only
This is a prerequisite-only guide! This guide is part of another procedure and isn’t meant to be used alone.

What you need

    1. iPod Touch 7th Generation Lightning Connector Assembly Replacement, Lightning Connector Assembly: step 1, image 1 of 1
      • Use the tip of a spudger to peel back a small piece of tape covering a screw on the left side of the headphone jack.

      Ask FixBot

      Add Comment

    2. iPod Touch 7th Generation Lightning Connector Assembly Replacement: step 2, image 1 of 1
      • Remove the following screws securing the headphone jack, Lightning connector, and speaker.

      • Three 2.6 mm #000 Phillips screws

      • Two 2.0 mm #000 Phillips screws

      • One 1.85 mm #000 Phillips screw

      Ask FixBot

      Add Comment

    3. iPod Touch 7th Generation Lightning Connector Assembly Replacement: step 3, image 1 of 1
      • Use the flat end of a spudger to pry the speaker up from the rear case.

      • Do not try to remove the speaker, as it is soldered to the Lightning connector assembly.

      Ask FixBot

      Add Comment

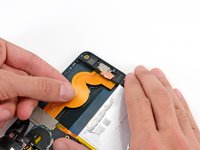
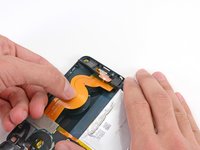
    4. iPod Touch 7th Generation Lightning Connector Assembly Replacement: step 4, image 1 of 2 iPod Touch 7th Generation Lightning Connector Assembly Replacement: step 4, image 2 of 2
      • Grasping the large ribbon cable, gently pull the Lightning connector assembly out of the bottom of the case.

      Ask FixBot

      Add Comment

Conclusion

To reassemble your device, follow these instructions in reverse order.

Cancel: I did not complete this guide.

Tarun Thiruma

Member since: 11/20/19

40,755 Reputation

133 Guides authored

0 Guide Comments

Add Comment

View Statistics:

Past 24 Hours: 0

Past 7 Days: 7

Past 30 Days: 18

All Time: 261