
iPod Touch 2nd Generation Front Panel Replacement

What you need

Video Overview

  1. iPod Touch 2nd Generation Front Panel Replacement, Front Panel: step 1, image 1 of 1
    • The glass front panel on the second generation Touch has a plastic frame glued both to its outer edge and also under the wide black strips at the top and bottom of the device. The frame also has a rubber strip that surrounds the edge of the glass panel.

    • The picture at left (front panel already removed) shows the locations of the metal clips (shown in red) that snap on to the plastic frame. In the next few steps, try to pry the front panel up from the gaps between these clips.

    • Also, be mindful of the very thin and delicate touch screen ribbon cable (connector location shown in orange) attaching the front panel to the upper left corner of the Touch.

  2. iPod Touch 2nd Generation Front Panel Replacement: step 2, image 1 of 2 iPod Touch 2nd Generation Front Panel Replacement: step 2, image 2 of 2
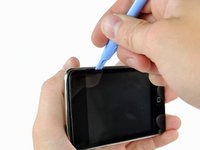
    • Gently insert a plastic opening tool, near the volume control buttons, between the plastic surround of the screen and the metal case.

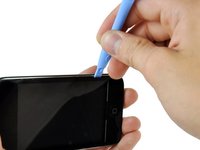
    • Rotate the tool away from the Touch to pry up on the glass panel.

    • The key is to work slowly and gently to avoid breaking internal components.

    • If you are having difficulties using a plastic opening tool. You could try a razor blade, we found it easier to release the clips with one. Please be extremely careful if you take this route!

  3. iPod Touch 2nd Generation Front Panel Replacement: step 3, image 1 of 2 iPod Touch 2nd Generation Front Panel Replacement: step 3, image 2 of 2
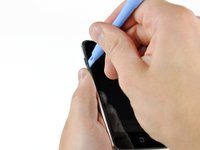
    • Insert the plastic opening tool between the front panel and its plastic surround and pry up at several points along the left edge of the Touch.

    • Do not insert the tool and run it down the edge of the front panel. This may damage the front panel and the rubber seal. It is best to work one point, pry up, then remove the tool and reinsert it at the next spot to be pried up.

  4. iPod Touch 2nd Generation Front Panel Replacement: step 4, image 1 of 2 iPod Touch 2nd Generation Front Panel Replacement: step 4, image 2 of 2
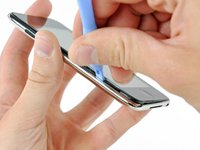
    • Continue prying up the left edge until the top and bottom edges start to lift out of the Touch.

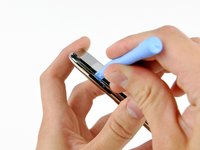
    • Once the top and bottom edges have lifted slightly out of the Touch, use the opening tool to assure the plastic surround is detached from the clips along the inside of the Touch.

  5. iPod Touch 2nd Generation Front Panel Replacement: step 5, image 1 of 1
    • Continue the prying procedure, now focusing on detaching the plastic surround from the internal metal clips.

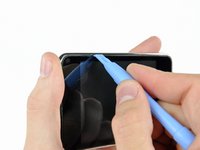
    • Pry along the top edge of the Touch to further separate the front panel from the rest of the device.

  6. iPod Touch 2nd Generation Front Panel Replacement: step 6, image 1 of 3 iPod Touch 2nd Generation Front Panel Replacement: step 6, image 2 of 3 iPod Touch 2nd Generation Front Panel Replacement: step 6, image 3 of 3
    • Pry up the front panel along the right edge using the method described in previous steps.

    • Eventually work around the entire perimeter of the front panel until it is lifted slightly from the rear panel.

    • Also, ensure that the plastic surround is separated from the clips in the rear panel.

  7. iPod Touch 2nd Generation Front Panel Replacement: step 7, image 1 of 1
    • Lift the front panel out of the rear case minding the cable still attaching it near the upper left corner of the Touch.

    • Make sure you DO NOT tear the display's touch screen connector cable. Tearing this will render your display useless.

  8. iPod Touch 2nd Generation Front Panel Replacement: step 8, image 1 of 1
    • Use the flat end of a spudger (or an opening tool) to pry the touch screen cable connector up off the upper logic board.

    • Now that the front panel is out, check it for damage. If the plastic surround is not flush with the front face of the glass panel, gently peel it off and stick it down.

    • Be careful not to scratch the front panel on the underside of the black portions, as the scratches will be visible once the device is reassembled.

    • Be sure to clean both the face of the display and the inner surface of the front panel, as any dust or fingerprints will be trapped inside the Touch once it is fully reassembled.

Conclusion

To reassemble your device, follow these instructions in reverse order.

263 other people completed this guide.

15 Comments

thanks guys! i fixed it and without you i would never do it! thaaaaankkksss!!! :D

great site!

thomas battaglia - Reply

Before you start, it is wise to have a front panel assembly that includes the front bezel, the mid-frame (plastic part with retaining clips) and a full home button assembly. It is A LOT EASIER if you buy one that is pre-assembled.

Gino - Reply

watch out for the ribbon cable of the digitizer, its highly breakable! i had to order two new screens because i damaged the ribbon cables!

so please, really watch out with the ribbon cable!!!

Danny de Bruyne - Reply

Can anyone please help me I ordered a replacement screen and I put it all back to gether with out a hitch but now the middle row of Icons are not responding. Is there anything I can do to fix this issue? also the power button is not responding. anyone with suggestions are welcome thanks.

Keith Holmes - Reply

Sorry that this is literally 10 years late but, you probably damaged the ribbon cables during the opening process, you will need to order a new power button and a new display, these days it is literally impossible to find those parts so finding a new 2g on ebay is your best bet.

Braydon Vanvelzor -

Add Comment

View Statistics:

Past 24 Hours: 0

Past 7 Days: 19

Past 30 Days: 76

All Time: 242,800