iPod Touch 2nd Generation Battery Replacement

What you need

  1. iPod Touch 2nd Generation Battery Replacement, Front Panel: step 1, image 1 of 1
    • The glass front panel on the second generation Touch has a plastic frame glued both to its outer edge and also under the wide black strips at the top and bottom of the device. The frame also has a rubber strip that surrounds the edge of the glass panel.

    • The picture at left (front panel already removed) shows the locations of the metal clips (shown in red) that snap on to the plastic frame. In the next few steps, try to pry the front panel up from the gaps between these clips.

    • Also, be mindful of the very thin and delicate touch screen ribbon cable (connector location shown in orange) attaching the front panel to the upper left corner of the Touch.

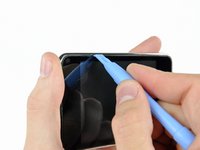
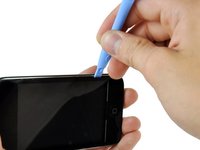
  2. iPod Touch 2nd Generation Battery Replacement: step 2, image 1 of 2 iPod Touch 2nd Generation Battery Replacement: step 2, image 2 of 2
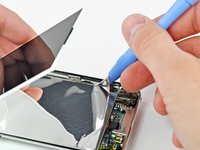
    • Gently insert a plastic opening tool, near the volume control buttons, between the plastic surround of the screen and the metal case.

    • Rotate the tool away from the Touch to pry up on the glass panel.

    • The key is to work slowly and gently to avoid breaking internal components.

    • If you are having difficulties using a plastic opening tool. You could try a razor blade, we found it easier to release the clips with one. Please be extremely careful if you take this route!

  3. iPod Touch 2nd Generation Battery Replacement: step 3, image 1 of 2 iPod Touch 2nd Generation Battery Replacement: step 3, image 2 of 2
    • Insert the plastic opening tool between the front panel and its plastic surround and pry up at several points along the left edge of the Touch.

    • Do not insert the tool and run it down the edge of the front panel. This may damage the front panel and the rubber seal. It is best to work one point, pry up, then remove the tool and reinsert it at the next spot to be pried up.

  4. iPod Touch 2nd Generation Battery Replacement: step 4, image 1 of 2 iPod Touch 2nd Generation Battery Replacement: step 4, image 2 of 2
    • Continue prying up the left edge until the top and bottom edges start to lift out of the Touch.

    • Once the top and bottom edges have lifted slightly out of the Touch, use the opening tool to assure the plastic surround is detached from the clips along the inside of the Touch.

  5. iPod Touch 2nd Generation Battery Replacement: step 5, image 1 of 1
    • Continue the prying procedure, now focusing on detaching the plastic surround from the internal metal clips.

    • Pry along the top edge of the Touch to further separate the front panel from the rest of the device.

  6. iPod Touch 2nd Generation Battery Replacement: step 6, image 1 of 3 iPod Touch 2nd Generation Battery Replacement: step 6, image 2 of 3 iPod Touch 2nd Generation Battery Replacement: step 6, image 3 of 3
    • Pry up the front panel along the right edge using the method described in previous steps.

    • Eventually work around the entire perimeter of the front panel until it is lifted slightly from the rear panel.

    • Also, ensure that the plastic surround is separated from the clips in the rear panel.

  7. iPod Touch 2nd Generation Battery Replacement: step 7, image 1 of 1
    • Lift the front panel out of the rear case minding the cable still attaching it near the upper left corner of the Touch.

    • Make sure you DO NOT tear the display's touch screen connector cable. Tearing this will render your display useless.

  8. iPod Touch 2nd Generation Battery Replacement: step 8, image 1 of 1
    • Use the flat end of a spudger (or an opening tool) to pry the touch screen cable connector up off the upper logic board.

    • Now that the front panel is out, check it for damage. If the plastic surround is not flush with the front face of the glass panel, gently peel it off and stick it down.

    • Be careful not to scratch the front panel on the underside of the black portions, as the scratches will be visible once the device is reassembled.

    • Be sure to clean both the face of the display and the inner surface of the front panel, as any dust or fingerprints will be trapped inside the Touch once it is fully reassembled.

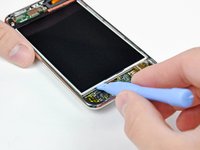
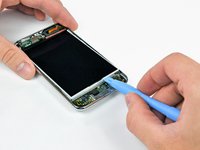
  9. iPod Touch 2nd Generation Battery Replacement, Display: step 9, image 1 of 2 iPod Touch 2nd Generation Battery Replacement, Display: step 9, image 2 of 2
    • Insert a small iPod opening tool with the edge angled up toward the underside of the display between the white plastic backlight and the metal shield beneath it.

    • Pry up along the lower edge of the display enough to grab it with your fingers.

  10. iPod Touch 2nd Generation Battery Replacement: step 10, image 1 of 1
    • Lift the display up from its lower edge and rotate it toward the top of the Touch.

    • The next few steps require removal of components under where the display normally sits. Be sure to hold the display to avoid putting tension on the delicate display ribbon cable.

  11. iPod Touch 2nd Generation Battery Replacement: step 11, image 1 of 2 iPod Touch 2nd Generation Battery Replacement: step 11, image 2 of 2
    • While holding the display with one hand, run an iPod opening tool down the two long edges of the mylar reflector attached to the metal display tray.

    • When it is sufficiently free from the display tray, remove the mylar reflector from the Touch.

  12. iPod Touch 2nd Generation Battery Replacement: step 12, image 1 of 1
    • Remove the seven Phillips screws securing the metal display tray to the rear panel.

    • The two darker screws belong in the two holes in the tray nearest the bottom edge of the Touch.

  13. iPod Touch 2nd Generation Battery Replacement: step 13, image 1 of 1
    • Lay the display back down into its tray.

    • Remove the final Phillips screw securing the metal tray to the rear panel.

  14. iPod Touch 2nd Generation Battery Replacement: step 14, image 1 of 1
    • Lift the display out of the metal tray and rotate it toward the top edge of the Touch.

    • Use an iPod opening tool to lift the metal display tray and rotate it up toward the top edge of the Touch.

  15. iPod Touch 2nd Generation Battery Replacement: step 15, image 1 of 1
    • Use the edge of an iPod opening tool to peel the copper tape off the top edge of the display.

    • Leave the copper tape attached to the metal display tray.

  16. iPod Touch 2nd Generation Battery Replacement: step 16, image 1 of 1
    • Use an iPod opening tool to pry the display cable connector up off its socket on the logic board.

  17. iPod Touch 2nd Generation Battery Replacement: step 17, image 1 of 1
    • Lift the metal display tray slightly (the battery is attached to its underside) and remove the display from the Touch, minding its delicate cable that may get caught.

    • The display ribbon cable is routed under the metal display tray.

  18. iPod Touch 2nd Generation Battery Replacement, Battery: step 18, image 1 of 1
    • Use the flat end of a spudger to pry the battery off the adhesive securing it to the metal display tray.

    • Remove the metal display tray and set it aside.

    • Lay the battery down flat in the rear case.

  19. iPod Touch 2nd Generation Battery Replacement: step 19, image 1 of 1
    • Use a pair of tweezers to remove the small strip of tape covering the end of the battery cable.

    • When finished installing your new battery, it is essential to cover the bare battery leads with tape to avoid electrical shorts.

  20. iPod Touch 2nd Generation Battery Replacement: step 20, image 1 of 1
    • Flip your battery over and lay it down in the rear panel as shown.

  21. iPod Touch 2nd Generation Battery Replacement: step 21, image 1 of 3 iPod Touch 2nd Generation Battery Replacement: step 21, image 2 of 3 iPod Touch 2nd Generation Battery Replacement: step 21, image 3 of 3
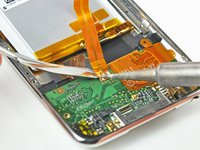
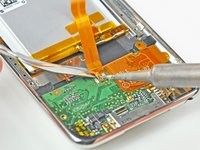
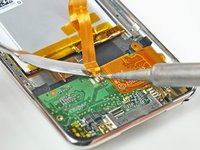
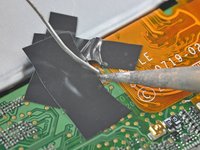
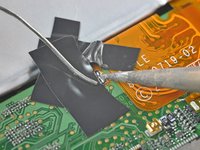
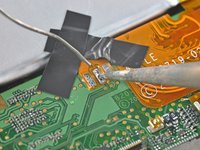
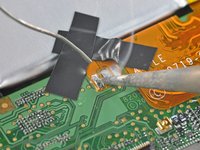
    • The battery on the second generation Touch is attached via solder pads with small holes that go through the battery ribbon cable and attach to flat pads on the face of the logic board. In this step, you will heat each solder pad individually while using a metal spudger to pry it up from the logic board.

    • DO NOT bridge the connection between the solder pads both on the board and on the ribbon cable with your spudger. Shorts have the potential to ruin the logic board.

    • Beware of overheating the board and the cable. Only hold the tip of the iron against the pad long enough to let the solder melt. Excess heat buildup has the potential to ruin the logic board or melt the ribbon cable.

    • Start working from one side of the battery ribbon cable. In our case, we started on the left. Heat the leftmost solder pad while gently prying up from under the ribbon cable to free it from the board. Repeat this process for each of the two remaining pads, working either right to left or left to right.

  22. iPod Touch 2nd Generation Battery Replacement: step 22, image 1 of 1
    • At this point, the battery should be free from the logic board.

    • Lift the old battery out of the Touch and set it aside.

  23. iPod Touch 2nd Generation Battery Replacement: step 23, image 1 of 2 iPod Touch 2nd Generation Battery Replacement: step 23, image 2 of 2
    • Next, use the tip of a soldering iron to flatten out the solder on the logic board solder pads. The pictures show a 'before' and 'after' shot.

    • Remember not to heat up the pads too much.

  24. iPod Touch 2nd Generation Battery Replacement: step 24, image 1 of 2 iPod Touch 2nd Generation Battery Replacement: step 24, image 2 of 2
    • Place your battery in the rear panel, with the cable side down, and use two small strips of electrical tape to hold the cable against the solder pads.

    • Installing the battery upside down (with the cable facing up) will destroy the logic board.

    • Place a strip of tape over the end of the battery ribbon cable to both cover two of the solder pads and hold the contacts down against the logic board.

    • Heat the rightmost contact until the solder below melts and apply a small amount of solder to the contact, allowing it to flow through the two holes in the cable and down to the logic board.

    • Do not apply too much solder. The amount required for a proper bond is miniscule.

    • As soon as the solder has flowed into the joint, remove both the solder and the iron.

  25. iPod Touch 2nd Generation Battery Replacement: step 25, image 1 of 2 iPod Touch 2nd Generation Battery Replacement: step 25, image 2 of 2
    • Remove the piece of tape covering the remaining two leads. If you are satisfied with the position of the cable relative to the pads on the board, proceed. If not, de-solder the first connection and try again.

    • Solder the two remaining pads to the logic board, being mindful of overheating the cable or board.

  26. iPod Touch 2nd Generation Battery Replacement: step 26, image 1 of 1
    • Don't forget to reapply the piece of tape over the solder pads to prevent any shorts.

Conclusion

To reassemble your device, follow these instructions in reverse order.

125 other people completed this guide.

10 Comments

1 thing I misunderstood or otherwise.

When removing the touch glass/front of the iPod you need to be very very very careful to actually get between the plastic/rubber and outer chrome frame, not between the glass and and the plastic/rubber part. Otherwise this will break all of your plastic pieces that are glued to your touch screen.

Another thing is I removed one of the contacts from the circuit board while removing the battery. I thought the ipod was toast. But upon further investigation I realized that that contact went though the board. So I scraped that area down to the other contacts and applied solder to it. Then I was able to reinstall the new battery. PHEW!

Stephan Brunet - Reply

cool. you've got a same problem with me :)

streetpoet11 -

Be careful when you insert your ipod opening tool into your device in step 2 and step 3. The ipod opening tool shouuld be inserted between the metal part and the rubber pad, not between the rubber pad and the edge of touch screen. It will damage your rubber pad surrounding the touch screen. Even though I did some damage to the rubber pad, it looks good when I finish the replacement :)

streetpoet11 - Reply

Did it! Taking apart the case of the Touch (first steps) was the hardest part. Soldering the battery in was a bit tricky. I tinned the connectors prior to soldering and that made it much easier than adding solder later. Reassembly took only about 20 minutes. Disassembly was about 45 minutes. Broke left side of plastic frame around glass front but when reassembled its no problem. You would never know it. I'm really pretty good at electronic assembly and I would agree that its very difficult.

traylor - Reply

Refer to this thread and I would suggest not desoldering the old pads. This happened to me and I was careful and work with electronics everyday.

Soldering point for iPod touch 2nd generation battery

nateokane - Reply

Add Comment

View Statistics:

Past 24 Hours: 13

Past 7 Days: 70

Past 30 Days: 324

All Time: 446,034