Introduction
Replace a cracked or faulty display.
What you need
-
-
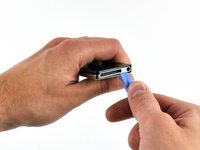
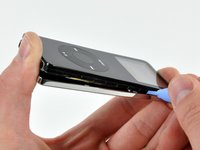
Insert the large iPod opening tool into the seam between the front case and rear panel of the iPod, below the dock connector. Run the tool back and forth to create an opening. The tool's edge should point toward the rear panel to prevent any accidental scratching of the aluminum front case.
-
-
-
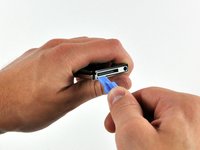
Insert a small iPod opening tool into the seam on the Hold button side of the iPod, with the edge of the tool pointing toward the rear panel.
-
-
-
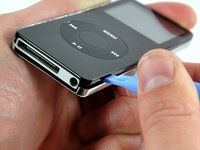
Gently enlarge the existing gap by pressing/wiggling the small iPod opening tool into the gap near each of the two tabs attached to the rear case, pushing the clips toward the center of the iPod until both have been freed.
-
-
-
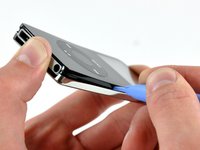
Repeat the same procedure listed in the previous step to free the five clips along the headphone jack side of the iPod.
-
-
-
After ensuring all tabs are free, separate the two halves of the iPod.
-
The rear panel is now free from the iPod.
-
-
-
-
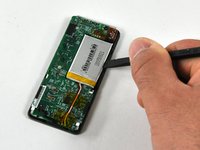
Remove the following 3 screws:
-
Two 3 mm Phillips screws near the dock connector.
-
One 4 mm Phillips screw along the edge of the logic board.
-
-
-
Insert the flat end of a spudger between the battery and the headphone jack side of the front case to pry the battery up off the adhesive securing it to the front case.
-
Rotate the battery out of the iPod and lay it next to the iPod. The battery is still soldered to the logic board by three wires, so don't remove it entirely.
-
-
-
Gently lift up on the dock connector end of the logic board to ensure the logic board is free.
-
-
-
Grasp the end of the logic board near the battery connector with one hand, and hold onto the rest of the iPod with your other hand.
-
Slide the logic board out of its holding brackets on the rear of the display.
-
-
-
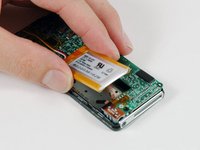
Use a spudger to flip up the black plastic tab holding the orange display ribbon in place. The black tab will rotate up 90 degrees, releasing the ribbon cable.
-
-
-
Use a spudger to flip up the black plastic tab holding the orange click wheel ribbon in place. The black tab will rotate up 90 degrees, releasing the ribbon cable.
-
-
-
Use a spudger to carefully pry up the adhesive holding down the edge of the display.
-
-
-
Gently lift up on one corner of the display to separate the adhesive holding the display in place.
-
Lift up on the other corner of the display in the same manner.
-


To reassemble your device, follow these instructions in reverse order.
Cancel: I did not complete this guide.
51 other people completed this guide.

2 Guide Comments
Noice! I accidentally stepped on my screen (TBF, my cat was in the way) so I decided to consult the almighty iFixit! I did have a bit of trouble removing the screen, though, as I found the adhesive too strong to pull. Therefore, I used my spudger as a lever to pull it out.
As this was my first intro into the world of DIY electronics repairing (that is to say, one that didn't have me losing every piece to it), I'm ready to see what else can come at me!
(Also, be careful not to put any fingerprints on the inside of the screen. I nearly did that, but some toilet paper and some isopropyl fixed it up.)