
iPod Nano 1st Generation Battery Replacement

What you need

  1. iPod Nano 1st Generation Battery Replacement, Rear Panel: step 1, image 1 of 1
    • Before opening your iPod, ensure that the hold switch is in the locked position.

  2. iPod Nano 1st Generation Battery Replacement: step 2, image 1 of 1
    • The rear panel is secured to the front case by eleven clips permanently attached to the rear panel. These clips lock onto small tabs machined into the front case.

    • To free the tabs, they must be pushed down and away from the iPod's case. Note the location of all tabs on the rear panel. When using an iPod opening tool to free the rear panel, be sure to work the tool at the location of these clips.

  3. iPod Nano 1st Generation Battery Replacement: step 3, image 1 of 2 iPod Nano 1st Generation Battery Replacement: step 3, image 2 of 2
    • Opening the iPod can be challenging. Don't get discouraged if it takes you a few tries before the iPod is opened.

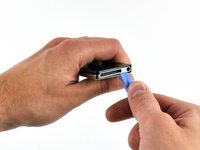
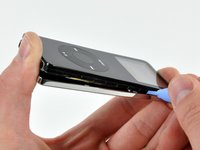
    • Insert the large iPod opening tool into the seam between the front case and rear panel of the iPod, below the dock connector. Run the tool back and forth to create an opening. The tool's edge should point toward the rear panel to prevent any accidental scratching of the aluminum front case.

  4. iPod Nano 1st Generation Battery Replacement: step 4, image 1 of 1
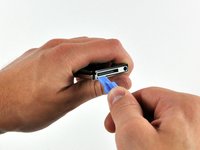
    • Insert a small iPod opening tool into the seam on the Hold button side of the iPod, with the edge of the tool pointing toward the rear panel.

  5. iPod Nano 1st Generation Battery Replacement: step 5, image 1 of 1
    • The large iPod opening tool is no longer needed to gain access to the left side of the iPod.

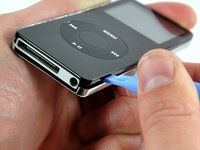
    • Gently enlarge the existing gap by pressing/wiggling the small iPod opening tool into the gap near each of the two tabs attached to the rear case, pushing the clips toward the center of the iPod until both have been freed.

  6. iPod Nano 1st Generation Battery Replacement: step 6, image 1 of 3 iPod Nano 1st Generation Battery Replacement: step 6, image 2 of 3 iPod Nano 1st Generation Battery Replacement: step 6, image 3 of 3
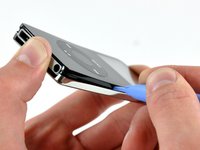
    • Repeat the same procedure listed in the previous step to free the five clips along the headphone jack side of the iPod.

  7. iPod Nano 1st Generation Battery Replacement: step 7, image 1 of 1
    • After ensuring all tabs are free, separate the two halves of the iPod.

    • The rear panel is now free from the iPod.

  8. iPod Nano 1st Generation Battery Replacement, Battery & Logic Board: step 8, image 1 of 1
    • Remove any kapton tape over the screws, if necessary.

    • Remove the following 3 screws:

    • Two 3 mm Phillips screws near the dock connector.

    • One 4 mm Phillips screw along the edge of the logic board.

    • During reassembly, make sure to put back any tape or plastic you remove. This will prevent any shorts between the logic board and the rear panel. If your tape is unusable, kapton tape can be purchased online.

  9. iPod Nano 1st Generation Battery Replacement: step 9, image 1 of 1
    • Peel up the ground strap connecting the battery to the logic board.

  10. iPod Nano 1st Generation Battery Replacement: step 10, image 1 of 2 iPod Nano 1st Generation Battery Replacement: step 10, image 2 of 2
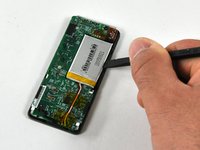
    • Insert the flat end of a spudger between the battery and the headphone jack side of the front case to pry the battery up off the adhesive securing it to the front case.

    • Rotate the battery out of the iPod and lay it next to the iPod. The battery is still soldered to the logic board by three wires, so don't remove it entirely.

  11. iPod Nano 1st Generation Battery Replacement: step 11, image 1 of 1
    • Gently lift up on the dock connector end of the logic board to ensure the logic board is free.

  12. iPod Nano 1st Generation Battery Replacement: step 12, image 1 of 1
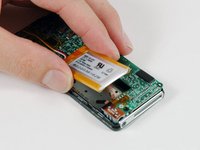
    • Grasp the end of the logic board near the battery connector with one hand, and hold onto the rest of the iPod with your other hand.

    • Make sure the logic board is lifted slightly above the white plastic notch on the battery side of the board. This notch prevents the board from sliding out in the next step.

    • Slide the logic board out of its holding brackets on the rear of the display.

    • The logic board is still connected to the iPod by two ribbon cables.

  13. iPod Nano 1st Generation Battery Replacement: step 13, image 1 of 1
    • Disconnecting the following two ribbon cables may be challenging. To prevent straining the cables or connectors, you can only separate the two halves of the iPod about 1/2 inch during the process.

    • Use a spudger to flip up the black plastic tab holding the orange display ribbon in place. The black tab will rotate up 90 degrees, releasing the ribbon cable.

  14. iPod Nano 1st Generation Battery Replacement: step 14, image 1 of 1
    • Use a spudger to slide the display ribbon out of its connector.

  15. iPod Nano 1st Generation Battery Replacement: step 15, image 1 of 1
    • Use a spudger to flip up the black plastic tab holding the orange click wheel ribbon in place. The black tab will rotate up 90 degrees, releasing the ribbon cable.

  16. iPod Nano 1st Generation Battery Replacement: step 16, image 1 of 1
    • Use a spudger to slide the click wheel ribbon out of its connector.

  17. iPod Nano 1st Generation Battery Replacement: step 17, image 1 of 1
    • The logic board and battery are now free from the iPod.

  18. iPod Nano 1st Generation Battery Replacement, Battery: step 18, image 1 of 1
    • Peel the orange kapton tape covering the battery leads.

  19. iPod Nano 1st Generation Battery Replacement: step 19, image 1 of 2 iPod Nano 1st Generation Battery Replacement: step 19, image 2 of 2
    • The next few steps require a soldering iron.

    • The ends of the battery leads are fed through small holes in the logic board and held in place by a small amount of solder.

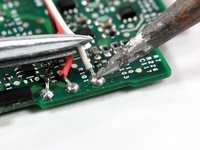
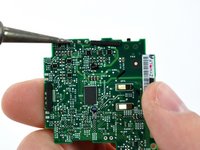
    • Begin by heating the exposed end of the white battery lead with the tip of a soldering iron while simultaneously pulling the lead away from the connection, using tweezers to grasp the lead by the insulation.

    • De-solder the remaining leads, following the procedure illustrated above.

    • Due to the delicate nature of electronic components, it is imperative to limit the amount of heat transferred from the soldering iron to the logic board. An easy way to accomplish this is to pull on the battery lead with light, continuous tension, while the soldering iron heats up the connection. In order to avoid damage, lift the solder tip off the connection as soon as the solder melts and the lead slides out.

  20. iPod Nano 1st Generation Battery Replacement: step 20, image 1 of 1
    • If present, remove the small piece of shrink tube protecting the new battery's positive lead.

  21. iPod Nano 1st Generation Battery Replacement: step 21, image 1 of 2 iPod Nano 1st Generation Battery Replacement: step 21, image 2 of 2
    • To aid in soldering the new battery, be sure the solder pad holes are clear of solder. This way, you can insert the new battery leads and solder them in place.

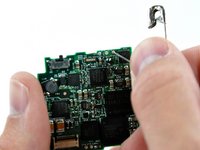
    • To open the solder holes, open a safety pin and push it against the solder blocking the hole. At the same time, heat the same solder pad from the other side of the logic board. Opening the holes completely will require repeating this procedure several times from alternating sides of the logic board.

    • These holes are extremely small, so the safety pin will probably be too large to pass all the way through. Do not insert the entire pin through the hole -- only the tip of the pin.

    • You can also try entering the tip of the pin on the other side of the board to open the solder pad hole.

  22. iPod Nano 1st Generation Battery Replacement: step 22, image 1 of 1
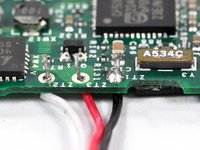
    • Place the logic board flat on a table with the gold ground contacts (shown in orange) facing up.

    • Using a pair of tweezers, insert the stripped ends of the battery leads into their respective holes.

    • Insert the black lead into the hole nearest the hold switch (shown in red).

    • Insert the red lead into the center hole.

    • Insert the white lead into the hole furthest from the hold switch.

    • To keep the leads in place, it may be helpful to first bend them 90 degrees, and then insert them into the holes.

    • To keep the leads in place, it may be helpful to first bend the battery leads into their final shape, then insert the stripped ends into the holes.

  23. iPod Nano 1st Generation Battery Replacement: step 23, image 1 of 1
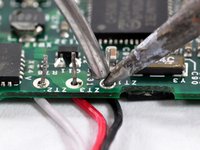
    • Flip the logic board and battery over so the bare ends of the battery leads are facing up.

  24. iPod Nano 1st Generation Battery Replacement: step 24, image 1 of 2 iPod Nano 1st Generation Battery Replacement: step 24, image 2 of 2
    • In this step, you will solder the battery leads to the solder pads on the logic board.

    • Excess heat transferred to the logic board while soldering may result in electronic component damage. As a rule of thumb, hold the tip of the soldering iron against the joint just long enough to melt the solder, then quickly remove it.

    • Solder the connection by momentarily placing the tip of the soldering iron against the connection, melting solder into the connection, and quickly removing both the solder and the tip of the soldering iron from the connection. The solder should flow around the new battery lead, solidly connecting it to the pad on the logic board.

    • Solder the other two battery leads in the same fashion, taking care not to bridge any of the connections together.

  25. iPod Nano 1st Generation Battery Replacement: step 25, image 1 of 1
    • Rotate the battery toward the logic board and place it flat in its void, bending the cables as necessary.

Conclusion

To reassemble your device, follow these instructions in reverse order.

104 other people completed this guide.

12 Comments

I skipped steps 8,9,11-17, and 21.

Step 19> when un-soldering the old battery wires, make sure to leave solder on the pads and in the holes.

I replaced steps 22-24 with Step 22-24> Very carefully and precisely:

-Place the black lead onto the pad nearest the hold switch (shown in red) with the end of wire pointing away from the battery.

-Place the red lead onto the center pad with the end of wire pointing away from the battery.

-Place the white lead onto the pad furthest from the hold switch with the end of wire pointing away from the battery.

Gently hold each wire in place on the pad while applying the soldering iron taking care not to touch the wire to any other pad or trace (note black wire). When the wire sinks into the solder, remove heat. Hold wire until solder has set.

Do step 25 and charge battery. Much simpler and less risk.

abeheide - Reply

I thought this was a bit difficult, mainly the initial separation and the soldering. I think one of those headsets with magnifying glasses would have been super helpful.

kissaj - Reply

For all newbies, make sure that your soldering spots are neat and clean. Your workplace must be clean! Too hasty repair...and you'll reassemble your Pod once again.

Thanks for the neat repair guide! Much appreciated!" Now I can enjoy my "new Pod" for another 8years at least! No that's what I call environmental awareness! (built in 2005)

Uwe von Ditfurth - Reply

Well, how’s it going? It’s been 8 years…

Zachary Rushworth -

Success! The instructions were clear and helpful. This was the third battery for my iPod, so the desoldering step took a fair amount of time. I am not very experienced with soldering, so I practiced on a little blinking christmas tree kit before attempting this, and I think that was useful.

jsandoe - Reply

Add Comment

View Statistics:

Past 24 Hours: 34

Past 7 Days: 205

Past 30 Days: 830

All Time: 128,066