
iPhone 3G Home Button Replacement

What you need

  1. iPhone 3G Home Button Replacement, Broken Glass: step 1, image 1 of 3 iPhone 3G Home Button Replacement, Broken Glass: step 1, image 2 of 3 iPhone 3G Home Button Replacement, Broken Glass: step 1, image 3 of 3
    • If your display glass is cracked, keep further breakage contained and prevent bodily harm during your repair by taping the glass.

    • Lay overlapping strips of clear packing tape over the iPhone's display until the whole face is covered.

    • This will keep glass shards contained and provide structural integrity when prying and lifting the display.

    • Wear safety glasses to protect your eyes from any glass shaken free during the repair.

  2. iPhone 3G Home Button Replacement, Home Button: step 2, image 1 of 1
    • Remove the 2 Phillips #00 screws at the bottom of the iPhone, located on both sides of the dock connector.

  3. iPhone 3G Home Button Replacement: step 3, image 1 of 2 iPhone 3G Home Button Replacement: step 3, image 2 of 2
    • Attach the small suction cup to the iPhone, above the home-button.

    • Grip the suction cup, and start lifting the display slowly, and gently, making sure not to remove the display completely. There are still ribbon cables connecting the display assembly to the motherboard.

    • In some cases, the suction cup just won't adhere to the screen! You could use a heavy duty suction cup, or duct tape to pry off the screen. However, if you do not plan on replacing the screen, I do not suggest that you use duct tape.

    • Lift the display to a 45 degree angle.

  4. iPhone 3G Home Button Replacement: step 4, image 1 of 3 iPhone 3G Home Button Replacement: step 4, image 2 of 3 iPhone 3G Home Button Replacement: step 4, image 3 of 3
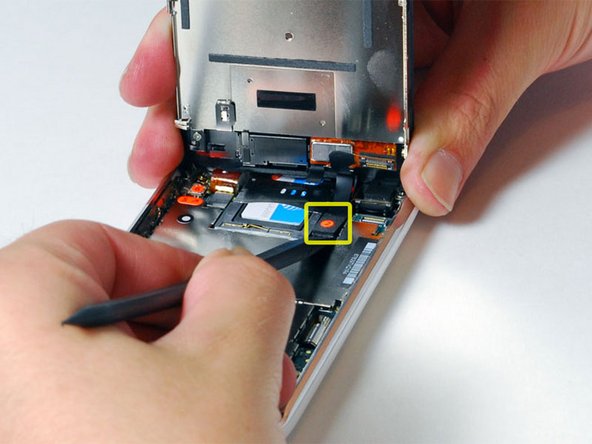
    • Use a spudger to disconnect ribbon cable(s) 1, 2, and 3.

    • Just a reminder. The 3rd cable is actually connected to the board by a port, which requires an inset connector.

    • Lift up the black tab on the back of the inset connector port, and then the 3rd ribbon should slide right out.

  5. iPhone 3G Home Button Replacement: step 5, image 1 of 1
    • After connectors 1, 2, and 3 are detached, you can lift the display assembly off completely, and set apart the case for the iPhone, you will only need the assembly for now.

    • Sorry for the bad image quality.

  6. iPhone 3G Home Button Replacement: step 6, image 1 of 1
    • It will be easy to locate the home-button assembly from here.

    • Make sure the cable that runs into the home button assembly is not damaged or loose. This cable is indicated in the image here with a rectangular marker.

  7. iPhone 3G Home Button Replacement: step 7, image 1 of 2 iPhone 3G Home Button Replacement: step 7, image 2 of 2
    • If the cables are all fine, or making sure the cables are firmly placed does not work, check the dock connector for any broken pins, especially the areas I highlighted with the circular red markers. If any pins are broken, you might want to buy new cables, because repairing these pins requires a lot of experience and precision tools.

    • If this STILL doesn't work, check the pins on the cables connected to the home-button (marked with a red marker in second image.) Again, if any pins are broken, you might want to buy new cables, or a new home-button, because these pins are very fragile and hard to fix.

  8. iPhone 3G Home Button Replacement: step 8, image 1 of 1
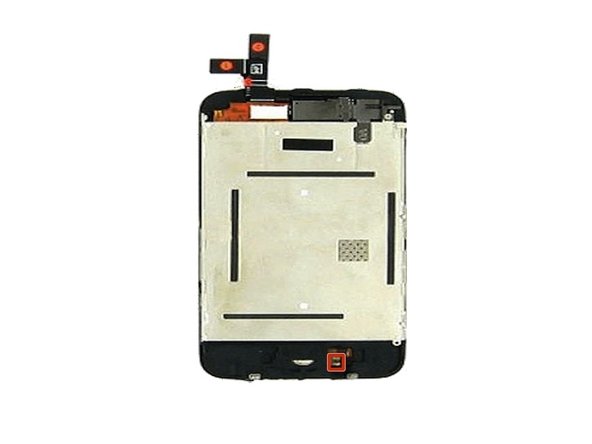
    • If any cables or pins are broken , you could buy new cables, as mentioned before. However, if the home-button screws are broken or missing, or the home-button is completely broken, you might want to buy a new home button assembly. This assembly is displayed on this step's adjoining image.

erthw46uhw4t

Member since: 05/01/12

1,841 Reputation

1 Guide authored

Team

iTweakTech Fixers Member of iTweakTech Fixers

Community

5 Members

2 Guides authored

View Statistics:

Past 24 Hours: 0

Past 7 Days: 11

Past 30 Days: 50

All Time: 96,790