Free Shipping on Domestic Orders $75+

Epson TM-U300 Cutter Blade Replacement

Views: 829

View statistics:

Past 24 Hours:
1
Past 7 Days:
11
Past 30 Days:
71
All Time:
829
Comments: 0

No one has left comments on this guide. Will you be first?

Go to guide comments
Completed: 0

No one has marked this guide "completed." Will you be the first?

Favorites: 0

No one has favorited (and subscribed to) this guide. Will you be the first?

Time Required: 15 minutes
Difficulty: Easy
Community-Contributed Guide

An awesome member of our community made this guide. It was not created by iFixit staff.

Epson TM-U300 Cutter Blade Replacement

Introduction

Go to step 1 ↓

Does your Epson TM-U300 printer not cut paper as well as it used to? Does the cutter keep jamming/making strange noises?

This guide shows you how to replace the blade.

Please go easy on me since this is the first guide I’ve ever submitted on iFixit. Thanks!

What you need

Parts

Tools

    1. Epson TM-U300 Cutter Blade Replacement, Remove the cutter unit: step 1, image 1 of 3 Epson TM-U300 Cutter Blade Replacement, Remove the cutter unit: step 1, image 2 of 3 Epson TM-U300 Cutter Blade Replacement, Remove the cutter unit: step 1, image 3 of 3
      • Make sure the power supply/interface cables are disconnected before proceeding!

      • Open the print head/ribbon cartridge cover.

      • Remove the two Phillips screws securing the two grounding brackets which hold the cutter unit in place.

      • Set the metal brackets aside.

      • Do not pull on them forcibly – you risk tearing the grounding wires.

      • Remove the cutter, being careful not to tear/pinch the cable coming from it.

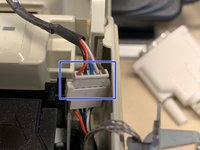
      • Disconnect the cable connecting the cutter to the printer.

      Ask FixBot

      Add Comment

    2. Epson TM-U300 Cutter Blade Replacement, Disassemble the cutter: step 2, image 1 of 3 Epson TM-U300 Cutter Blade Replacement, Disassemble the cutter: step 2, image 2 of 3 Epson TM-U300 Cutter Blade Replacement, Disassemble the cutter: step 2, image 3 of 3
      • Caution: The screws are quite soft and easy to strip.

      • Make sure the cutter assembly is oriented so that the motor/gears face you.

      • Remove the three screws holding the two halves in place.

      • Separate the two halves, making sure not to damage the wires.

      Ask FixBot

      Add Comment

    3. Epson TM-U300 Cutter Blade Replacement, Remove the blade: step 3, image 1 of 3 Epson TM-U300 Cutter Blade Replacement, Remove the blade: step 3, image 2 of 3 Epson TM-U300 Cutter Blade Replacement, Remove the blade: step 3, image 3 of 3
      • The blade will be accessible after separating the two halves.

      • The blade is sharp! Be careful not to injure yourself.

      • Make sure to note the position the blade is installed in.

      • The toothed edge should be facing the opening for the paper, with the longer of the three notches on the right (assuming the frame is oriented as pictured).

      • Make sure to route the wires coming from the cutter assembly through the groove in the left hinge of the print head cover when reinstalling the assembly into the printer.

      Ask FixBot

      Add Comment

Conclusion

To reassemble your printer, follow these instructions in reverse order.

Cancel: I did not complete this guide.

Fifo F

Member since: 03/12/15

148 Reputation

1 Guide authored

0 Guide Comments

Add Comment

View Statistics:

Past 24 Hours: 1

Past 7 Days: 11

Past 30 Days: 71

All Time: 829