Free Shipping on Domestic Orders $75+

iPad Pro 13" Volume Button Installation

Prerequisite Only
This is a prerequisite-only guide! This guide is part of another procedure and isn’t meant to be used alone.

What you need

    1. iPad Pro 13" Volume Button Installation, Check the volume button cap: step 1, image 1 of 1
      • Make sure the silver retaining bracket is properly seated in each volume button cap.

      Ask FixBot

      Add Comment

    2. iPad Pro 13" Volume Button Installation, Place the button caps: step 2, image 1 of 3 iPad Pro 13" Volume Button Installation, Place the button caps: step 2, image 2 of 3 iPad Pro 13" Volume Button Installation, Place the button caps: step 2, image 3 of 3
      • Slide each retaining bracket and button cap into a volume button recess.

      Ask FixBot

      Add Comment

    3. iPad Pro 13" Volume Button Installation, Install the button cap screws: step 3, image 1 of 1
      • Place a piece of tape over the volume button caps to keep them in place while you work.

      • Use a JCIS or JIS 00 screwdriver to install the four 1.6 mm‑long screws securing the volume button retaining brackets.

      • Remove the tape.

      Ask FixBot

      Add Comment

    4. iPad Pro 13" Volume Button Installation, Install the plungers: step 4, image 1 of 3 iPad Pro 13" Volume Button Installation, Install the plungers: step 4, image 2 of 3 iPad Pro 13" Volume Button Installation, Install the plungers: step 4, image 3 of 3
      • Use a pair of tweezers to slide the plungers into their openings.

      • One end of the plunger is slightly larger than the other. Make sure to insert the smaller end into the opening.

      Ask FixBot

      Add Comment

    5. iPad Pro 13" Volume Button Installation, Place the volume button and bracket: step 5, image 1 of 3 iPad Pro 13" Volume Button Installation, Place the volume button and bracket: step 5, image 2 of 3 iPad Pro 13" Volume Button Installation, Place the volume button and bracket: step 5, image 3 of 3
      • Place the volume button ribbon cable into its place in the iPad. Be careful not to knock either plunger out.

      • Gently press the ribbon cable into place, making sure all of the screw holes align with their wells.

      • Be careful not to press on any of the components on top of the ribbon cable.

      Ask FixBot

      Add Comment

    6. iPad Pro 13" Volume Button Installation, Install the volume button and bracket screws: step 6, image 1 of 1
      • Use a JCIS or JIS 00 screwdriver to install the 1.6 mm‑long screws securing the volume button ribbon cable to the side of the iPad frame.

      Ask FixBot

      Add Comment

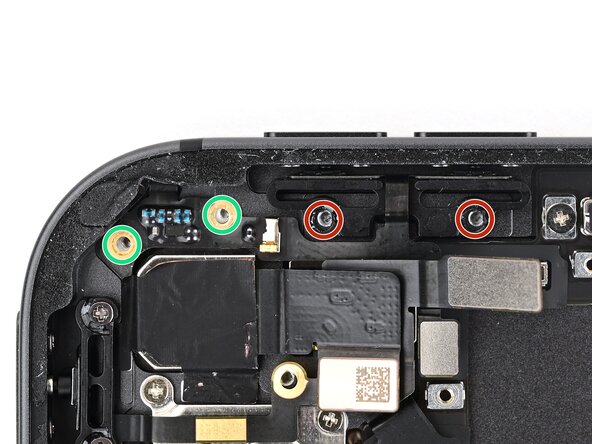
    7. iPad Pro 13" Volume Button Installation: step 7, image 1 of 2 iPad Pro 13" Volume Button Installation: step 7, image 2 of 2
      • Use a JCIS or JIS 00 screwdriver to install four screws securing the volume buttons:

      • Two 2.0 mm‑long screws securing the volume buttons bracket

      • Two 1.4 mm‑long screws securing the volume buttons ribbon cable

      Ask FixBot

      Add Comment

    8. iPad Pro 13" Volume Button Installation, Connect the volume buttons: step 8, image 1 of 3 iPad Pro 13" Volume Button Installation, Connect the volume buttons: step 8, image 2 of 3 iPad Pro 13" Volume Button Installation, Connect the volume buttons: step 8, image 3 of 3
      • Use your finger or the flat end of a spudger to connect the volume button press connector, then the lock button press connector.

      Ask FixBot

      Add Comment

Finish Line

Cancel: I did not complete this guide.

Nick Schultz

Member since: 03/24/24

65,240 Reputation

343 Guides authored

0 Guide Comments

Add Comment

View Statistics:

Past 24 Hours: 0

Past 7 Days: 1

Past 30 Days: 10

All Time: 53