Free Shipping on Domestic Orders $75+

iPad Mini 3 Wi-Fi Front Panel Assembly Replacement

Prerequisite Only
This is a prerequisite-only guide! This guide is part of another procedure and isn’t meant to be used alone.

What you need

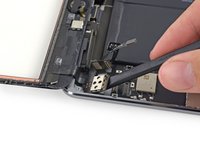
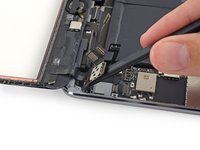
    1. iPad Mini 3 Wi-Fi Front Panel Assembly Replacement, Front Panel Assembly: step 1, image 1 of 2 iPad Mini 3 Wi-Fi Front Panel Assembly Replacement, Front Panel Assembly: step 1, image 2 of 2
      • Use the tip of a spudger to lift the digitizer cable connector straight up off of its socket.

      Ask FixBot

      Add Comment

    2. iPad Mini 3 Wi-Fi Front Panel Assembly Replacement: step 2, image 1 of 2 iPad Mini 3 Wi-Fi Front Panel Assembly Replacement: step 2, image 2 of 2
      • Slide the flat end of a spudger under the battery side of the digitizer board to begin separating it from the rear case.

      Ask FixBot

      Add Comment

    3. iPad Mini 3 Wi-Fi Front Panel Assembly Replacement: step 3, image 1 of 2 iPad Mini 3 Wi-Fi Front Panel Assembly Replacement: step 3, image 2 of 2
      • Lift the digitizer board up to free the last of the adhesive.

      Ask FixBot

      Add Comment

    4. iPad Mini 3 Wi-Fi Front Panel Assembly Replacement: step 4, image 1 of 1
      • Lift and remove the front panel assembly from the iPad.

      Ask FixBot

      Add Comment

Conclusion

To reassemble your device, follow these instructions in reverse order.

Cancel: I did not complete this guide.

Evan Noronha

Member since: 02/05/15

229,803 Reputation

166 Guides authored

0 Guide Comments

Add Comment

View Statistics:

Past 24 Hours: 1

Past 7 Days: 5

Past 30 Days: 22

All Time: 627