Free Shipping on Domestic Orders $75+

iPad 10 Battery Removal

Prerequisite Only
This is a prerequisite-only guide! This guide is part of another procedure and isn’t meant to be used alone.

What you need

    1. iPad 10 Battery Removal, Remove the battery connector screw: step 1, image 1 of 1
      • Use a JIS 00 screwdriver to remove the 1.7 mm‑long screw securing the battery connector.

      Ask FixBot

      Add Comment

    2. iPad 10 Battery Removal, Remove the battery adhesive: step 2, image 1 of 3 iPad 10 Battery Removal, Remove the battery adhesive: step 2, image 2 of 3 iPad 10 Battery Removal, Remove the battery adhesive: step 2, image 3 of 3
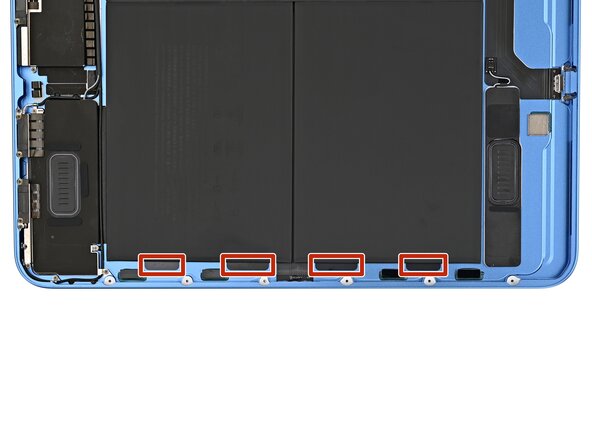
      • Use a pair of blunt tweezers to grab one of the four stretch-release adhesive strips under the battery.

      Ask FixBot

      Add Comment

    3. iPad 10 Battery Removal: step 3, image 1 of 2 iPad 10 Battery Removal: step 3, image 2 of 2
      • Pull the adhesive pull tab away from the battery, and roll the tweezers to wrap the adhesive around them.

      Ask FixBot

      Add Comment

    4. iPad 10 Battery Removal: step 4, image 1 of 3 iPad 10 Battery Removal: step 4, image 2 of 3 iPad 10 Battery Removal: step 4, image 3 of 3
      • Slowly pull the adhesive out, keeping it as close to the iPad as possible without touching it.

      Ask FixBot

      Add Comment

    5. iPad 10 Battery Removal, Remove the remaining stretch‑release strips: step 5, image 1 of 3 iPad 10 Battery Removal, Remove the remaining stretch‑release strips: step 5, image 2 of 3 iPad 10 Battery Removal, Remove the remaining stretch‑release strips: step 5, image 3 of 3
      • Remove the remaining three stretch‑release adhesive strips securing the battery.

      Ask FixBot

      Add Comment

    6. iPad 10 Battery Removal, Lift the battery cells: step 6, image 1 of 3 iPad 10 Battery Removal, Lift the battery cells: step 6, image 2 of 3 iPad 10 Battery Removal, Lift the battery cells: step 6, image 3 of 3
      • Insert a plastic card beneath each battery cell to separate any remaining adhesive securing it.

      • Don't bend or crease the battery. If the battery won't lift, apply a few drops of high-concentration (>90%) isopropyl alcohol or adhesive remover so it runs underneath the stuck section.

      Ask FixBot

      Add Comment

    7. iPad 10 Battery Removal, Remove the battery: step 7, image 1 of 3 iPad 10 Battery Removal, Remove the battery: step 7, image 2 of 3 iPad 10 Battery Removal, Remove the battery: step 7, image 3 of 3
      • Slide the battery away from the logic board to disconnect its connector.

      • If it doesn't slide out easily, "walk" the battery out, first on the left side, then the right, to disconnect it.

      • Remove the battery.

      Ask FixBot

      Add Comment

Finish Line

Cancel: I did not complete this guide.

Nick Schultz

Member since: 03/24/24

65,246 Reputation

343 Guides authored

0 Guide Comments

Add Comment

View Statistics:

Past 24 Hours: 0

Past 7 Days: 1

Past 30 Days: 8

All Time: 35