
iMac Intel 21.5" EMC 2389 Optical Drive Fan Replacement

What you need

  1. iMac Intel 21.5" EMC 2389 Optical Drive Fan Replacement, Glass Panel: step 1, image 1 of 2 iMac Intel 21.5" EMC 2389 Optical Drive Fan Replacement, Glass Panel: step 1, image 2 of 2
    Tool used on this step:
    Heavy-Duty Suction Cups (Pair)
    $14.95
    Buy
    • Before beginning, unplug your iMac and lay it on a soft surface as shown.

    • Stick a suction cup near each of the two top corners of the glass panel.

    • To attach the suction cups we sell, first position the suction cup with the movable handle parallel to the face of the glass panel. While lightly holding the suction cup against the glass, raise the movable handle until it is parallel with the other handle.

    • If your suction cups refuse to stick, try cleaning both the glass panel and the suction cup with a mild solvent.

  2. iMac Intel 21.5" EMC 2389 Optical Drive Fan Replacement: step 2, image 1 of 2 iMac Intel 21.5" EMC 2389 Optical Drive Fan Replacement: step 2, image 2 of 2
    • Gently lift the glass panel perpendicular to the face of the LCD enough to clear the steel mounting pins attached along the underside of the top edge of the glass panel.

    • Pull the glass panel away from the lower edge of the iMac and carefully set it aside.

    • During reinstallation, be sure to meticulously clean the inside of the glass panel and the face of the LCD as any dust or fingerprints trapped inside will be annoyingly visible when the machine is turned on.

  3. iMac Intel 21.5" EMC 2389 Optical Drive Fan Replacement, Display: step 3, image 1 of 3 iMac Intel 21.5" EMC 2389 Optical Drive Fan Replacement, Display: step 3, image 2 of 3 iMac Intel 21.5" EMC 2389 Optical Drive Fan Replacement, Display: step 3, image 3 of 3
    • Remove the eight 8 mm T10 Torx screws securing the display to the outer case.

    • The last two pictures are detail shots of each side of the display.

  4. iMac Intel 21.5" EMC 2389 Optical Drive Fan Replacement: step 4, image 1 of 1
    • Slightly lift the top edge of the display out of the outer case.

    • Do not lift it too much. There are several cables attaching the display to the logic board.

  5. iMac Intel 21.5" EMC 2389 Optical Drive Fan Replacement: step 5, image 1 of 2 iMac Intel 21.5" EMC 2389 Optical Drive Fan Replacement: step 5, image 2 of 2
    • Pull the vertical sync cable connector out of its socket on the LED driver board near the top left corner of your iMac.

  6. iMac Intel 21.5" EMC 2389 Optical Drive Fan Replacement: step 6, image 1 of 2 iMac Intel 21.5" EMC 2389 Optical Drive Fan Replacement: step 6, image 2 of 2
    • Rotate the display out of the outer case enough to disconnect the LED backlight power cable from the LED driver board.

    • Disconnect the LED backlight power cable by depressing the locking mechanism while pulling the connector away from its socket (toward the bottom edge of the iMac).

  7. iMac Intel 21.5" EMC 2389 Optical Drive Fan Replacement: step 7, image 1 of 2 iMac Intel 21.5" EMC 2389 Optical Drive Fan Replacement: step 7, image 2 of 2
    • The display data cable plug has a wire lock. Disengage the plug's lock by rotating the plastic tab so that it points upward. (It is not a pull tab.)

    • Pull the display data cable straight out of its socket on the logic board.

    • Do not lift up on the display data cable, as its socket is very fragile. Pull the cable parallel to the face of the logic board.

  8. iMac Intel 21.5" EMC 2389 Optical Drive Fan Replacement: step 8, image 1 of 2 iMac Intel 21.5" EMC 2389 Optical Drive Fan Replacement: step 8, image 2 of 2
    • Disconnect the LCD thermal sensor cable connector from its socket on the logic board.

    • If your fan is spinning full speed after completion, check this connection or the hard drive's thermal sensor cable.

  9. iMac Intel 21.5" EMC 2389 Optical Drive Fan Replacement: step 9, image 1 of 1
    • Carefully pull the display toward the top edge of your iMac and lift it out of the outer case, minding any cables that may get caught.

  10. iMac Intel 21.5" EMC 2389 Optical Drive Fan Replacement, Optical Drive: step 10, image 1 of 1
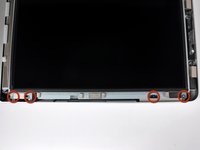
    • Remove the following four screws:

    • One 9.3 mm T10 Torx screw with a large head

    • Three 9.3 mm T10 Torx screws with a normal sized head

  11. iMac Intel 21.5" EMC 2389 Optical Drive Fan Replacement: step 11, image 1 of 2 iMac Intel 21.5" EMC 2389 Optical Drive Fan Replacement: step 11, image 2 of 2
    • Pull the optical drive thermal sensor connector toward the top edge of the iMac to disconnect it from its socket on the logic board.

  12. iMac Intel 21.5" EMC 2389 Optical Drive Fan Replacement: step 12, image 1 of 2 iMac Intel 21.5" EMC 2389 Optical Drive Fan Replacement: step 12, image 2 of 2
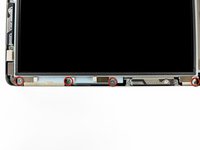
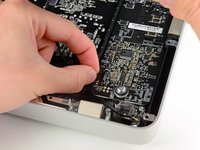
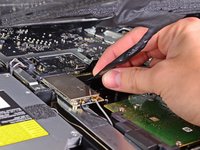
    • Lift the inner edge of the optical drive and maneuver its connector past the GPU frame attached to the logic board.

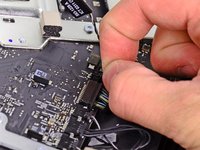
    • Carefully pull the optical drive off its mounting pins on the right side of the outer case to gain clearance for disconnecting the optical drive cable.

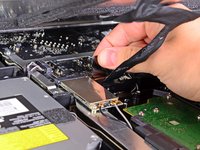
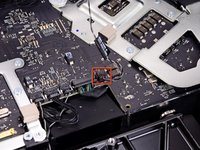
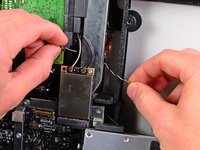
    • Allow the optical drive to hang down as you de-route the optical drive thermal sensor connector from behind the GPU heat sink.

  13. iMac Intel 21.5" EMC 2389 Optical Drive Fan Replacement: step 13, image 1 of 1
    • Disconnect the optical drive cable by pulling its connector away from the optical drive.

    • Remove the optical drive from the iMac.

    • Do not forget to also move the thermal sensor from the optical drive to the enclosure when you install the second hard drive.

  14. iMac Intel 21.5" EMC 2389 Optical Drive Fan Replacement, Optical Drive Fan: step 14, image 1 of 1
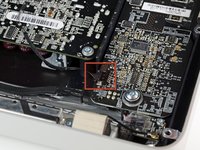
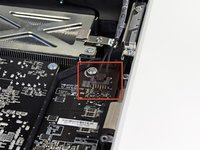
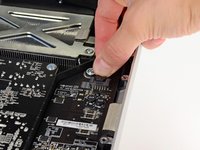
    • Remove the single 13 mm T10 Torx screw securing the optical drive fan to the outer case.

  15. iMac Intel 21.5" EMC 2389 Optical Drive Fan Replacement: step 15, image 1 of 1
    • Pull the optical drive fan off the pins attached to the outer case.

  16. iMac Intel 21.5" EMC 2389 Optical Drive Fan Replacement: step 16, image 1 of 1
    • Pull the optical drive fan connector out of its socket on the logic board.

    • Remove the optical drive fan from the iMac.

Conclusion

To reassemble your device, follow these instructions in reverse order.

6 other people completed this guide.

0 Comments

Add Comment

View Statistics:

Past 24 Hours: 0

Past 7 Days: 5

Past 30 Days: 7

All Time: 5,180