
iMac G5 20" Model A1145 Microphone Replacement

What you need

  1. iMac G5 20" Model A1145 Microphone Replacement, Access Door: step 1, image 1 of 1
    • Orient the iMac face-side down on a table with the bottom edge facing yourself.

    • Remove the two Phillips screws securing the access door to the bottom grille of your iMac.

    • The screws are captive in the access door.

    • Before beginning the repair, unplug the computer and press and hold the power switch for 20-30 seconds, to discharge internal capacitors.

  2. iMac G5 20" Model A1145 Microphone Replacement: step 2, image 1 of 1
    • Remove the access door.

  3. iMac G5 20" Model A1145 Microphone Replacement, Front Bezel: step 3, image 1 of 1
    • Remove the three T8 Torx screws securing the front bezel to the rear case along the lower edge of the iMac.

  4. iMac G5 20" Model A1145 Microphone Replacement: step 4, image 1 of 2 iMac G5 20" Model A1145 Microphone Replacement: step 4, image 2 of 2
    • Turn the computer over.

    • Use your thumbs to press both RAM arms in past the front bezel for enough clearance to lift it off the rear case.

  5. iMac G5 20" Model A1145 Microphone Replacement: step 5, image 1 of 1
    • While holding the RAM arms in with your thumbs, lift the lower edge of the front bezel enough to clear the rear case.

  6. iMac G5 20" Model A1145 Microphone Replacement: step 6, image 1 of 3 iMac G5 20" Model A1145 Microphone Replacement: step 6, image 2 of 3 iMac G5 20" Model A1145 Microphone Replacement: step 6, image 3 of 3
    Tool used on this step:
    Plastic Cards
    $2.99
    Buy
    • Re-orient your iMac so it sits upright on the stand.

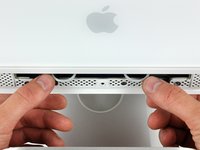
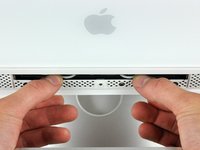
    • Insert a plastic card up into the corner of the air vent slot near the top of the rear case.

    • Push the card toward the top of the iMac to release the front bezel latch.

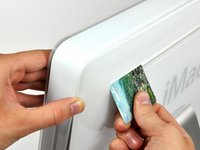
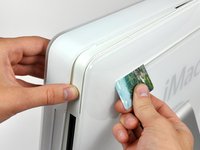
    • Pull the front bezel away from the rear case.

    • Repeat this process for the other side of the front bezel.

    • It may be necessary to apply several layers of duct tape to the top of the access card to aid in releasing the latches.

    • If the bezel refuses to release, try pressing the lower edge back onto the rear case and repeat this opening process.

    • Alternatively, you can use a strong magnet by holding it to the front top left/right corner of the display. You will hear a snapping sound when the hatch is released.

  7. iMac G5 20" Model A1145 Microphone Replacement: step 7, image 1 of 1
    • Lay your iMac stand-side down on a table.

    • Lift the front bezel from its lower edge and rotate it away from the rest of your iMac, minding the RAM arms that may get caught.

    • Lay the front bezel above the rest of the iMac.

  8. iMac G5 20" Model A1145 Microphone Replacement: step 8, image 1 of 1
    • If necessary, remove the piece of kapton tape wrapped around the microphone and camera connectors.

  9. iMac G5 20" Model A1145 Microphone Replacement: step 9, image 1 of 2 iMac G5 20" Model A1145 Microphone Replacement: step 9, image 2 of 2
    • Disconnect both the camera and microphone cables.

  10. iMac G5 20" Model A1145 Microphone Replacement, Camera Board: step 10, image 1 of 1
    • Lay the bezel front side down on a table.

    • If necessary, peel back the tape covering the camera board.

  11. iMac G5 20" Model A1145 Microphone Replacement: step 11, image 1 of 1
    • Remove the two T6 Torx screws securing the camera board to the front bezel.

  12. iMac G5 20" Model A1145 Microphone Replacement: step 12, image 1 of 1
    • Lift the camera board out from the front bezel.

  13. iMac G5 20" Model A1145 Microphone Replacement, Microphone: step 13, image 1 of 1
    • Use a spudger to pry the microphone off the adhesive holding it to the front bezel.

Conclusion

To reassemble your device, follow these instructions in reverse order.

0 Comments

Add Comment

View Statistics:

Past 24 Hours: 0

Past 7 Days: 2

Past 30 Days: 5

All Time: 4,406