
iHome iH27B Power Connector Replacement

What you need

  1. iHome iH27B Power Connector Replacement, Outer Case: step 1, image 1 of 1
    • Remove any iPod or apple music device connected to the iHome and unplug from any power source.

    • Flip the iHome so the speakers are laying on a flat surface, and you have the concealed battery areas facing you.

  2. iHome iH27B Power Connector Replacement: step 2, image 1 of 3 iHome iH27B Power Connector Replacement: step 2, image 2 of 3 iHome iH27B Power Connector Replacement: step 2, image 3 of 3
    • Using your fingers, press down firmly on the plastic slide and push in the direction of the arrows shown above the word "Open" on the plastic.

    • Remove the plastic slide from its location and set it aside.

    • These plastic slides are not interchangeable, so make sure each goes back to its original location in reassembly.

    • Remove all 4 AA batteries by placing your fingernail at one end of the battery and applying force upwards until the battery is freed from its holder.

    • Insert your fingernail or a prying tool under the notch of the plastic slide that is protecting the watch battery.

    • Set the plastic covering and the watch battery aside.

  3. iHome iH27B Power Connector Replacement: step 3, image 1 of 1
    • Remove the following screws:

    • Eight 10 mm using the Phillips #0 on the bottom of your device.

    • Cataloging each screw by size in plastic bags or separate places on a flat surface will make them easier to find when reassembling.

  4. iHome iH27B Power Connector Replacement: step 4, image 1 of 1
    • Use your fingers or a plastic opening tool to carefully pry apart the plastic connections still connecting the base to the top.

    • Be careful not to pry too hard. Cracking the plastic connections could make reassembly harder.

  5. iHome iH27B Power Connector Replacement: step 5, image 1 of 1
    • Slowly lift the plastic base towards you and lay it on the flat surface. The base should still be connected to the rest of the iHome by a few wires.

    • You should have visible access to most of the components inside the iHome now.

  6. iHome iH27B Power Connector Replacement, Power Connector: step 6, image 1 of 2 iHome iH27B Power Connector Replacement, Power Connector: step 6, image 2 of 2
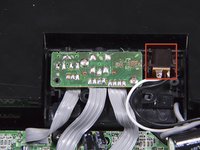
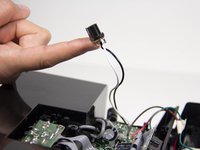
    • Firmly grasp the power connector, which is the plastic rectangular piece with the white and black wires connected to it.

    • Pull upwards and dislodge the connector.

  7. iHome iH27B Power Connector Replacement: step 7, image 1 of 1
    • Using the scissors on your wire strippers, cut the connecting wires.

    • Using your wire strippers, remove about 1/4 " of the plastic tubing surrounding the end of your exposed wire, careful to not damage the wires.

    • Using a wire-nut or electrician's tape, connect the wires of the replacement power connector to your exposed wires. Connect white wire to white, and black to black.

Conclusion

To reassemble your device, follow these instructions in reverse order.

John Kraemer

Member since: 10/09/12

76 Reputation

9 Guides authored

Team

Cal Poly, Team 3-21, Amido Fall 2012 Member of Cal Poly, Team 3-21, Amido Fall 2012

CPSU-AMIDO-F12S3G21

4 Members

9 Guides authored

0 Comments

Add Comment

View Statistics:

Past 24 Hours: 0

Past 7 Days: 0

Past 30 Days: 3

All Time: 2,111