
bObi Pet Left or Right Wheel Replacement

What you need

  1. bObi Pet Left or Right Wheel Replacement, Turn bObi Pet's Power Off: step 1, image 1 of 3 bObi Pet Left or Right Wheel Replacement, Turn bObi Pet's Power Off: step 1, image 2 of 3 bObi Pet Left or Right Wheel Replacement, Turn bObi Pet's Power Off: step 1, image 3 of 3
    • Before we get started, turn bObi Pet OFF and flip her over onto a flat surface.

    • Next, remove the dustbin. Grip the button on the back of the bin and pull to remove.

  2. bObi Pet Left or Right Wheel Replacement, Remove the Front Wheel: step 2, image 1 of 3 bObi Pet Left or Right Wheel Replacement, Remove the Front Wheel: step 2, image 2 of 3 bObi Pet Left or Right Wheel Replacement, Remove the Front Wheel: step 2, image 3 of 3
    • Then, remove bObi Pet’s front wheel. Grip the wheel with your hand and pull straight up, using the screwdriver for leverage.

    • Behind the wheel are two screws. Use the screwdriver to remove the larger screw set deeper in the wheel compartment.

    • Keep the wheel, its screw, and all other screws removed from bObi Pet for later reassembly.

  3. bObi Pet Left or Right Wheel Replacement, Remove the Dustbin Holders: step 3, image 1 of 3 bObi Pet Left or Right Wheel Replacement, Remove the Dustbin Holders: step 3, image 2 of 3 bObi Pet Left or Right Wheel Replacement, Remove the Dustbin Holders: step 3, image 3 of 3
    • For the next step, remove the screws on both sides of the dustbin.

    • Then, remove the corner pieces that were held down by the screws.

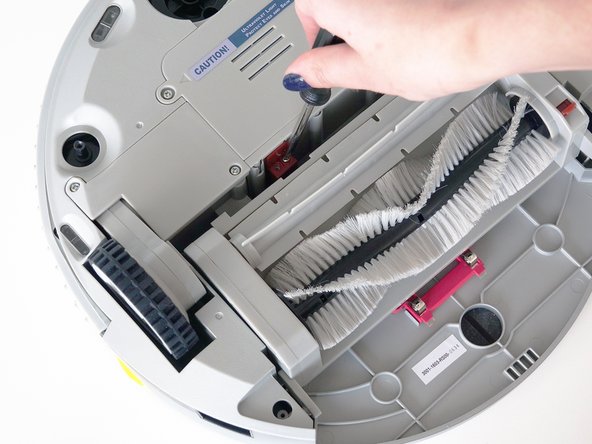
    • Grip the brush compartment and pull down to reveal two screws on a red fastener. Remove them with the screwdriver.

  4. bObi Pet Left or Right Wheel Replacement, Detach the Main Brushes: step 4, image 1 of 2 bObi Pet Left or Right Wheel Replacement, Detach the Main Brushes: step 4, image 2 of 2
    • Pull the brush compartment up until it is freed from the red fastener. Then, detach the brush compartment and set it aside.

  5. bObi Pet Left or Right Wheel Replacement, Uninstall the Cover Screws: step 5, image 1 of 3 bObi Pet Left or Right Wheel Replacement, Uninstall the Cover Screws: step 5, image 2 of 3 bObi Pet Left or Right Wheel Replacement, Uninstall the Cover Screws: step 5, image 3 of 3
    • Remove the 4 screws located beneath the brush compartment.

    • Next, remove the 2 screws on the dustbin’s red fastener.

    • Remove the fastener and set it aside for reassembly.

  6. bObi Pet Left or Right Wheel Replacement, Uninstall the Wheel's Screws: step 6, image 1 of 2 bObi Pet Left or Right Wheel Replacement, Uninstall the Wheel's Screws: step 6, image 2 of 2
    • Remove the two screws holding the wheel you'd like to replace. In this case, bObi Pet's right wheel is being replaced.

  7. bObi Pet Left or Right Wheel Replacement, Disconnect the Cover: step 7, image 1 of 3 bObi Pet Left or Right Wheel Replacement, Disconnect the Cover: step 7, image 2 of 3 bObi Pet Left or Right Wheel Replacement, Disconnect the Cover: step 7, image 3 of 3
    • The cover is no longer secured, so carefully flip Bobi Pet onto her wheels.

    • Lift the cover to reveal the main board underneath. Remove the two circuit plugs connecting the lid to the mainboard.

  8. bObi Pet Left or Right Wheel Replacement, Disconnect the Wheel: step 8, image 1 of 3 bObi Pet Left or Right Wheel Replacement, Disconnect the Wheel: step 8, image 2 of 3 bObi Pet Left or Right Wheel Replacement, Disconnect the Wheel: step 8, image 3 of 3
    • The wheels are attached to the top of the mainboard.

    • Unplug the wheel you wish to replace. If there is glue holding the circuit plug in place, you may scrape it off using your screwdriver.

    • Lift bObi Pet and feed the wheel's wires through the opening in her cover. The wheel will detach from underneath.

  9. bObi Pet Left or Right Wheel Replacement, Place the New Wheel: step 9, image 1 of 3 bObi Pet Left or Right Wheel Replacement, Place the New Wheel: step 9, image 2 of 3 bObi Pet Left or Right Wheel Replacement, Place the New Wheel: step 9, image 3 of 3
    • Place your new wheel in the open space underneath bObi Pet.

    • Ensure the circuit plug goes through the opening on bObi Pet and reaches the main board.

    • Plug your new wheel into the mainboard. You may add glue or electrical tape to the new wheel’s circuit plug for a more secure hold.

  10. bObi Pet Left or Right Wheel Replacement, Attach the Cover: step 10, image 1 of 3 bObi Pet Left or Right Wheel Replacement, Attach the Cover: step 10, image 2 of 3 bObi Pet Left or Right Wheel Replacement, Attach the Cover: step 10, image 3 of 3
    • Attach the two circuit plugs from bObi Pet's cover back onto her main board.

    • The yellow-wired plug connects to the right side of the mainboard.

    • The white-wired plug on bObi Pet’s lid connects to the middle of the mainboard.

    • Lay down the cover and line up the edges precisely.

  11. bObi Pet Left or Right Wheel Replacement, Replace the Wheel's Screws: step 11, image 1 of 3 bObi Pet Left or Right Wheel Replacement, Replace the Wheel's Screws: step 11, image 2 of 3 bObi Pet Left or Right Wheel Replacement, Replace the Wheel's Screws: step 11, image 3 of 3
    • While holding bObi Pet’s top and bottom together, carefully flip her over onto a flat surface.

    • Then reinstall the 2 screws on the wheel you've just replaced.

  12. bObi Pet Left or Right Wheel Replacement, Install the Front Wheel: step 12, image 1 of 3 bObi Pet Left or Right Wheel Replacement, Install the Front Wheel: step 12, image 2 of 3 bObi Pet Left or Right Wheel Replacement, Install the Front Wheel: step 12, image 3 of 3
    • Next, reinstall the front wheel’s screw.

    • Place the front wheel on top and firmly push down to secure it.

  13. bObi Pet Left or Right Wheel Replacement, Replace the Cover Screws: step 13, image 1 of 3 bObi Pet Left or Right Wheel Replacement, Replace the Cover Screws: step 13, image 2 of 3 bObi Pet Left or Right Wheel Replacement, Replace the Cover Screws: step 13, image 3 of 3
    • Replace the dustbin’s red fastener and install its 2 screws.

    • Next, install the 4 screws in the space beneath the brush compartment.

  14. bObi Pet Left or Right Wheel Replacement, Connect the Main Brush Attachment: step 14, image 1 of 3 bObi Pet Left or Right Wheel Replacement, Connect the Main Brush Attachment: step 14, image 2 of 3 bObi Pet Left or Right Wheel Replacement, Connect the Main Brush Attachment: step 14, image 3 of 3
    • Plug in the brush compartment.

    • Then, replace its red brush fastener and install the 2 screws.

    • Position the brush compartment back in its original place.

  15. bObi Pet Left or Right Wheel Replacement, Replace bObi Pet's Bin: step 15, image 1 of 3 bObi Pet Left or Right Wheel Replacement, Replace bObi Pet's Bin: step 15, image 2 of 3 bObi Pet Left or Right Wheel Replacement, Replace bObi Pet's Bin: step 15, image 3 of 3
    • Reinsert the corner pieces on both sides of the dustbin, with the arms of the brush attachment linked.

    • Make sure the rubber strip is not stuck under the brush compartment before you reinstall the 2 screws in each of the corner pieces.

    • Make sure the bin can slide in easily before using bObi Pet again, and you've finished the repair.

Conclusion

Congratulations on completing bObi Pet's left or right wheel repair and happy cleaning!

Chelsea

Member since: 09/24/14

2,278 Reputation

31 Guides authored

0 Comments

Add Comment

View Statistics:

Past 24 Hours: 0

Past 7 Days: 0

Past 30 Days: 3

All Time: 564