
Xiaomi Redmi 2 Screen Assembly Replacement

What you need

  1. Xiaomi Redmi 2 Screen Assembly Replacement, Motherboard: step 1, image 1 of 2 Xiaomi Redmi 2 Screen Assembly Replacement, Motherboard: step 1, image 2 of 2
    • Use the flat end of the spudger to remove the back panel from the mid-frame and front body.

  2. Xiaomi Redmi 2 Screen Assembly Replacement: step 2, image 1 of 1
    • Insert your finger into the curved opening of the mid-frame.

    • Lift the battery and remove.

  3. Xiaomi Redmi 2 Screen Assembly Replacement: step 3, image 1 of 1
    • Remove the SIM and/or memory cards if present.

    • Remove twelve 3.4 mm Phillips #000 screws securing the mid-frame to the front body.

  4. Xiaomi Redmi 2 Screen Assembly Replacement: step 4, image 1 of 1
    • Slide the spudger between the mid-frame and front body, gradually prying the two bodies apart as you slide the spudger around the perimeter of the phone.

  5. Xiaomi Redmi 2 Screen Assembly Replacement: step 5, image 1 of 1
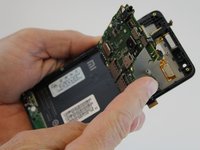
    • Remove the 3.4 mm Phillips #000 screw that holds the motherboard to the front body.

    • Keep this screw separate from the initial twelve.

  6. Xiaomi Redmi 2 Screen Assembly Replacement: step 6, image 1 of 2 Xiaomi Redmi 2 Screen Assembly Replacement: step 6, image 2 of 2
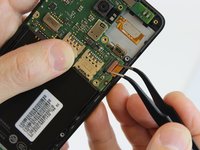
    • Using one prong of the tweezers, pry back the brown clip located on top of the LCD ribbon connector.

  7. Xiaomi Redmi 2 Screen Assembly Replacement: step 7, image 1 of 2 Xiaomi Redmi 2 Screen Assembly Replacement: step 7, image 2 of 2
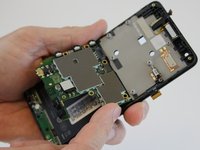
    • Using one prong of the tweezers, pry the ribbon clip away from the motherboard.

  8. Xiaomi Redmi 2 Screen Assembly Replacement: step 8, image 1 of 2 Xiaomi Redmi 2 Screen Assembly Replacement: step 8, image 2 of 2
    • Lift and hinge the motherboard with your fingers.

  9. Xiaomi Redmi 2 Screen Assembly Replacement: step 9, image 1 of 2 Xiaomi Redmi 2 Screen Assembly Replacement: step 9, image 2 of 2
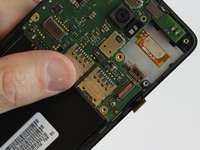
    • Using one prong of the tweezers, lift and pry back the metal clip positioned over the front proximity sensor ribbon connector.

  10. Xiaomi Redmi 2 Screen Assembly Replacement: step 10, image 1 of 2 Xiaomi Redmi 2 Screen Assembly Replacement: step 10, image 2 of 2
    • Using the tweezers, pull the antenna connector from the motherboard.

  11. Xiaomi Redmi 2 Screen Assembly Replacement: step 11, image 1 of 1
    • Lift the motherboard out of the front cover and set aside.

  12. Xiaomi Redmi 2 Screen Assembly Replacement, Front Speaker: step 12, image 1 of 1
    • Using the nylon or metal spudger, gently pry the front speaker from the screen assembly.

  13. Xiaomi Redmi 2 Screen Assembly Replacement: step 13, image 1 of 1
    • Using your fingers, gently lift the front speaker from the screen assembly.

  14. Xiaomi Redmi 2 Screen Assembly Replacement, PCB Circuit Board: step 14, image 1 of 1
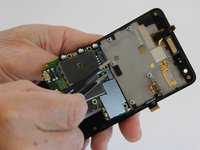
    • Remove the 2.9 mm Phillips #000 screw that holds the PCB circuit board to the screen assembly.

  15. Xiaomi Redmi 2 Screen Assembly Replacement: step 15, image 1 of 1
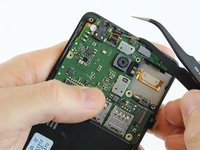
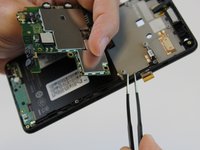
    • Using the tweezers, lift the antenna connector from the PCB circuit board.

  16. Xiaomi Redmi 2 Screen Assembly Replacement: step 16, image 1 of 2 Xiaomi Redmi 2 Screen Assembly Replacement: step 16, image 2 of 2
    • Do not remove the PCB circuit board at this time.

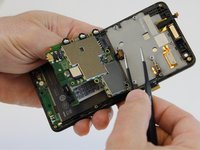
    • Using the nylon or metal spudger, gently pry back the top of the PCB circuit board from the screen assembly.

  17. Xiaomi Redmi 2 Screen Assembly Replacement: step 17, image 1 of 1
    • Using the nylon or metal spudger, pry back the silver clip covering the ribbon connector.

  18. Xiaomi Redmi 2 Screen Assembly Replacement: step 18, image 1 of 2 Xiaomi Redmi 2 Screen Assembly Replacement: step 18, image 2 of 2
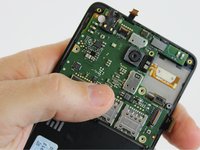
    • Carefully lift the PCB circuit board from the screen assembly and set aside.

    • The screen assembly is pictured to the left of the circuit board and is now ready for repair or replacement.

Conclusion

To reassemble your device, follow these instructions in reverse order.

31 other people completed this guide.

Alicia Brenner

Member since: 10/01/15

3,539 Reputation

5 Guides authored

Team

USF Tampa, Team 1-3, Leahy Fall 2015 Member of USF Tampa, Team 1-3, Leahy Fall 2015

USFT-LEAHY-F15S1G3

2 Members

5 Guides authored

2 Comments

ok so good is can service nice

SAFUTRA - Reply

Touch is not working after replacing full LCD, Brought new display & changed again but no luck, Display is okay but touch not working.

Rajesh Gopisetti - Reply

Add Comment

View Statistics:

Past 24 Hours: 0

Past 7 Days: 5

Past 30 Days: 12

All Time: 17,376