
Xbox Series X|S Controller (Model 1914) Left Handle Cover Replacement

What you need

  1. Xbox Series X|S Controller (Model 1914) Left Handle Cover Replacement, Insert an opening tool: step 1, image 1 of 3 Xbox Series X|S Controller (Model 1914) Left Handle Cover Replacement, Insert an opening tool: step 1, image 2 of 3 Xbox Series X|S Controller (Model 1914) Left Handle Cover Replacement, Insert an opening tool: step 1, image 3 of 3
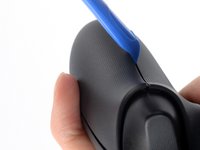
    • Insert an opening tool between the left handle cover and the bottom inner edge of the back housing.

  2. Xbox Series X|S Controller (Model 1914) Left Handle Cover Replacement, Release the left handle cover clips: step 2, image 1 of 3 Xbox Series X|S Controller (Model 1914) Left Handle Cover Replacement, Release the left handle cover clips: step 2, image 2 of 3 Xbox Series X|S Controller (Model 1914) Left Handle Cover Replacement, Release the left handle cover clips: step 2, image 3 of 3
    • Strong plastic clips secure the handle cover. Significant force is required to release them.

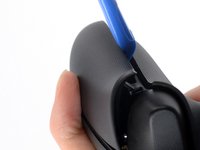
    • Slide the opening tool along the inner edge of the left handle cover and pry intermittently to release the plastic clips.

  3. Xbox Series X|S Controller (Model 1914) Left Handle Cover Replacement, Remove the left handle cover: step 3, image 1 of 3 Xbox Series X|S Controller (Model 1914) Left Handle Cover Replacement, Remove the left handle cover: step 3, image 2 of 3 Xbox Series X|S Controller (Model 1914) Left Handle Cover Replacement, Remove the left handle cover: step 3, image 3 of 3
    • The plastic clips on the outer edge make it difficult to slide along it and release the clips. Therefore, prying up on the inner edge is the easier option.

    • Pry up the middle inner edge of the handle cover with the opening tool to release the remaining clips.

    • Place a finger on top of the handle cover to prevent it from being forcefully ejected.

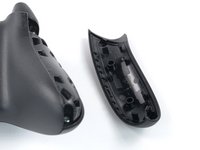
    • Remove the left handle cover.

    • To reinstall the left handle cover, position it on the back housing and press down firmly along the edges to engage all of the clips.

Conclusion

To reassemble your device, follow these instructions in reverse order.

Repair didn’t go as planned? Try some basic troubleshooting, or ask our Answers community for help.

One other person completed this guide.

Manuel Haeussermann

Member since: 07/13/22

15,547 Reputation

71 Guides authored

Team

iFixit Member of iFixit

Staff

135 Members

17,170 Guides authored

0 Comments

Add Comment

View Statistics:

Past 24 Hours: 6

Past 7 Days: 23

Past 30 Days: 102

All Time: 1,153