
WowWee MiP Robot LED Light Replacement

What you need

  1. WowWee MiP Robot LED Light Replacement, Battery: step 1, image 1 of 2 WowWee MiP Robot LED Light Replacement, Battery: step 1, image 2 of 2
    • Remove the three 12.0 mm Phillips # 2 screws from the battery cover.

  2. WowWee MiP Robot LED Light Replacement: step 2, image 1 of 2 WowWee MiP Robot LED Light Replacement: step 2, image 2 of 2
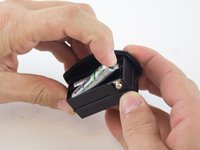
    • Carefully pull the battery pack from the robot.

    • Remove the batteries from the battery pack.

  3. WowWee MiP Robot LED Light Replacement, Wheel: step 3, image 1 of 2 WowWee MiP Robot LED Light Replacement, Wheel: step 3, image 2 of 2
    • Use a metal spudger to carefully pry off the hubcap without marring the plastic wheel or hubcap.

    • This plastic material is not replaceable. Any damage will be noticeable.

  4. WowWee MiP Robot LED Light Replacement: step 4, image 1 of 2 WowWee MiP Robot LED Light Replacement: step 4, image 2 of 2
    • Remove the 12.0 mm Phillips #2 screw.

    • Hold the wheel in place, or it will rotate as you attempt to remove the screw.

  5. WowWee MiP Robot LED Light Replacement: step 5, image 1 of 1
    • Pull the wheel off of the square axle.

    • Do not use excessive force while removing the wheel. Pulling too hard on the wheel can damage the axle.

  6. WowWee MiP Robot LED Light Replacement, WowWee MiP Robot Body Disassembly: step 6, image 1 of 2 WowWee MiP Robot LED Light Replacement, WowWee MiP Robot Body Disassembly: step 6, image 2 of 2
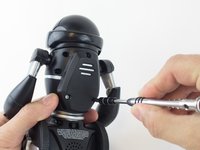
    • Remove the eight 9.3 mm Phillips #1 screws from the back of the robot.

  7. WowWee MiP Robot LED Light Replacement: step 7, image 1 of 3 WowWee MiP Robot LED Light Replacement: step 7, image 2 of 3 WowWee MiP Robot LED Light Replacement: step 7, image 3 of 3
    • Remove the arms from the body.

    • Carefully open the body compartment.

    • Open the compartment slowly. There are wires connecting the two body pieces together. If pulled too hard, the wires and/or the motherboard could be damaged.

  8. WowWee MiP Robot LED Light Replacement: step 8, image 1 of 1
    Tool used on this step:
    Tweezers
    $4.99
    Buy
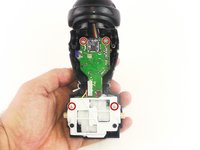
    • Using precision tweezers, disconnect the following three bundles of wires:

    • Connecting the battery pack to the motherboard.

    • Connecting the power switch to the motherboard.

    • Connecting the speaker to the motherboard.

  9. WowWee MiP Robot LED Light Replacement, LED Light: step 9, image 1 of 2 WowWee MiP Robot LED Light Replacement, LED Light: step 9, image 2 of 2
    • Remove the four 7.5mm Phillips #1 screws.

  10. WowWee MiP Robot LED Light Replacement: step 10, image 1 of 2 WowWee MiP Robot LED Light Replacement: step 10, image 2 of 2
    • Carefully pull the motor and motherboard assembly straight out from the base.

    • Be careful not to break the plastic rods that go through the motor assembly and are connect to the shell.

  11. WowWee MiP Robot LED Light Replacement: step 11, image 1 of 1
    Tool used on this step:
    Tweezers
    $4.99
    Buy
    • Use the precision tweezers to unplug the bundle of wires.

  12. WowWee MiP Robot LED Light Replacement: step 12, image 1 of 1
    • Slide the head back to separate it from the body.

    • The motherboard does not need to be separated from the head to replace the LED light.

  13. WowWee MiP Robot LED Light Replacement: step 13, image 1 of 1
    • Remove the 7.5mm Phillips #1 screw.

    • The LED light is soldered to the small circuit board.

Conclusion

To reassemble your device, follow these instructions in reverse order.

One other person completed this guide.

Courtney

Member since: 02/04/16

236 Reputation

1 Guide authored

Team

USF Tampa, Team 3-4, Wollert Spring 2016 Member of USF Tampa, Team 3-4, Wollert Spring 2016

USFT-WOLLERT-S16S3G4

4 Members

10 Guides authored

0 Comments

Add Comment

View Statistics:

Past 24 Hours: 0

Past 7 Days: 5

Past 30 Days: 16

All Time: 613