Whirlpool Dryer Steam Nozzle Replacement

What you need

  1. Whirlpool Dryer Steam Nozzle Replacement, Safety Precautions: step 1, image 1 of 1
    • Before you begin your repair, unplug your dryer.

    • Your power cord may have four prongs rather than three. The additional prong is a ground connection.

  2. Whirlpool Dryer Steam Nozzle Replacement, Unfasten the top panel: step 2, image 1 of 3 Whirlpool Dryer Steam Nozzle Replacement, Unfasten the top panel: step 2, image 2 of 3 Whirlpool Dryer Steam Nozzle Replacement, Unfasten the top panel: step 2, image 3 of 3
    Tool used on this step:
    FixMat
    $36.95
    Buy
    • Throughout this guide, keep track of each screw and reinstall it exactly where it came from.

    • Use a nut driver to remove the screws securing the top panel to the rear panel bracket.

  3. Whirlpool Dryer Steam Nozzle Replacement, Remove the top panel: step 3, image 1 of 2 Whirlpool Dryer Steam Nozzle Replacement, Remove the top panel: step 3, image 2 of 2
    • Grasp the top and slide it 1/2 to 1 inch toward the rear of the machine.

  4. Whirlpool Dryer Steam Nozzle Replacement: step 4, image 1 of 2 Whirlpool Dryer Steam Nozzle Replacement: step 4, image 2 of 2
    • Lift the top panel upward to separate it from the chassis.

    • Remove the top panel from the machine.

  5. Whirlpool Dryer Steam Nozzle Replacement, Unfasten the cover plate: step 5, image 1 of 1
    • Remove the cover plate screw.

  6. Whirlpool Dryer Steam Nozzle Replacement, Remove the cover plate: step 6, image 1 of 3 Whirlpool Dryer Steam Nozzle Replacement, Remove the cover plate: step 6, image 2 of 3 Whirlpool Dryer Steam Nozzle Replacement, Remove the cover plate: step 6, image 3 of 3
    • Remove the cover plate.

  7. Whirlpool Dryer Steam Nozzle Replacement, Disconnect the cord: step 7, image 1 of 1
    • Remove the screws securing the cord cables.

    • Mark the cables with a permanent marker if needed and take a picture or draw a diagram.

  8. Whirlpool Dryer Steam Nozzle Replacement, Remove the cord: step 8, image 1 of 3 Whirlpool Dryer Steam Nozzle Replacement, Remove the cord: step 8, image 2 of 3 Whirlpool Dryer Steam Nozzle Replacement, Remove the cord: step 8, image 3 of 3
    • Pull the cord carefully down through the round hole.

    • Make sure you replace the connections correctly when you reassemble.

  9. Whirlpool Dryer Steam Nozzle Replacement, Unfasten the cord terminal block: step 9, image 1 of 1
    • Remove the green ground screw.

    • Remove the cord terminal block screws.

  10. Whirlpool Dryer Steam Nozzle Replacement, Move the cord terminal block: step 10, image 1 of 3 Whirlpool Dryer Steam Nozzle Replacement, Move the cord terminal block: step 10, image 2 of 3 Whirlpool Dryer Steam Nozzle Replacement, Move the cord terminal block: step 10, image 3 of 3
    • Move the cord terminal block behind the rear panel.

  11. Whirlpool Dryer Steam Nozzle Replacement, Unfasten the rear panel: step 11, image 1 of 2 Whirlpool Dryer Steam Nozzle Replacement, Unfasten the rear panel: step 11, image 2 of 2
    Tool used on this step:
    FixMat
    $36.95
    Buy
    • Remove the rear panel screws.

    • Throughout this guide, keep track of each screw and reinstall it exactly where it came from.

  12. Whirlpool Dryer Steam Nozzle Replacement: step 12, image 1 of 2 Whirlpool Dryer Steam Nozzle Replacement: step 12, image 2 of 2
    • Remove the screw holding the main board bracket to the chassis.

    • Remove the screws from the top rear of the machine.

  13. Whirlpool Dryer Steam Nozzle Replacement, Remove the rear panel: step 13, image 1 of 3 Whirlpool Dryer Steam Nozzle Replacement, Remove the rear panel: step 13, image 2 of 3 Whirlpool Dryer Steam Nozzle Replacement, Remove the rear panel: step 13, image 3 of 3
    • Put on gloves before continuing, as the rear panel is sharp.

    • Lift the panel about 1/2 inch and tilt it to the rear to release it from the vent pipe.

    • Slide the panel off the vent pipe and remove it.

  14. Whirlpool Dryer Steam Nozzle Replacement, Reassembly information: step 14, image 1 of 2 Whirlpool Dryer Steam Nozzle Replacement, Reassembly information: step 14, image 2 of 2
    • During reassembly, perform the following:

    • Make sure that the vent pipe is fitted into the collar on the panel.

    • Make sure the tabs at the bottom are aligned to the bottom rim of the chassis.

    • Position the panel so its screw holes match with the chassis.

  15. Whirlpool Dryer Steam Nozzle Replacement, Disconnect the water tube: step 15, image 1 of 3 Whirlpool Dryer Steam Nozzle Replacement, Disconnect the water tube: step 15, image 2 of 3 Whirlpool Dryer Steam Nozzle Replacement, Disconnect the water tube: step 15, image 3 of 3
    • Push the retaining clip out with a small screwdriver or spudger.

    • Grab the retaining clip with your fingertips and remove it.

  16. Whirlpool Dryer Steam Nozzle Replacement: step 16, image 1 of 3 Whirlpool Dryer Steam Nozzle Replacement: step 16, image 2 of 3 Whirlpool Dryer Steam Nozzle Replacement: step 16, image 3 of 3
    • Press the yellow sleeve toward the valve to release the water tube.

    • While holding the sleeve in place, pull the water tube out of the sleeve

  17. Whirlpool Dryer Steam Nozzle Replacement, Unfasten the nozzle cover: step 17, image 1 of 1
    • Remove the sheet metal screw securing the steam nozzle cover.

    • Be careful not to drop any tools as you work, or you may chip the drum's enamel coating

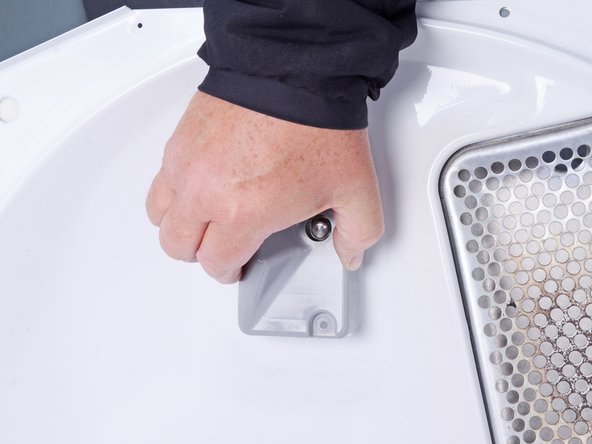
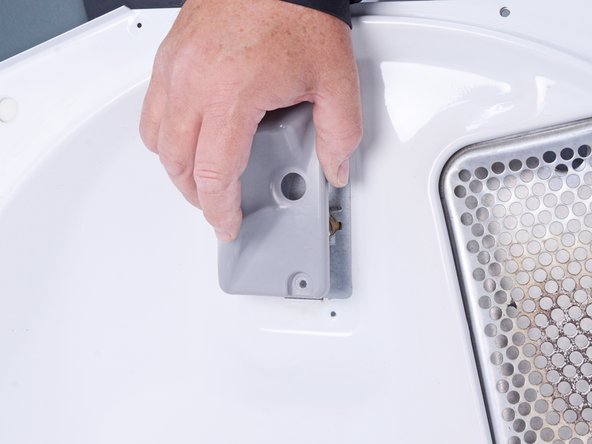
  18. Whirlpool Dryer Steam Nozzle Replacement, Remove the nozzle cover: step 18, image 1 of 3 Whirlpool Dryer Steam Nozzle Replacement, Remove the nozzle cover: step 18, image 2 of 3 Whirlpool Dryer Steam Nozzle Replacement, Remove the nozzle cover: step 18, image 3 of 3
    • Lift the lower edge of the cover and tilt it outward to clear the nozzle.

    • Slide the cover down to disengage the tab at the upper end of the cover.

    • Remove the cover.

  19. Whirlpool Dryer Steam Nozzle Replacement, Unfasten nozzle assembly: step 19, image 1 of 1
    • Remove the nozzle assembly screw.

  20. Whirlpool Dryer Steam Nozzle Replacement, Remove nozzle assembly: step 20, image 1 of 3 Whirlpool Dryer Steam Nozzle Replacement, Remove nozzle assembly: step 20, image 2 of 3 Whirlpool Dryer Steam Nozzle Replacement, Remove nozzle assembly: step 20, image 3 of 3
    • Lift the nozzle assembly up to disengage the tab at the lower end.

    • Remove the nozzle assembly.

Conclusion

To reassemble your device, follow these instructions in reverse order.

Repair didn’t go as planned? Ask our Answers community for help.

Bill Gilbert

Member since: 06/30/22

29,938 Reputation

213 Guides authored

Team

iFixit Member of iFixit

Staff

135 Members

17,198 Guides authored

0 Comments

Add Comment

View Statistics:

Past 24 Hours: 0

Past 7 Days: 3

Past 30 Days: 20

All Time: 120